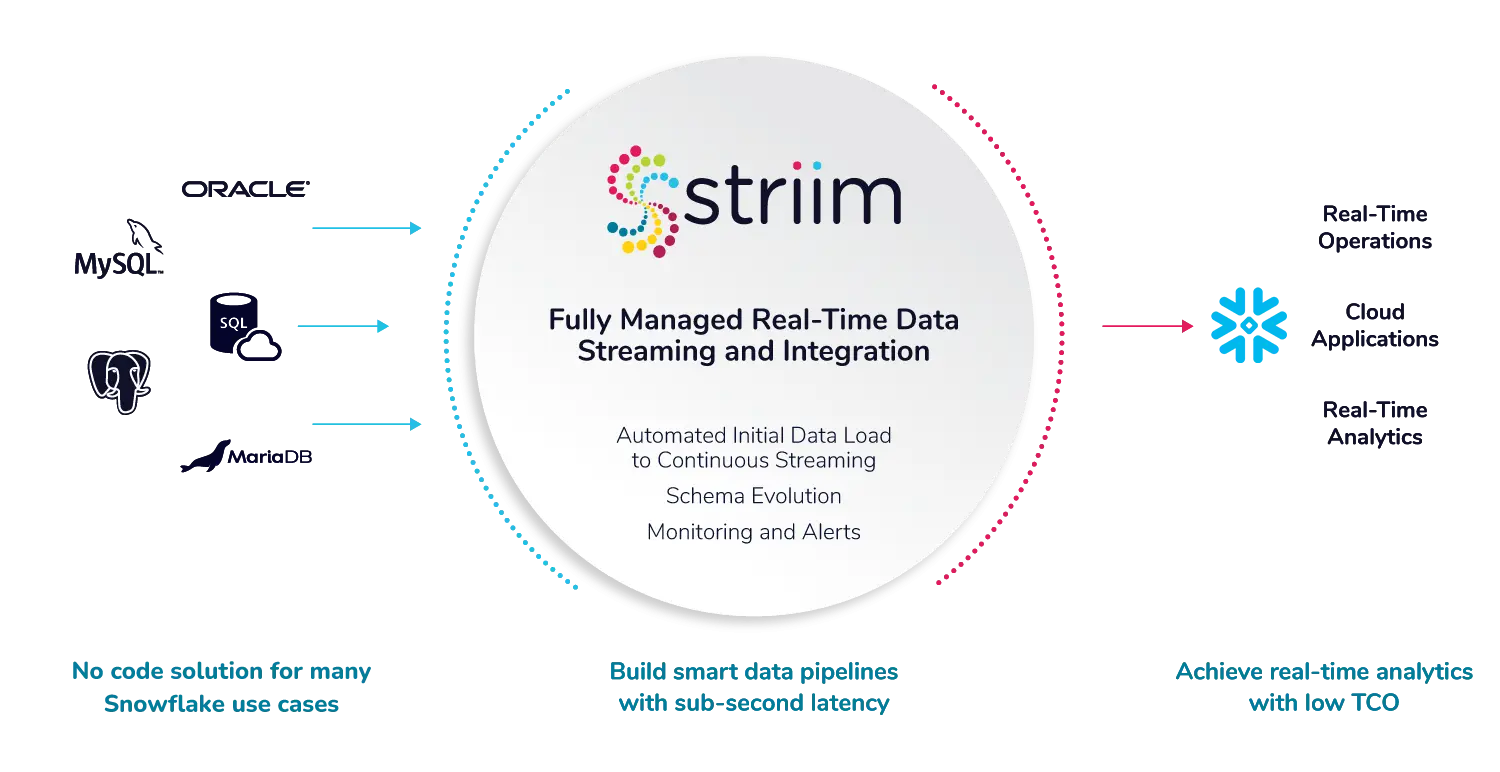
Setting Up Streaming ETL to Snowflake

6 Minute Read

Snowflake, the data warehouse built for the cloud, is designed to bring power and simplicity to your cloud-based analytics solutions, especially when combined with a streaming ETL to Snowflake running in the cloud.Streaming ETL to Snowflake

Snowflake helps you make better and faster business decisions using your data on a massive scale, fueling data-driven organizations. Just take a look at Snowflake’s example use cases and you can see how companies are creating value from their data with Snowflake. There’s just one key caveat – how do you get your data into Snowflake in the first place?

Approaches – ETL/CDC/ELT
There are plenty of options when it comes to using data integration technologies, including ETL to Snowflake.

Let’s start with traditional ETL. Now a 50+ year old legacy technology, ETL was the genesis of data movement and enabled batch, disk-based transformations. While ETL is still used for advanced transformation capabilities, the high latencies and immense load on your source databases leave something to be desired.

Next, there was Change Data Capture (CDC). Pioneered by the founders of Striim at their previous company, GoldenGate Software (acquired by Oracle), CDC technology enabled use cases such as zero downtime database migration and heterogeneous data replication. However, CDC lacks transformational capabilities, forcing you into an ELT approach – first landing the data into a staging area such as storage, and then transforming to its final form. While this works, the multiple hops increase your end-to-end latency and architectural complexity.

Continuously Integrating Transactional Data into Snowflake

Enter, Striim. Striim is an evolution from GoldenGate and combines the real-time nature of CDC with many of the transformational capabilities of ETL into a next-generation streaming solution for ETL to Snowflake and other analytics platforms, on-premises or in the cloud. Enabling real-time data movement into Snowflake, Striim continuously ingests data from on-premises systems and other cloud environments to Snowflake. In this quick start guide, we will walk you through, step-by-step, how to use Striim for streaming ETL to Snowflake by loading data in real time, whether you run Snowflake on Azure or AWS.

Data Flow
We’ll get started with an on-premises Oracle to Snowflake application with in-line transformations and denormalization. This guide assumes you already have Striim installed either on-premises or in the cloud, along with your Oracle database and Snowflake account configured.

After installing Striim, there are a variety of ways to create applications, or data pipelines, from a source to a target. Here, I’ll focus on using our pre-built wizards and drag-and-drop UI, but you can also build applications with the drag-and-drop UI from scratch, or using a declarative language using the CLI.

We will show how you can set up the flow between the source and target, and then how you can enrich records using an in-memory cache that’s preloaded with reference data.

  1. In the Add App page, select Start with Template.

Striim for ETL to Snowflake

2. In the following App Wizard screen, search for Snowflake.

Striim for ETL to Snowflake

3. For this example, we’ll choose Oracle CDC to Snowflake.

Striim for ETL to Snowflake

4. Name the application whatever you’d like – we’ll choose oracleToSnowflake. Go ahead and use the default admin Namespace. Namespaces are used for both application organization and enable a microservices approach when you have multiple data pipelines. Click Save.

Striim for ETL to Snowflake

5. Follow the wizards, entering first your on-premises Oracle configuration properties, and then your Snowflake connection properties. In this case I’m migrating an Oracle orders table. Click Save, and you’ll be greeted by our drag and drop UI with the source and target pre-populated. If you want to just do a straight source-to-target migration, that’s it! However, we’ll continue this example with enrichment and denormalization, editing our application using the connectors located on the left-hand side menu bar.

Striim for ETL to Snowflake

6. In this use case, we’ll enrich the Orders table with another table of the same on-premises Oracle database. Locate the Enrichment tab on the left-hand menu bar, and drag and drop the DB Cache to your canvas.

Striim for ETL to Snowflake

7. First, name the cache whatever you’d like – I chose salesRepCache. Then, specify the Type of your cache. In this case, my enrichment table contains three fields: ID, Name, and Email. Specify a Key to map. This tells Striim’s in-memory cache how to position the data for the fastest possible joins. Finally, specify your Oracle Username, the JDBC Connection URL, your password, and the tables that you want to use as a cache. Click Save.

Striim for ETL to Snowflake

8. Now we’ll go ahead and join our streaming CDC source with the static Database Cache. Click the circular stream beneath your Oracle source, and click Connect next CQ component.

Striim for ETL to Snowflake

9. Application logic in Striim is expressed using Continuous Queries, or CQs. You do so using standard SQL syntax and optional Java functionality for custom scenarios. Unlike a query on a database where you run one query and receive one result, a CQ is constantly running, executing the query on an event-by-event basis as the data flows through Striim. Data can be easily pre-formatted or denormalized using CQs.

10. In this example, we are doing a few simple transformations of the fields of the streaming Oracle CDC source, as well as enriching the source with the database cache – adding in the SALES_REP_NAME and SALES_REP_EMAIL fields where the SALES_REP_ID of the streaming CDC source equals the SALES_REP_ID of the static database cache. Specify the name of the stream you want to output the result to, and click Save. Your logic here may vary depending on your use case.

Striim for ETL to Snowflake

11. Lastly, we have to configure our SnowflakeTarget to read from the enrichedStream, not the original CDC source. Click on your Snowflake target and change the Input Stream from the Oracle source stream to your enriched stream. Click Save.

Striim for ETL to Snowflake

12. Now you’re good to go! In the top menu bar, click on Created and press Deploy App.

Striim for ETL to Snowflake

13. The deployment page allows you to specify where you want specific parts of your data pipeline to run. In this case I have a very simple deployment topology – I’m just running Striim on my laptop, so I’ll choose the default option.

Striim for ETL to Snowflake

14. Click the eye next to your enrichedStream to preview your data as it’s flowing through, and press Start App in the top menu bar.

Striim for ETL to Snowflake

15. Now that the apps running, let’s generate some data. In this case I just have a sample data generator that is connecting to my source Oracle on-premises database.

Striim for ETL to Snowflake

16. Data is flowing through the Striim platform, and you can see the enriched Sales Rep Name and Emails. 

Striim for ETL to Snowflake

17. Lastly, let’s go to our Snowflake warehouse and just do a simple select * query. Data is now being continuously written to Snowflake.

Striim for ETL to Snowflake

That’s it! Without any coding, you now have set up streaming ETL to Snowflake to load data continuously, in real time.

Interested in learning more about streaming ETL to Snowflake? Check out our Striim for Snowflake solution page, schedule a demo with a Striim technologist, or download the Striim platform to get started!