Use Streaming Analytics to Monitor and Secure DNS Services
Once upon a time in a hotel bar in Las Vegas, two security professionals sat down over tall drinks of fine Irish whiskey and one asked the other an age old question:
“If you could do any one thing to improve the security of the internet as a whole, what would it be?”
There was a pause while decades of experience and knowledge silently were reviewed and thought over and then, with a smile, they both replied at the same time:

“Harden DNS.”
At that very moment the piano player at the bar started to play, “Sound out the galleon” and the two security professionals raised their glasses to each other and set off scribbling on bar napkins various ways to harden and better monitor their DNS servers.
This is the story of one such way.
How can you utilize streaming analytics to analyze and alert on DNS traffic within your network? In this blog entry we will cover how to utilize streaming analytics to analyze DNS A record requests and validate them against blacklists and external services for security, and against public DNS services for accuracy. While we acknowledge that each network is unique, this example is fairly generic and should work with most networks where DNS is handled internally. Should your network be substantially different, have heart, because flexibility and the ability to adapt is one of the cornerstones of stream processing. For now, let’s assume we have a medium-sized network in which we will provide DNS service internally, and for our streaming analytics platform we will use Striim.
Step One: Define goals
The goal here is to both improve your security stance and to explore diverse uses of Striim as a security platform. We will do this by analyzing the DNS query logs and comparing DNS A record requests against an internal blacklist, an external blacklist, external domain validation systems, and alternative DNS services. Our goal is to analyze DNS A record requests and to alert the SOC if we discover traffic on the network that indicates communication with known bad domains, questionable domains, non existing domains, or questionable requests.
Step Two : Gather Resources
The resources required for this app are easily found, and you most likely already have this information readily available.
- Internal Blacklist
Utilizing your various security systems, you have previously identified domains that are known bad actors. These could be domains that belong to VPN services, sources of previous attacks, or just a list of domains from which you don’t care to see traffic from. It can be argued that these can be addressed by blackholing traffic at the border, however, in the spirit of defense in depth, while that can stop traffic from connecting, this app will assist in the effort by providing a secondary check that clearly indicates who is requesting a connection to the undesired domain, and a backup should the primary checking process fail due to hardware/software failure or compromise.
- External Blacklist
This is a secondary blacklist similar to the internal one, however, this blacklist is curated by an external source. We all have our favorite blogs, projects, and resources. This allows you a place to utilize their results and information while keeping it separate from internal, potentially confidential data on past bad actors against your network. For this example we will be using a externally curated list of domain names associated with ransomware attacks.
- DNS server logs
For this example we are using SYSLOG-NG to gather logs from our internal DNS servers, breaking them down into individual logs based on content, and storing them in a central logging location. In this case, we are only interested in the DNS Query logs, however, you can use your imagination and the flexibility of Striim to make good use of the other DNS logs provided by your DNS server. Here is an example of a sanitized DNS query log entry:
Aug 22 18:11:04 ns1 queries-log: 22-Aug-2017 18:10:58.461 queries: info: client 123.45.6.78#53 (press-any-key.foo): query: press-any-key.foo IN A -ED (200.100.90.80)
- Java JAR for querying external DNS servers
This will allow us to query external DNS servers for any information that they can bring to our analysis. The requests are made by inserting the following in your TQL:
NSLookup(query,server,record_type)
In this example, we will extract the query from the DNS server query logs into the field _QUERY , and the record request type into _TYPE.
If we were to check the record against the Quad9 database of bad actors, the TQL would look like this:
SELECT _QUERY,_TYPE,
NSLookup(_QUERY,”9.9.9.9”,_TYPE) AS _QUAD9_QUERY
FROM DNS_QUERY_STREAM WHERE _TYPE=”A”;
In this case we are using the query extracted from the DNS query log, querying against the Quad9 database, for only DNS A records.
- DNS services to compare against:
For this example we will use the following DNS services to compare the results from our internal DNS server against:
- Quad9 (www.quad9.net): A DNS service that provides checking against a blacklist of bad actors based on research and reporting.
- Norton ConnectSafe (https://connectsafe.norton.com/): Another DNS service that provides checking against a curated blacklist of bad actors.
- Google DNS (https://developers.google.com/speed/public-dns/): A public DNS server. Although it does not serve as a blacklist enforcer, they state that under special circumstances they will block resolution for bad sites.
- Level 3 DNS (https://www.level3.com/en/): A public DNS server.
We will use these four services to validate the DNS queries that our network generates.
Step Three: Set process and parameters
How we apply the resources we have is as important as the resources themselves. This is where a good flowcharting system comes into play. We also have to create a scoring system in order to determine what, if any, action is to take place based on our results.
For this demo we will keep things simple. We will report either an ‘all clear‘ or no alert, a yellow or caution alert, and a red alert if we have high confidence that bad traffic is happening. There are a number of ways to score this, from this simple 3 color method, to methods involving assigning score values to all possible outcomes. The depth is up to you thanks to Striim being flexible as to how you score and display threats.
As far as process goes, let’s take it one at a time.
EXTERNAL DNS SERVERS
The external DNS servers will react differently from each other, so we have to be careful and let our TQL reflect this. Here is a grid showing what you can expect from the servers we are using in this demo:

* Google says that they only block domains under special circumstances. (https://developers.google.com/speed/public-dns/faq)
** Cloudflare offers extremely heightened DNS privacy and DDoS mitigation but not blocking of domains like Norton & Quad9 advertise. For details see (https://blog.cloudflare.com/announcing-1111/)
INTERNAL BLACKLISTS
One of the most important things that we can do with our data is to create a list of bad actors, bad traffic, and unwanted traffic based on our own internal experiences and requirements. From the review and analysis of our traffic, we can create a list of known items to serve as future warnings. Policy and procedure will dictate how often these internal blacklists are reviewed, how they are applied, and to ensure that they perform in an effective way or are corrected so that they accomplish the goal of better security.
EXTERNAL BLACKLISTS
There are many groups and organizations out there who are dedicated to identifying and sharing information on bad actors. Many of them provide open source blacklists that can be either directly queried (in the case of Quad9 and other similar) or downloaded, imported, and integrated into a security system.
STRIIM AND BLACKLISTS
To effectively use these blacklists, we will load them into Striim by way of a cache, which will be used to compare against real-time traffic in a stream as Striim processes the data. Let’s start by defining the cache and loading our internal blacklist into it:
CREATE TYPE DNS_BLACKLIST_Type(
_DOMAIN String,
_IP String,
_REASON String
);
CREATE CACHE DNS_BLACKLIST USING FileReader (
directory:’/var/log/striim/blacklist’,
wildcard:’dns_query.blacklist’,
charset: ‘UTF-8’,
blocksize: ’64’,
positionbyeof: ‘false’
)
PARSE USING DSVPARSER (
columndelimiter: ‘,’,
header: ‘true’
)
QUERY (keytomap:’_DOMAIN’) OF DNS_BLACKLIST_Type;
Next, let’s repeat this process with our external blacklists, utilizing a blacklist for known botnet command and control servers and ransomware servers:
CREATE TYPE DNS_RANSOMWARE_Type(
_DOMAIN String
);
CREATE CACHE DNS_RANSOMWARE USING FileReader (
directory:’/var/log/striim/blacklist’,
wildcard:’dns_query_ransomwaretracker.blacklist’,
charset: ‘UTF-8’,
blocksize: ’64’,
positionbyeof: ‘false’
)
PARSE USING DSVPARSER (
columndelimiter: ‘,’,
header: ‘true’
)
QUERY (keytomap:’_DOMAIN’) OF DNS_RANSOMWARE_Type;
CREATE TYPE DNS_C2_Type(
_DOMAIN String,
_REASON String,
_REFATE String,
_REF String
);
CREATE CACHE DNS_C2 USING FileReader (
directory:’/var/log/striim/blacklist’,
wildcard:’c2.blacklist’,
charset: ‘UTF-8’,
blocksize: ’64’,
positionbyeof: ‘false’
)
PARSE USING DSVPARSER (
columndelimiter: ‘,’,
header: ‘true’
)
QUERY (keytomap:’_DOMAIN’) OF DNS_C2_Type;
THE DASHBOARD
Finally, we can create a dashboard that takes all of this gathered information and places it in a series of comprehensive dashboards so that an analyst can observe the data and make security decisions with clarity and speed.

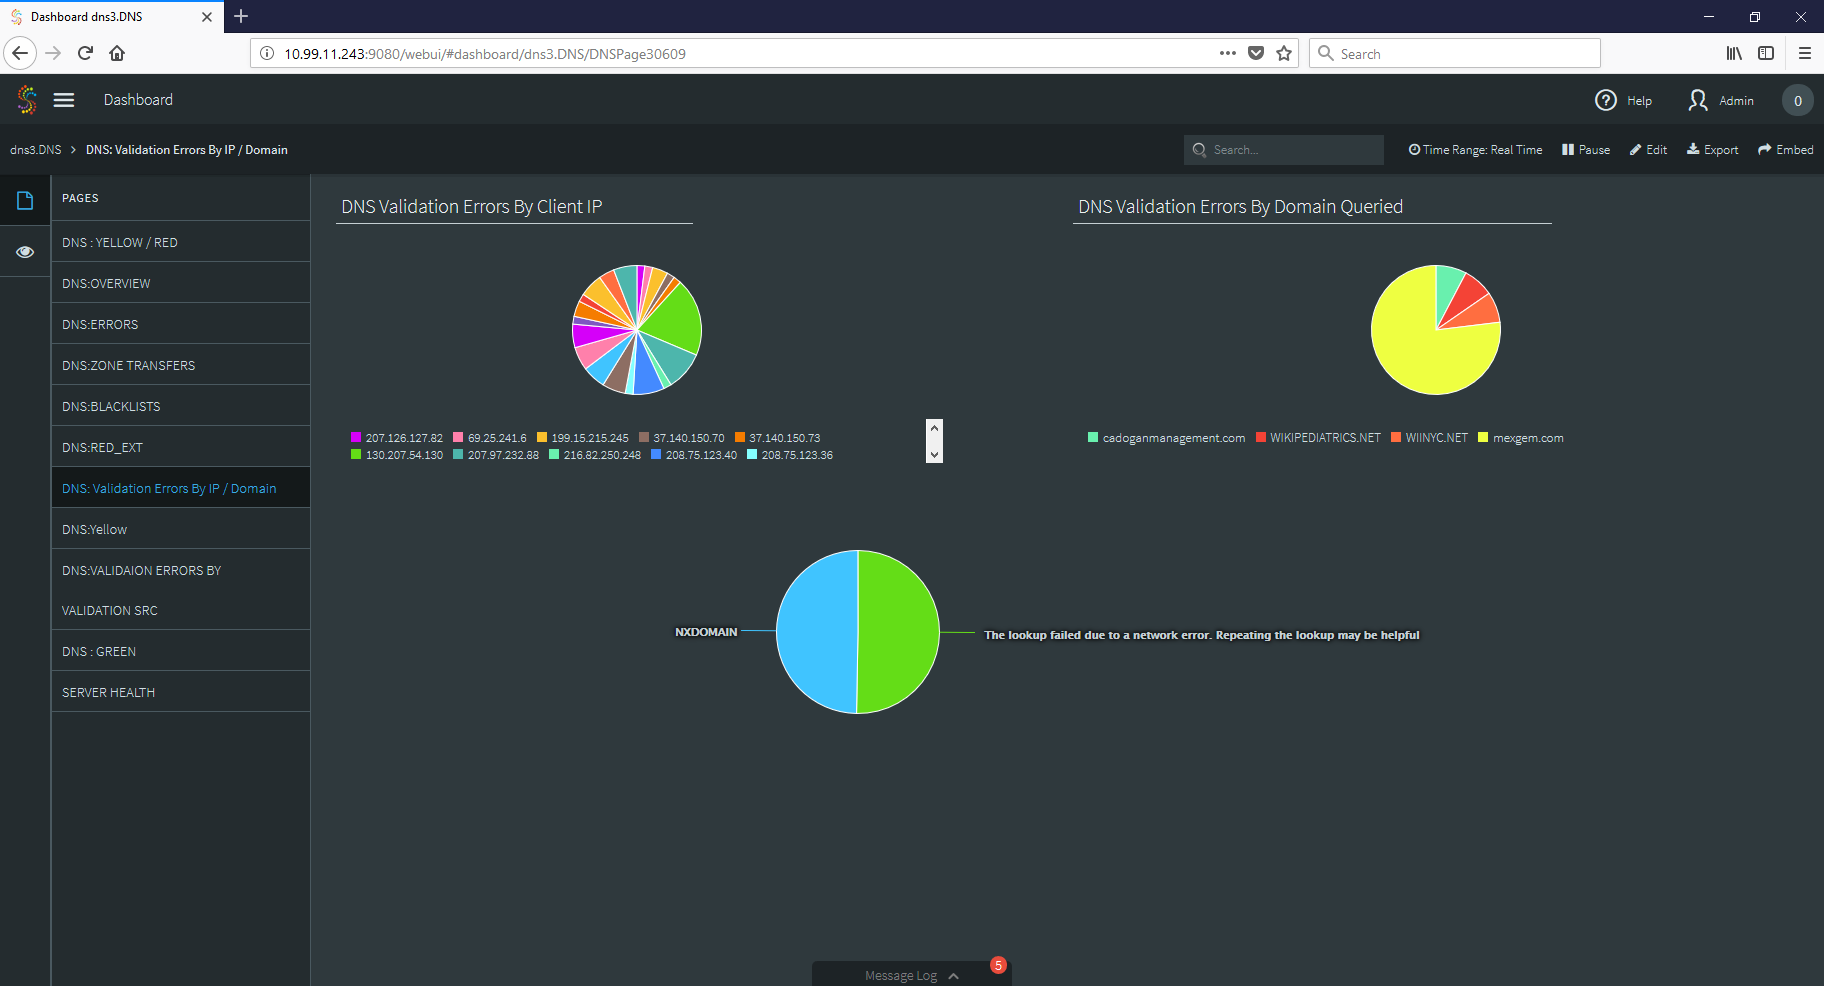
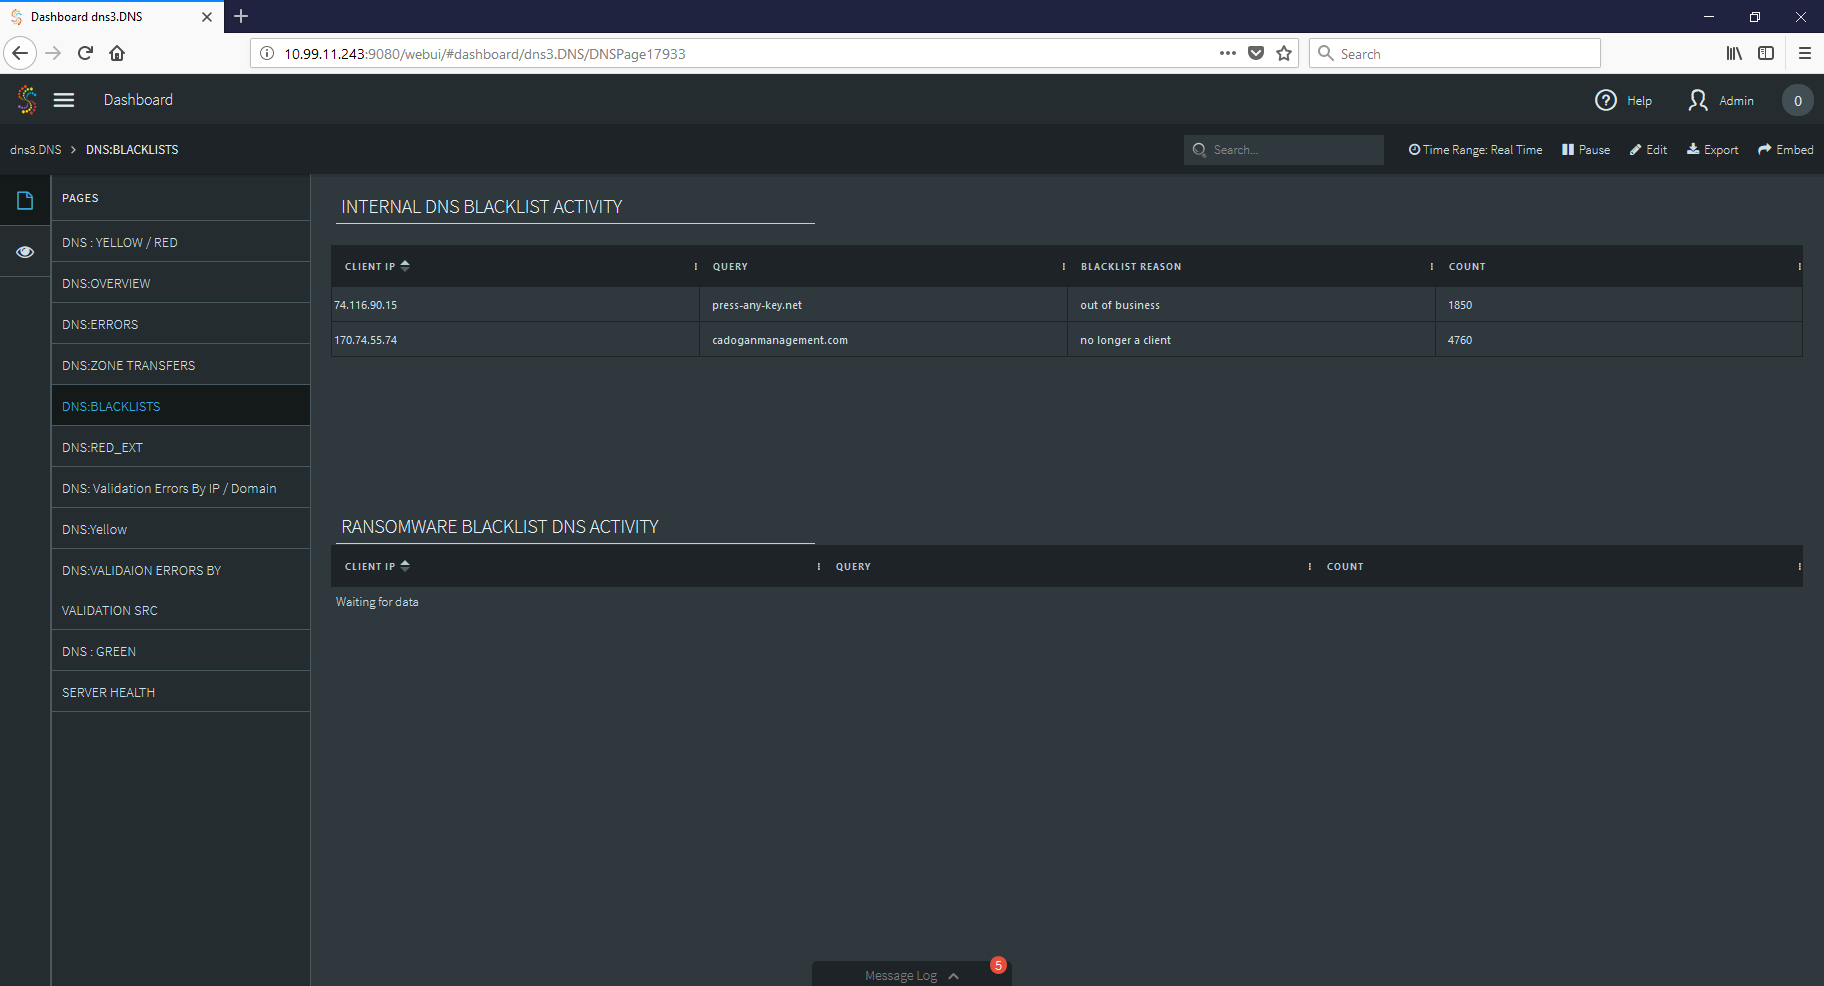
As you can see, by applying the strengths of stream processing to your log files, you can create tools that not only improve your security stance, but also give your SOC quick access to vital information when during security incidents.
That’s all for now!
Do you have questions about how to use streaming analytics to improve your security posture? Do you have security related data but are unsure how to use or analyze it? Contact me at frankc@striim.com and I will address your questions in future blog entries! Make sure that any information you share is cleared through your security process and procedures before sharing with us.