Striim and Microsoft Azure accelerate time-to-insight wherever your data resides. Striim is Microsoft Fabric ready and can help you achieve your goals.
Learn How American Airlines Powers Global TechOps with Striim and Microsoft Azure
In 2022, American Airlines announced a strategic partnership with Microsoft Azure to transform operations and analytics in the cloud. The American Airlines TechOps team wanted to step up to the internal challenge of adopting the mandate to modernize and accelerate their operations in the cloud.
American Airlines deployed a real-time data hub with Striim and Azure to ensure a seamless, real-time operation at massive scale.
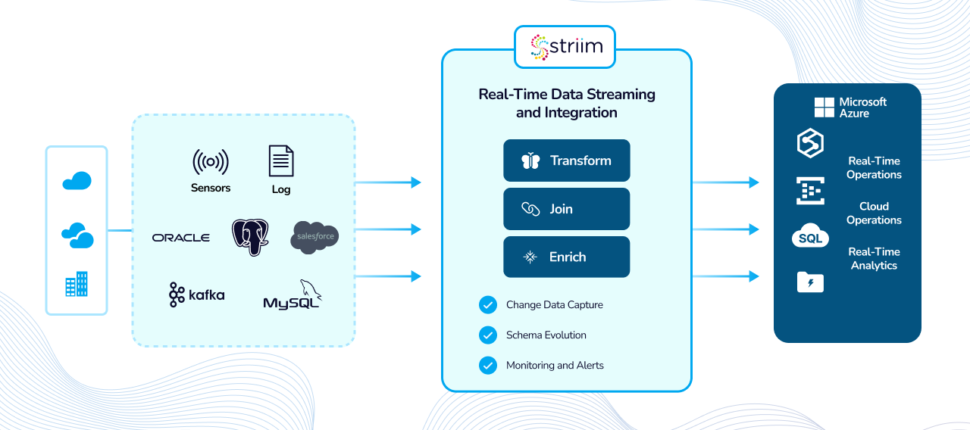
With Striim and Microsoft Azure, enterprises can accelerate cloud adoption and digital transformation by making critical business data available in real time. With continuous, streaming data integration from on-premises and cloud enterprise sources to Azure analytics tools like Synapse and Power BI, users have an unbeatable, data-driven experience with up-to-the-second operational visibility.
Striim for Oracle and Salesforce to Microsoft Fabric
Data in Oracle and Salesforce are the lifeblood for many organizations, not all of that data is being used as fully or effectively as it could be. Striim Cloud on Microsoft Azure captures events as they occur; transforms, filters, and enriches data with an in-memory SQL-based engine; then delivers to the Azure cloud to provide scalable, real-time, low-cost analytics, without affecting the source database. Watch Microsoft and Striim show you how quickly and easily data can be moved to Synapse in this Azure Webinar Series episode.
Striim Cloud, a Fully Managed Service on Azure
Achieve the kind of sustained agility that allows you to pivot and adapt in real-time, add layers of intelligence to your applications, and unlock fast and predictive insights from data wherever it resides. That’s the power of Striim with Azure Synapse. Let us show you how
Buy Striim Solutions Straight from the Azure Marketplace
Add Striim Cloud and Striim Platform directly from Azure Marketplace to quickly build data pipelines and stream trillions of events every day to Azure Synapse Analytics and Power BI to conduct real-time analytics and address time-sensitive operational issues.
Explore Further
Oracle Change Data Capture – An Event-Driven Architecture for Cloud Adoption
Usage-Based Pricing that Scales with Your Business Needs
Scale your consumption up and down as needed. Whether you're processing billions of events per hour or on stand-by for new events, Striim meters exactly what you use.
Striim is a unified data integration and streaming platform that enables real-time analytics across every facet of your operations. Keep data flowing from legacy solutions, proactively run your business, and reach new levels of speed and performance with Striim’s change data capture (CDC) for real-time ETL.