Creating and Configuring Validation Pairs
After configuring the Advanced Settings, you must create, configure and select Validation Pairs for comparison.
The Validation Pair is the fundamental unit of comparison in Validata. It links a Source table to its corresponding Target table and includes the column mappings between them, along with the Source–Target column pairs you select as the comparison key. All validation activity—row-level checks, column comparisons, and content mismatch detection—happens at the Validation Pair level. The resulting metrics, such as IN-SYNC and OUT-OF-SYNC, are also reported per Validation Pair.
Every Validation Pair must have a correct table mapping, accurate column mappings, and an appropriate comparison key. These elements ensure that comparisons are consistent, predictable, and compatible with the selected Validation Type. If a Validation Pair does not satisfy the requirements of the chosen Validation Type, it cannot be included in the validation run.
Your chosen validation scope determines how Validation Pairs are created. While the core configuration of a Validation Pair is the same regardless of scope, it is shaped by the validation method you select.
In this section, we will discuss:
Creating Validation Pairs by mapping Source and Target tables
Configuring Validation Pairs by mapping columns from the Source and Target tables, selecting column pairs for comparison, and selecting the comparison key
Selecting Validation Pairs for comparison
After creating the Validation Pairs and successfully configuring them according to your chosen validation method, you can select the Validation Pairs for comparison and launch a Validation Run.
Creating Validation Pairs
As stated previously, the creation of Validation Pairs depends on the validation scope you choose.
If you choose the Quick Start (Validation Pair) scope, you define the Validation Pair on the same screen where you configure the Advanced Settings
If you choose the Validation Set scope, you can select the tables used to form Validation Pairs in two ways:
Manual selection: You select the schemas that contain the tables you want to compare. Validata intelligently automaps the Source and Target tables from those schemas to create an initial set of Validation Pairs, which you can review and adjust as needed.
By default, no Validation Pair is selected for comparison; you must choose the Pairs you want Validata to compare. You can change your selections at any time, and the updates take effect in the next validation run.
At each run, Validata will evaluate the selected Validation Pairs only. It will not check the data systems for tables newly added to your selected schemas; you must update the Validation configuration manually.
Wildcard selection: You define wildcard rules to identify the tables that should participate in the validation. Validata selects the matching Source and Target tables, automaps them into Validation Pairs, and allows you to review and refine those mappings. Validata uses your wildcard rules to select tables from the Source and Target data systems and then intelligently automaps the selected tables to form an initial set of Validation Pairs. You can review and modify these mappings as needed.
By default, any mapped Validation Pair that meets the rules of your chosen validation method is automatically selected for comparison. You can review the selections and deselect any Pairs that you do not want Validata to compare.
At each run, Validata checks for newly added tables that match your wildcard rules. If it finds any, it automaps them into new Validation Pairs and adds them—when valid—to the list of Pairs selected for comparison..
Choosing between Manual and Wildcard SelectionChoosing between Manual and Wildcard Selection:
Use Manual Selection if you expect the set of Source and Target tables to remain steady over time and unlikely to grow or shrink rapidly and unpredictably.
Use Wildcard Selection when you need a flexible, pattern-based table selection method that can automatically find, create and add new Validation Pairs for comparison.
Quick Start (Validation Pair) scope
When you select the Quick Start (Validation Pair) scope, you define the Validation Pair on the same page as the Validation's Advanced Settings.
Using built-in validation methods
The following rules apply when using the Quick Start scope with Vector, Fast Record, Full Record, Key, or Interval validation methods:
You must define the Validation Pair on the same page as the Advanced Settings, as shown below.
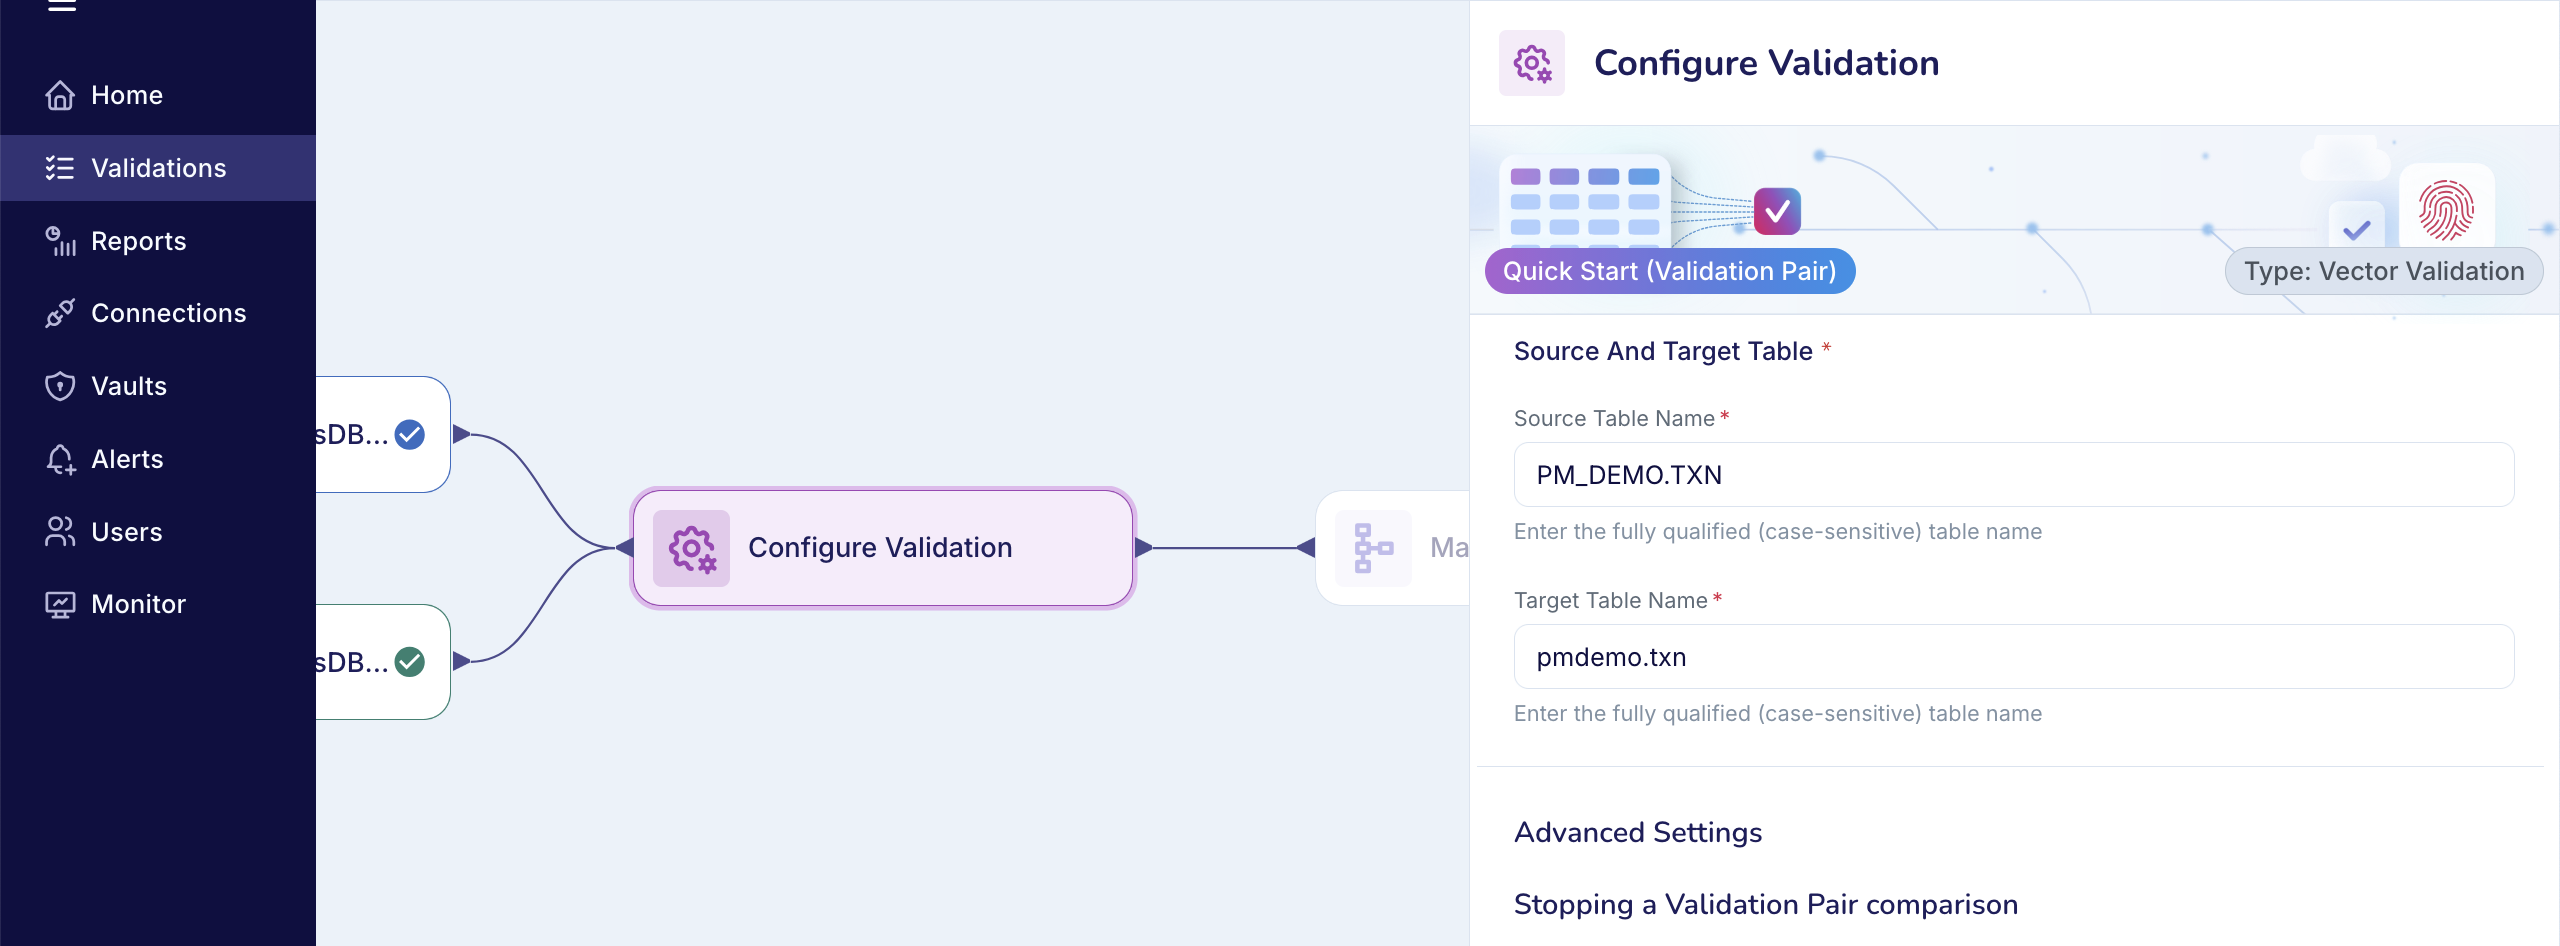
If Validata can configure the Validation Pair successfully, meaning it can automap the columns between the Source and Target tables and select a comparison key that meets the requirements of the validation method, then the Validation Pair is ready for comparison.
The screenshot below shows a Validation Pair that Validata successfully automapped.
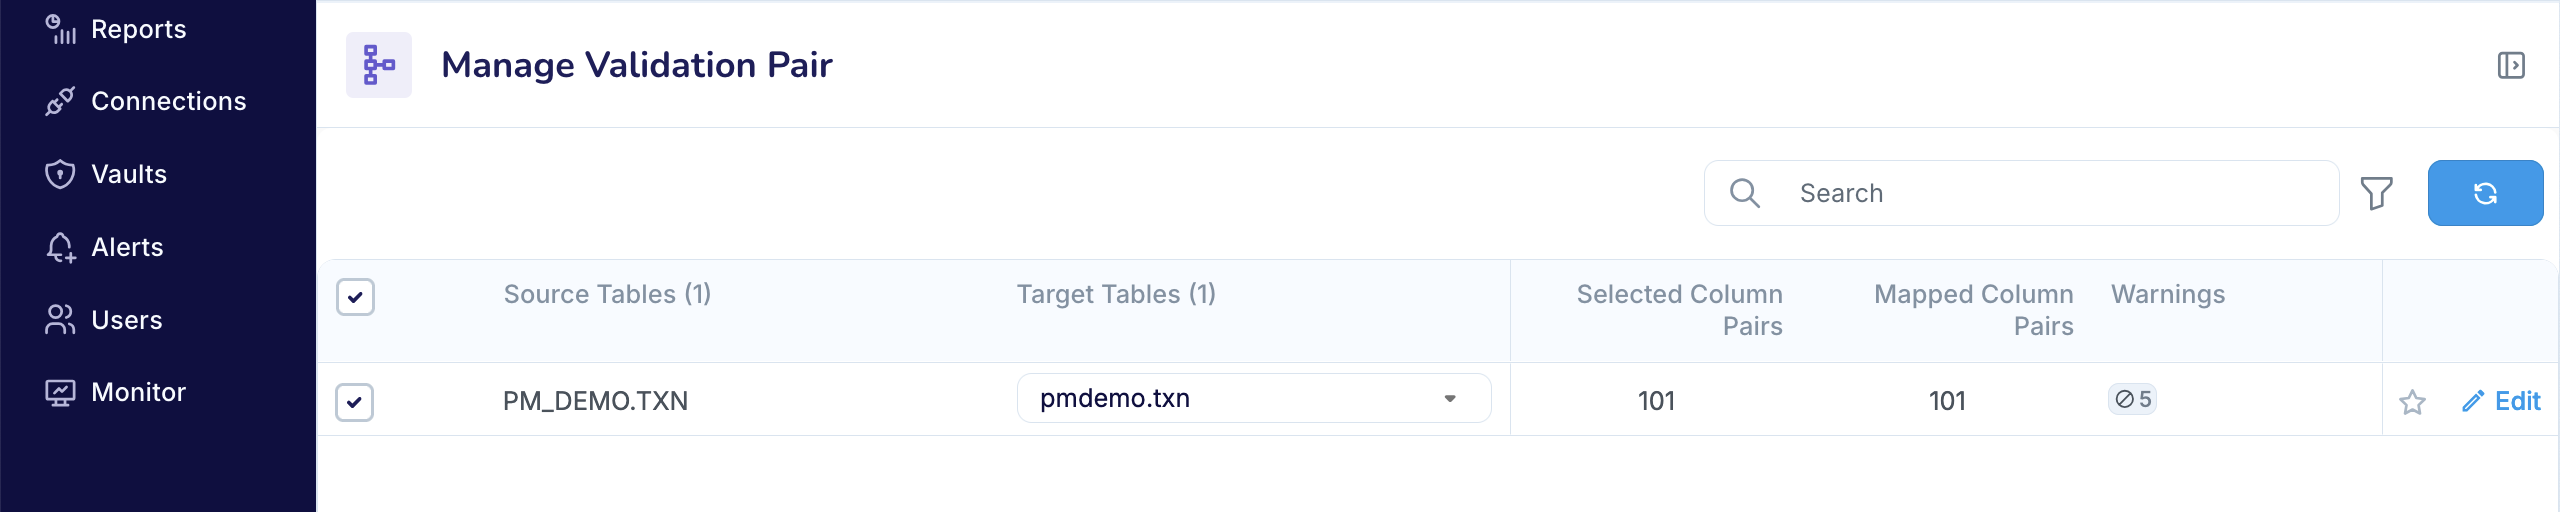
If Validata can map some or all columns but cannot select a valid comparison key, it displays a warning label on the Validation Pair. You must edit the Validation Pair configuration to resolve any issues with the comparison key, and also adjust the column pair mappings and select column pairs for validation.

For example, in the screenshot above, Validata mapped the columns but could not determine a comparison key. You must select a valid key so Validata can evaluate this Pair. To configure a Validation Pair, see Configuring a Validation Pair.
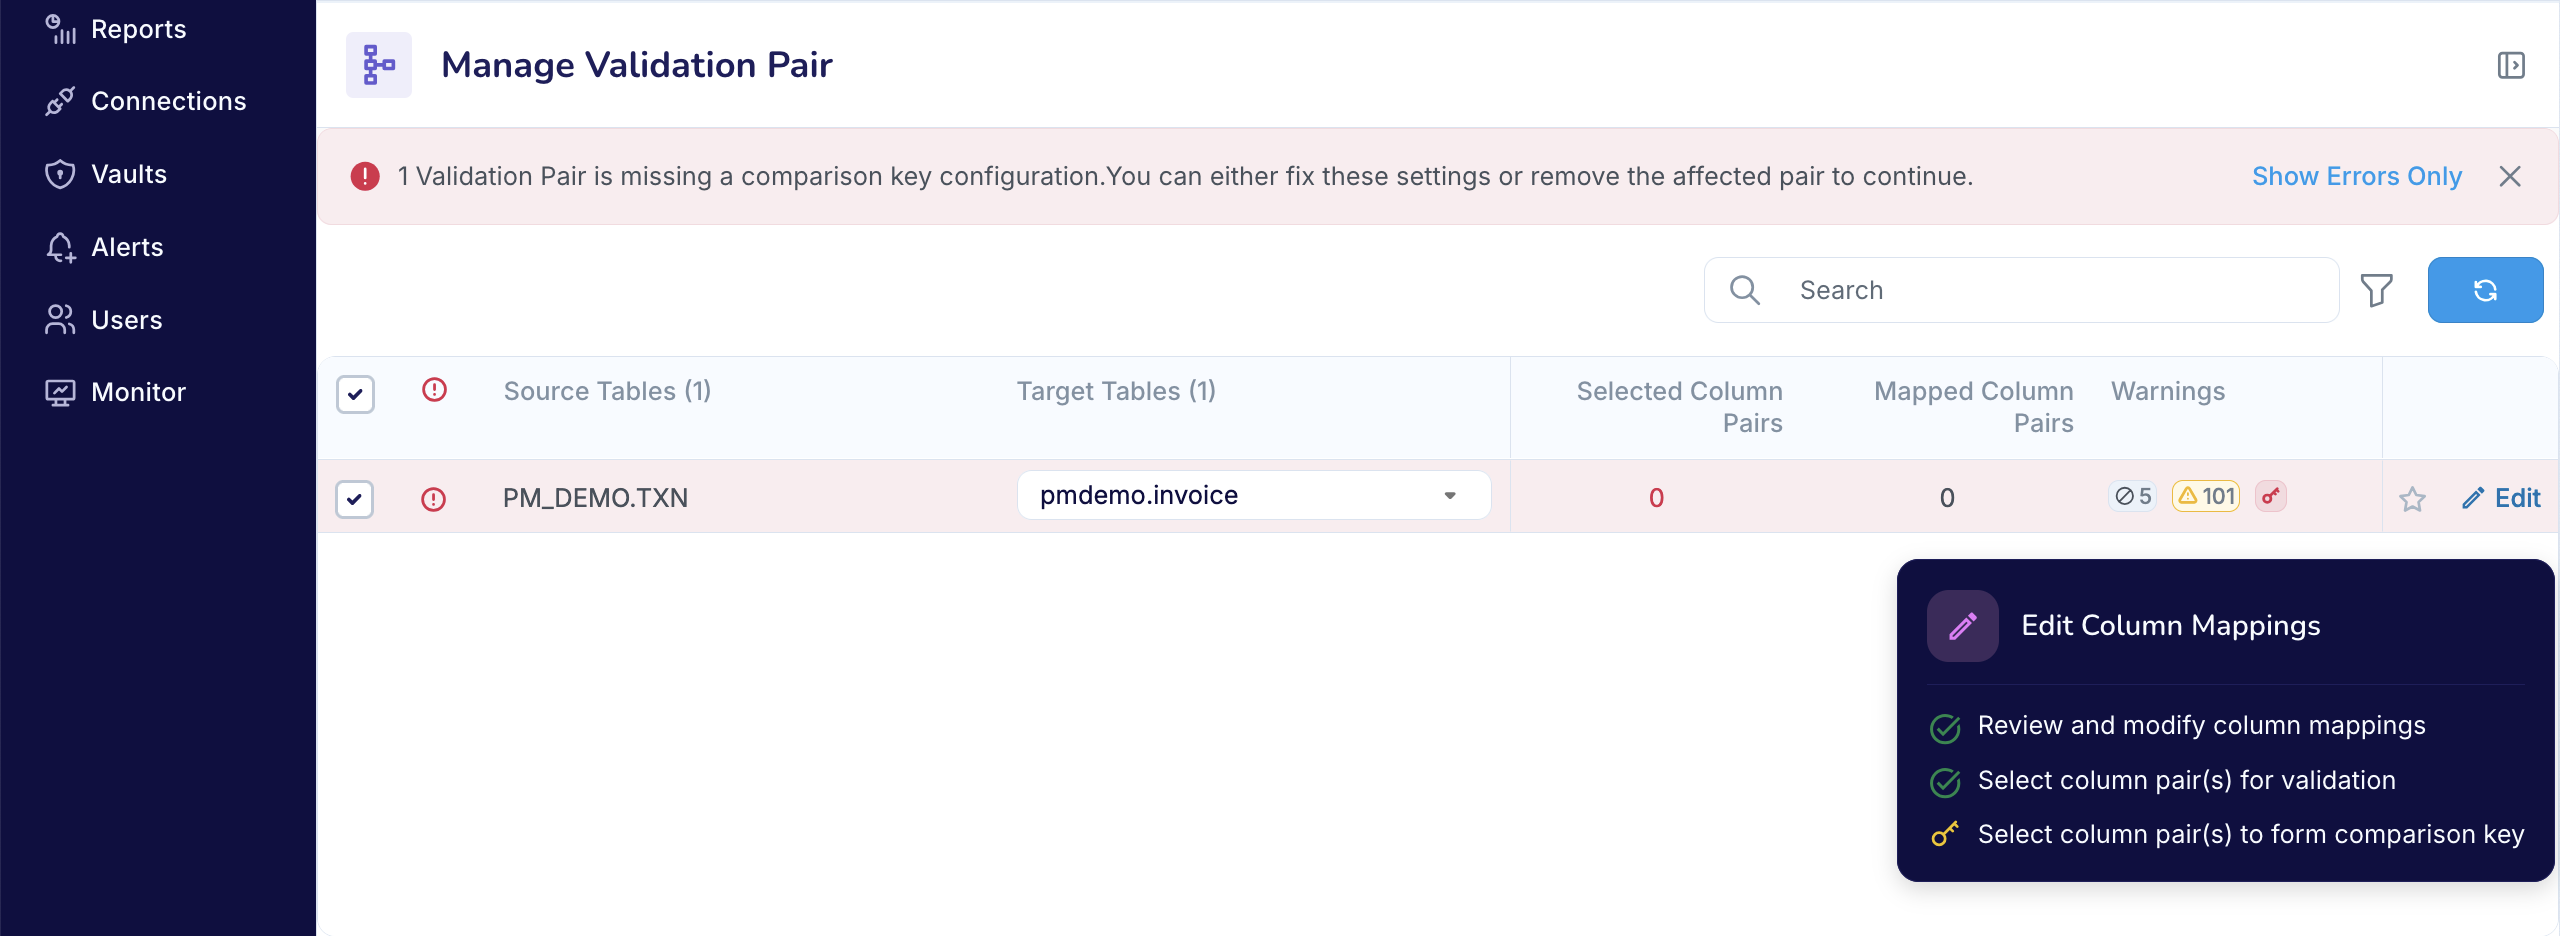
If Validata reports many column-mapping or comparison-key issues, it usually indicates that the Source and Target tables you selected are not logically aligned, as shown below. In that case, you must edit the Validation Pair and select tables that correspond to each other.
If you believe the correct tables are mapped, you will need to update the Validation Pair to resolve the column-mapping or comparison-key issues. For instructions, see Configuring a Validation Pair.
After resolving issues with your Validation Pair, you can Save your configuration.
Using Custom Validation
If you used the Quick Start (Validation Pair) scope with Custom Validation, your Source and Target queries implicitly define the Validation Pair.
The queries determine which columns appear in the results, and Validata maps those columns based on their position in the Source and Target result sets.
Because the mapping is derived directly from the query outputs, no additional Validation Pair configuration is needed—or possible—for Custom Validation
For example, in the screenshot for Custom Validation, the queries are designed to map the column
TRANSACTION_IDin the Source query result totransaction_idin the Target query result,PRODUCT_IDtoproduct_id, and so on.After verifying the query results, you can save the configuration and launch a validation run (see Starting a validation run).
Validation Set scope with Manual table selection
After configuring the Advanced Settings, you must decide how you want to select the tables for comparison. In this example, you will select the tables manually.
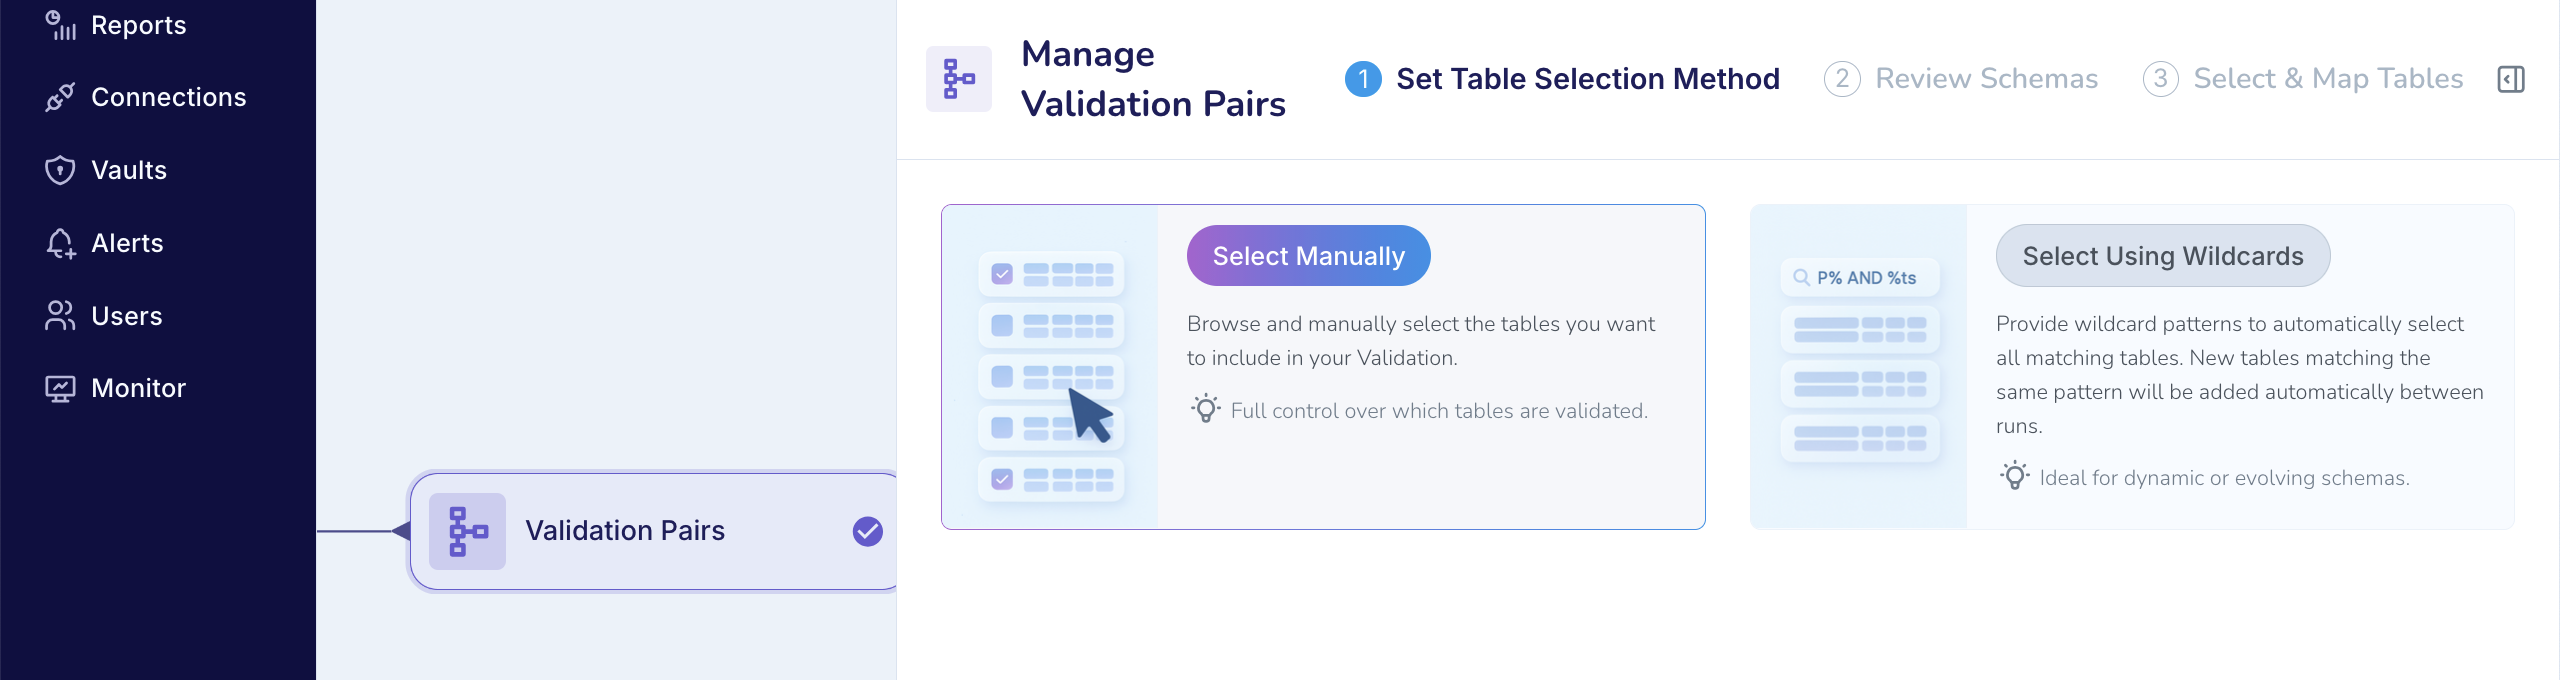
Validata retrieves the schemas available in the Source and Target data systems. You must select the schemas that contain the tables you want to compare, as shown below.
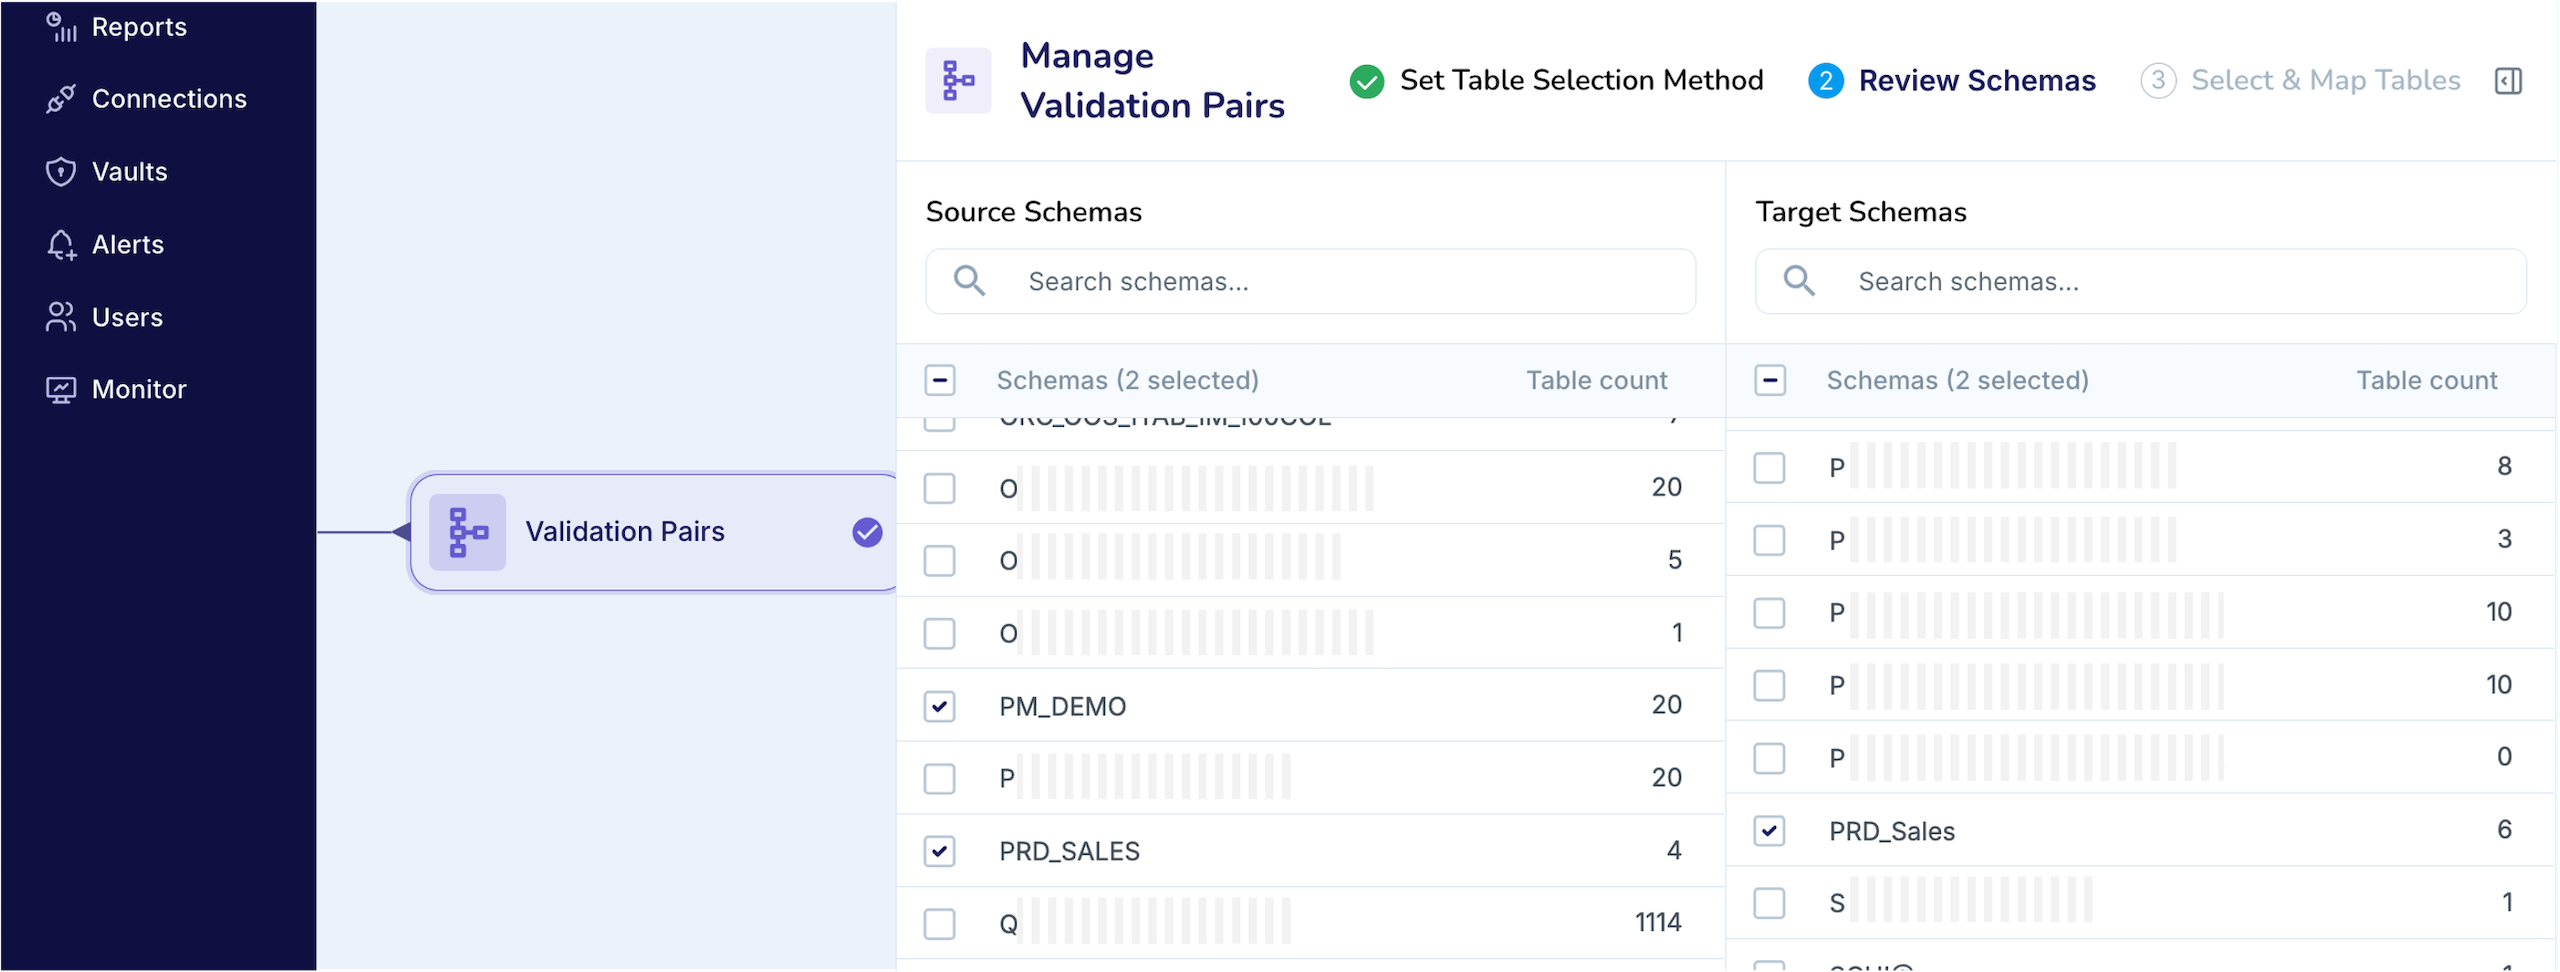
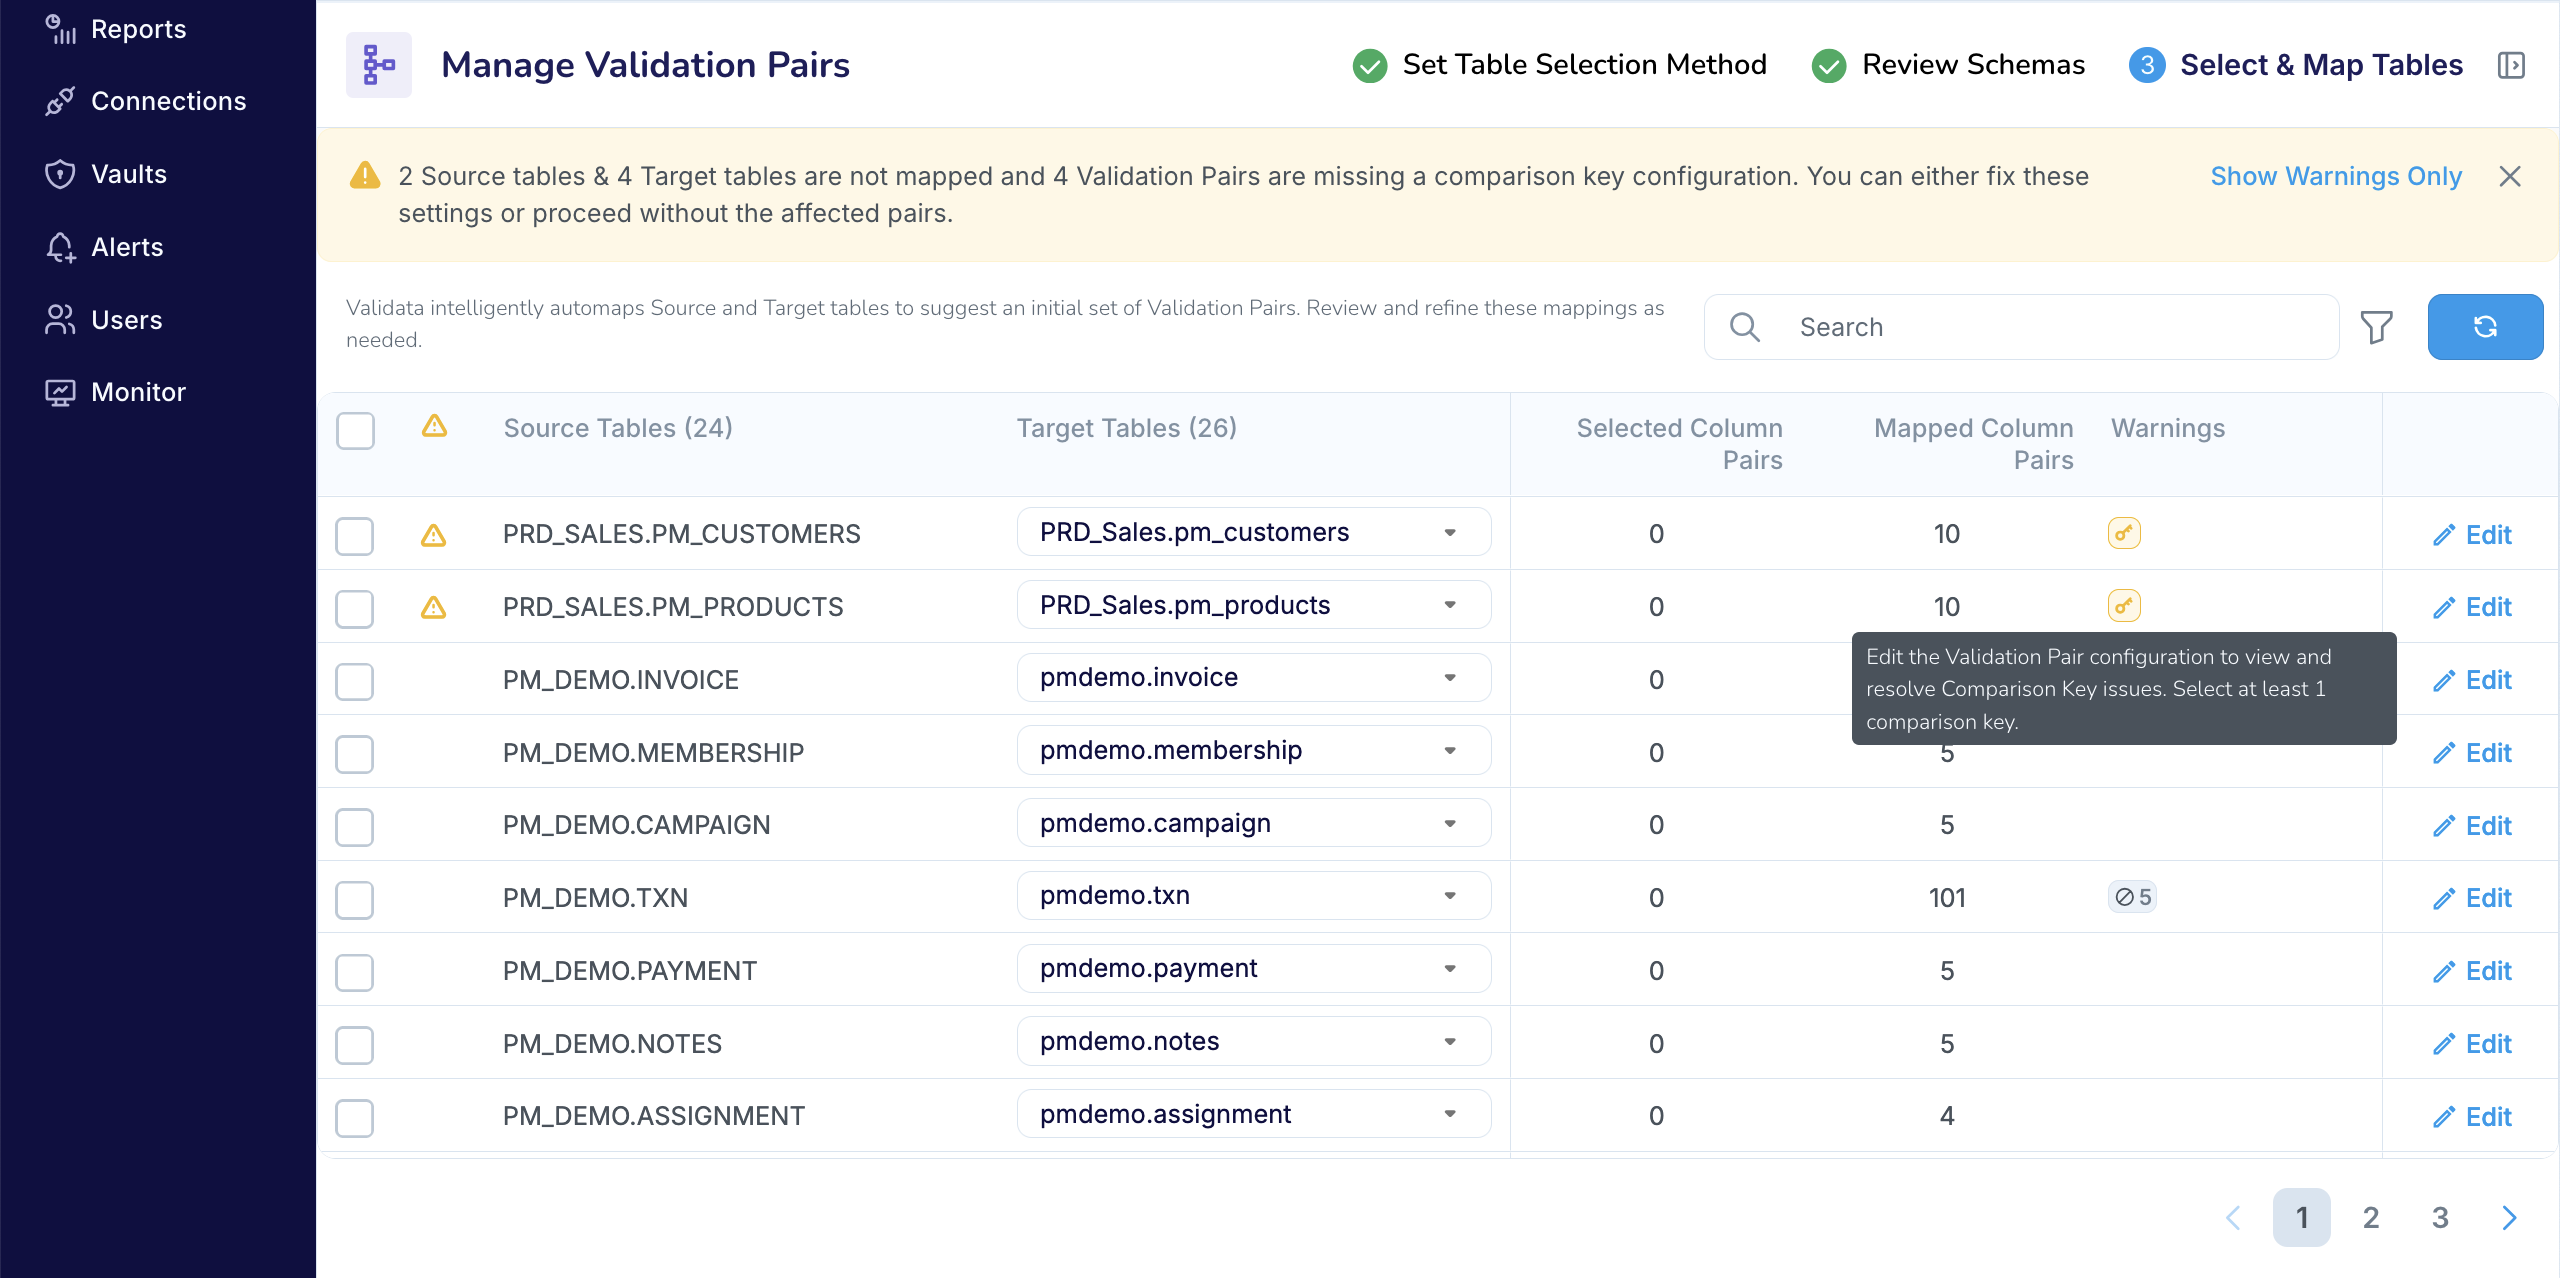
Validata intelligently automaps tables from the selected Source and Target schemas to create an initial set of Validation Pairs, as shown in the screenshot below. For each automapped Pair, Validata also maps the columns between the two tables and selects a comparison key. If Validata cannot map a table or column, or cannot determine a comparison key, it marks the affected Validation Pairs with appropriate UI labels.
Validata displays mapped Validation Pairs first, followed by unmapped Pairs—tables that do not have a corresponding match on the other side. You can use the search bar to quickly locate a specific table.
You can review and modify a Validation Pair mapping as follows:
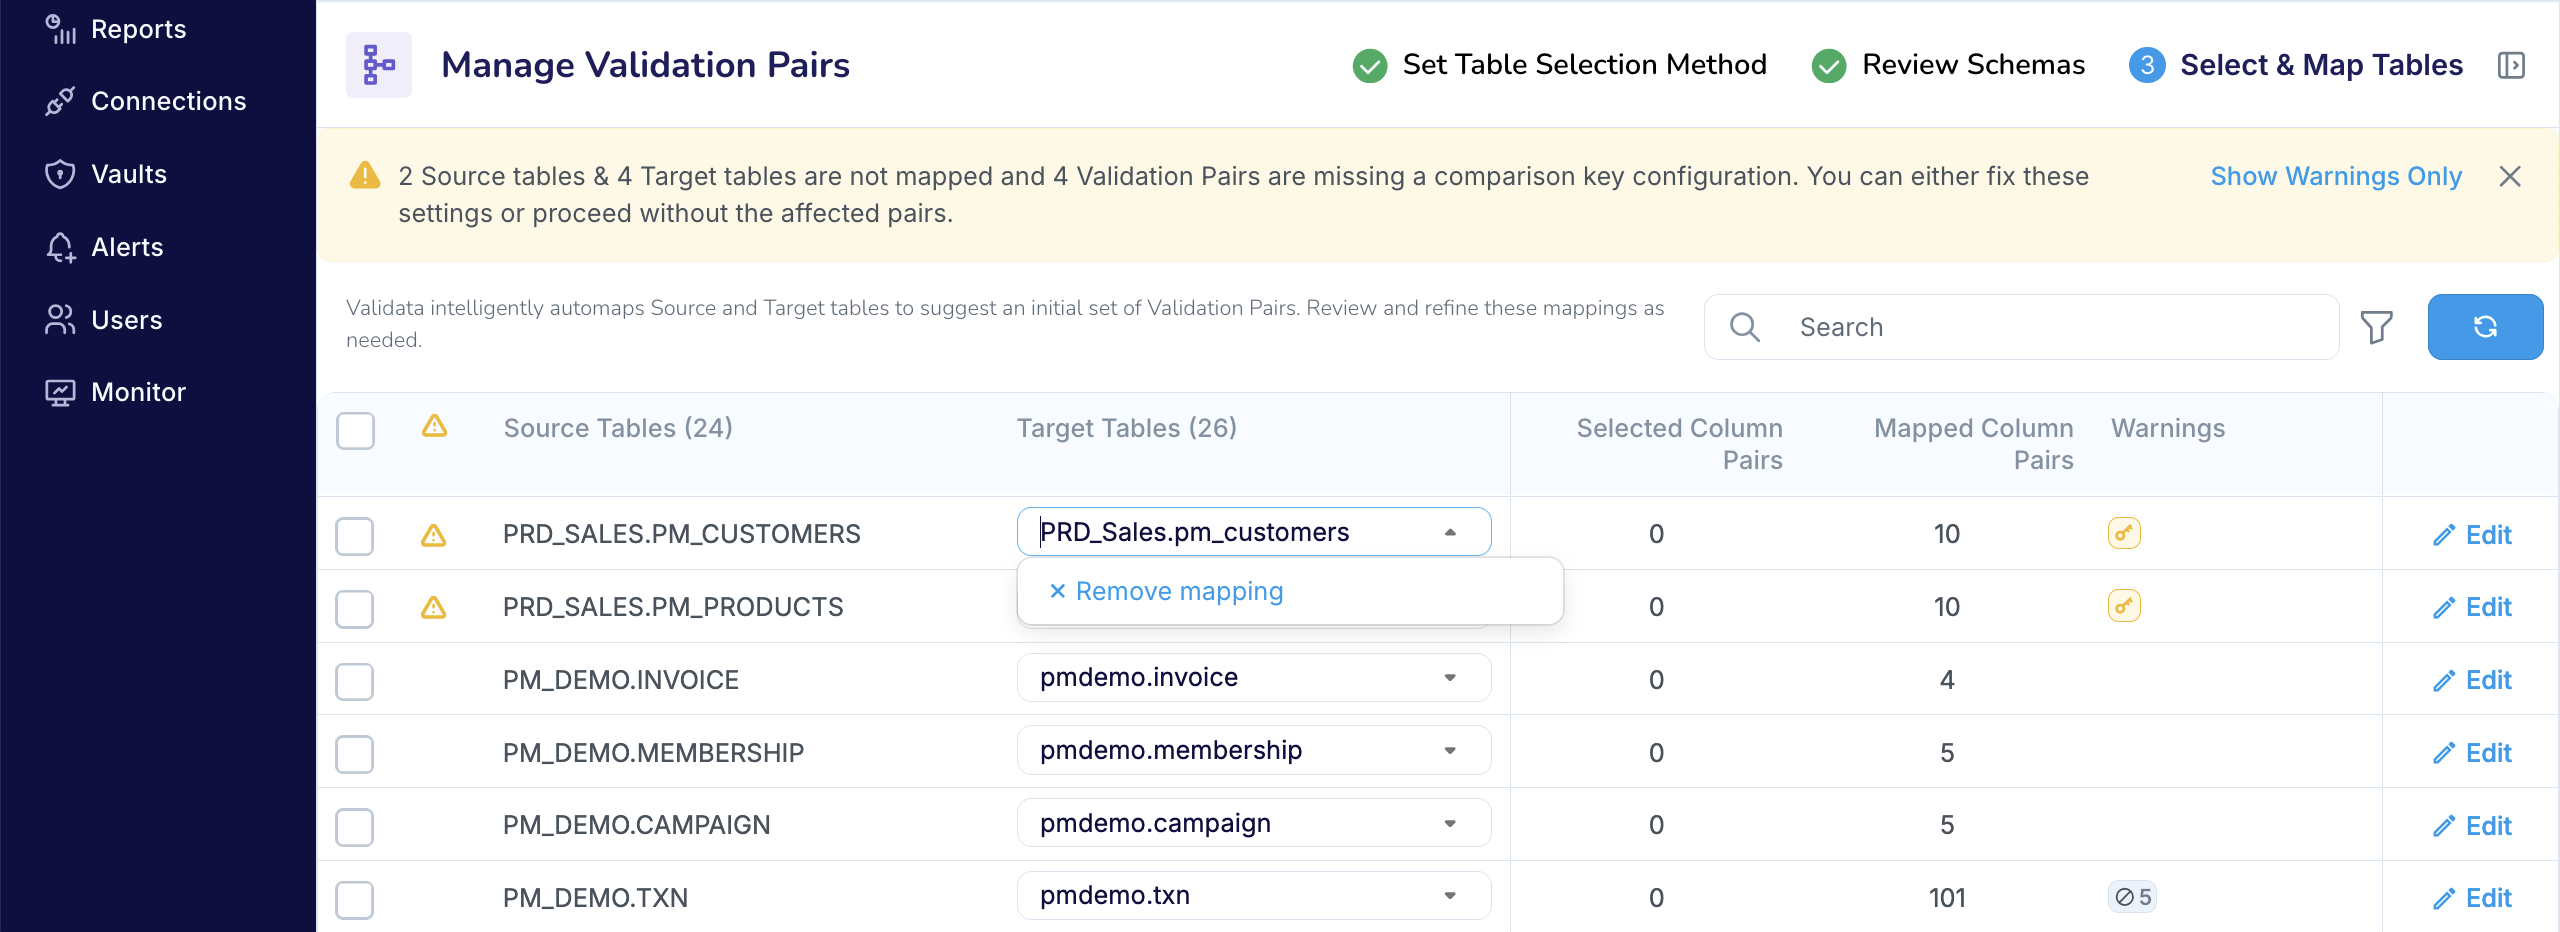
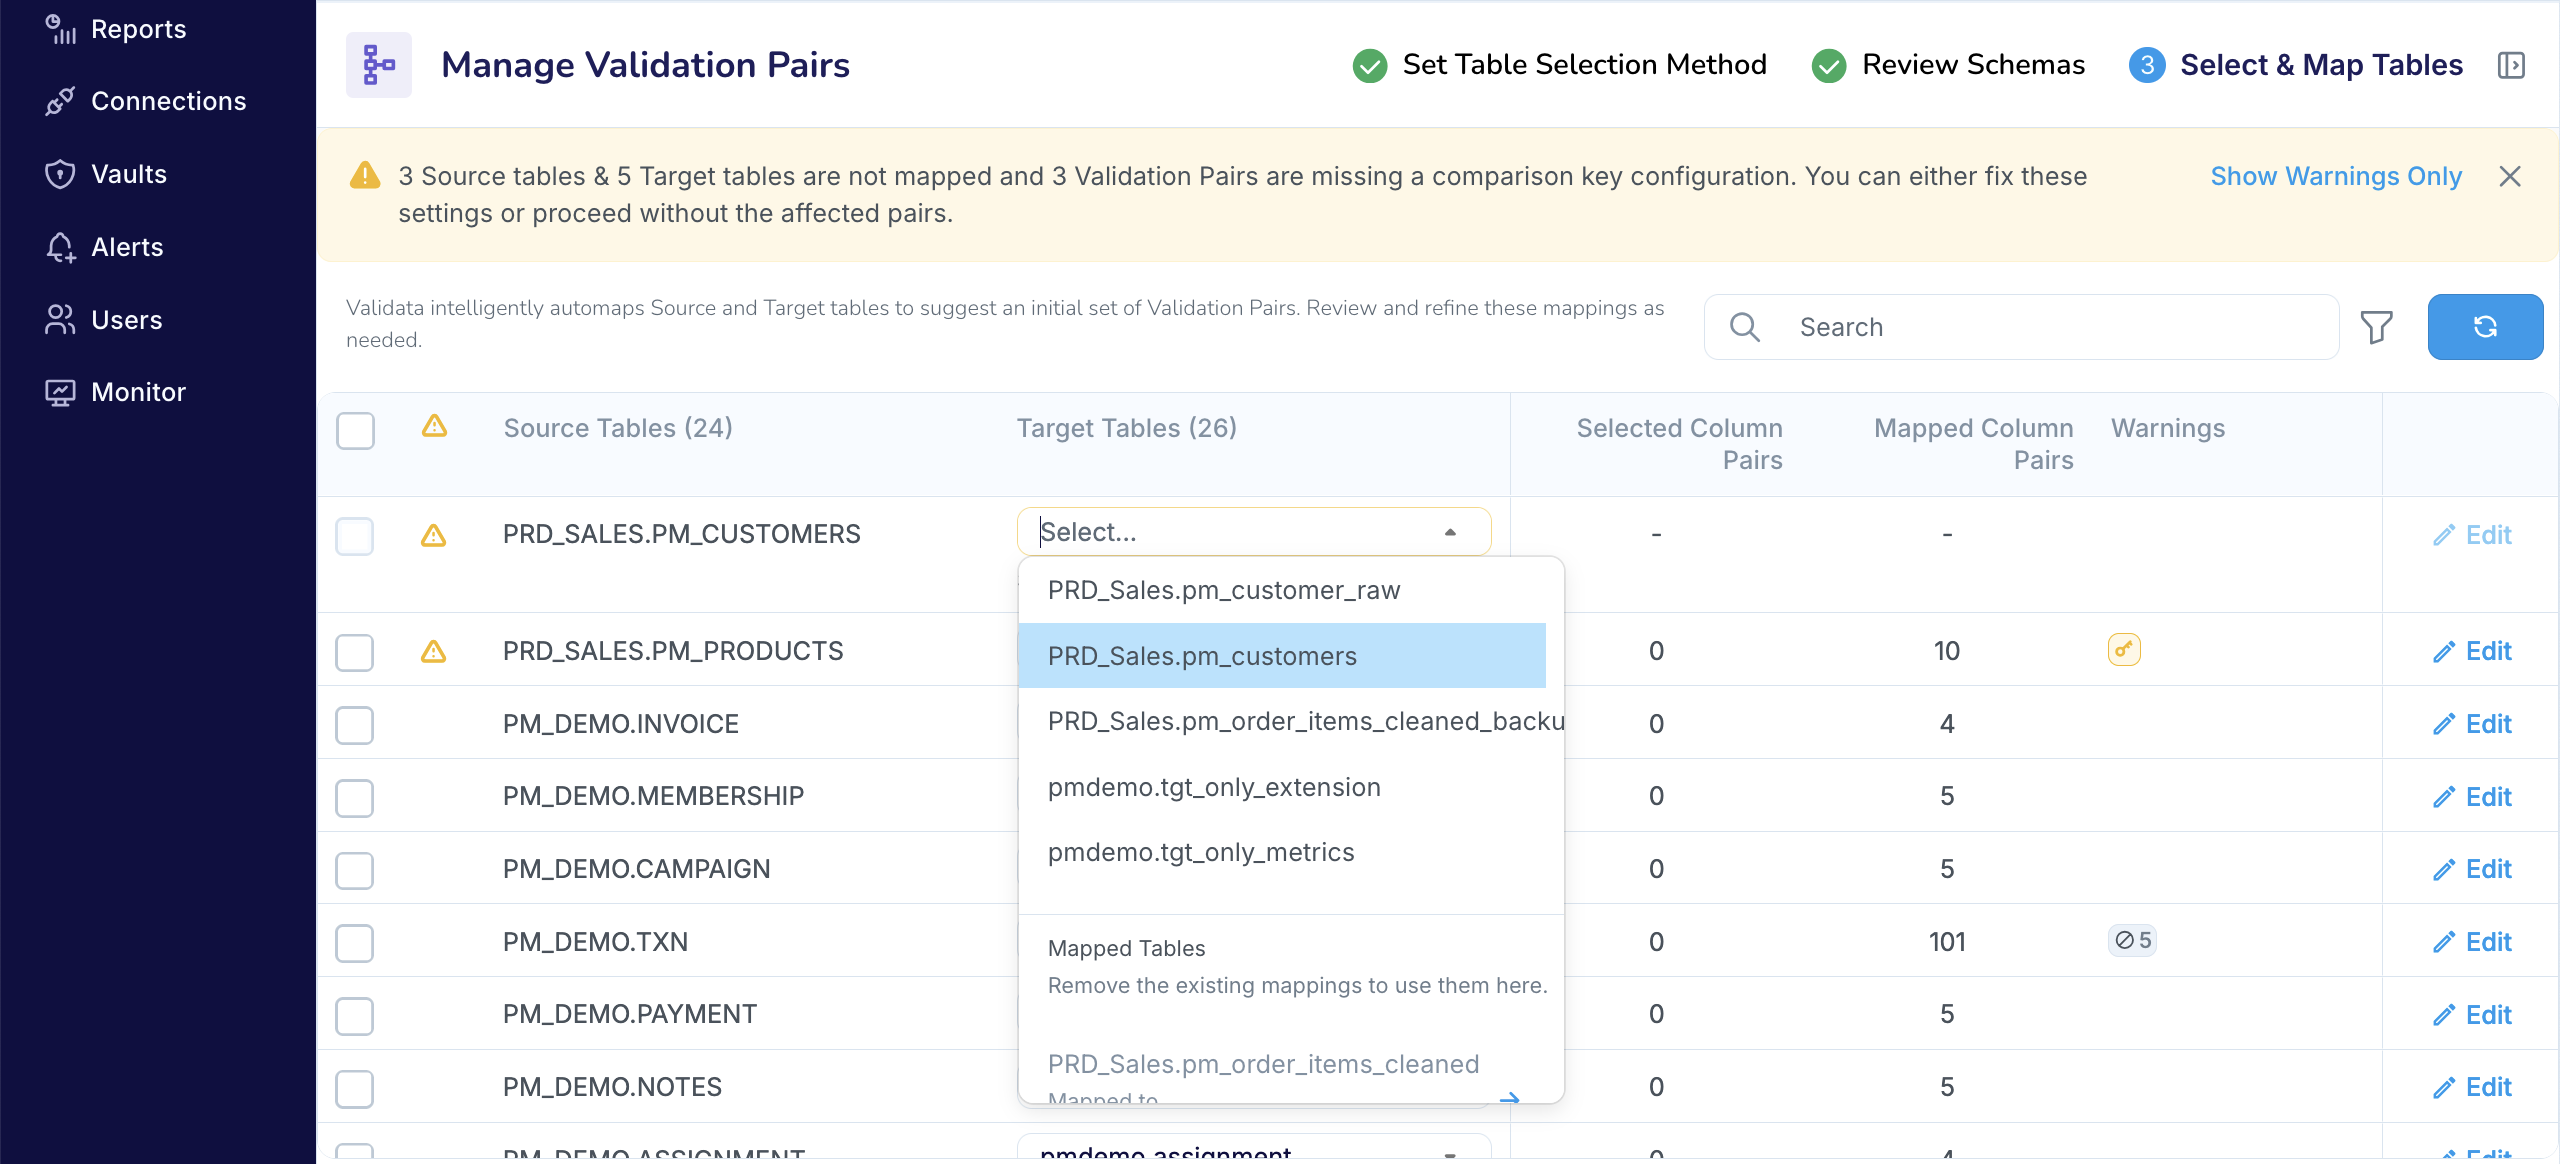
Mapped Validation Pair: If Validata has mapped a Source table to a Target table and you want to change that mapping, remove the Target table (first screenshot below) and then select a different unmapped Target table (second screenshot below).
Unmapped Validation Pair:
If Validata cannot automap a Source table, you can manually map it to any unmapped Target table. The drop-down list for the Target table shows all unmapped options.
If Validata cannot auto-map a Target table, it will appear in the list of unmapped Target tables.
After reviewing the mappings, resolve any issues that prevent a Validation Pair from being selected for comparison. Typically, this involves editing the Validation Pair to choose or correct the comparison key, adjust column mappings, and select column pairs for validation. To learn how to configure a Validation Pair, see Configuring a Validation Pair.
You can select a Validation Pair for comparison in two ways:
Select individual Validation Pairs:
If Validata successfully created a comparison key for a Validation Pair, then you can select that individual Pair for validation, and Validata will automatically select all mapped column pairs for evaluation.
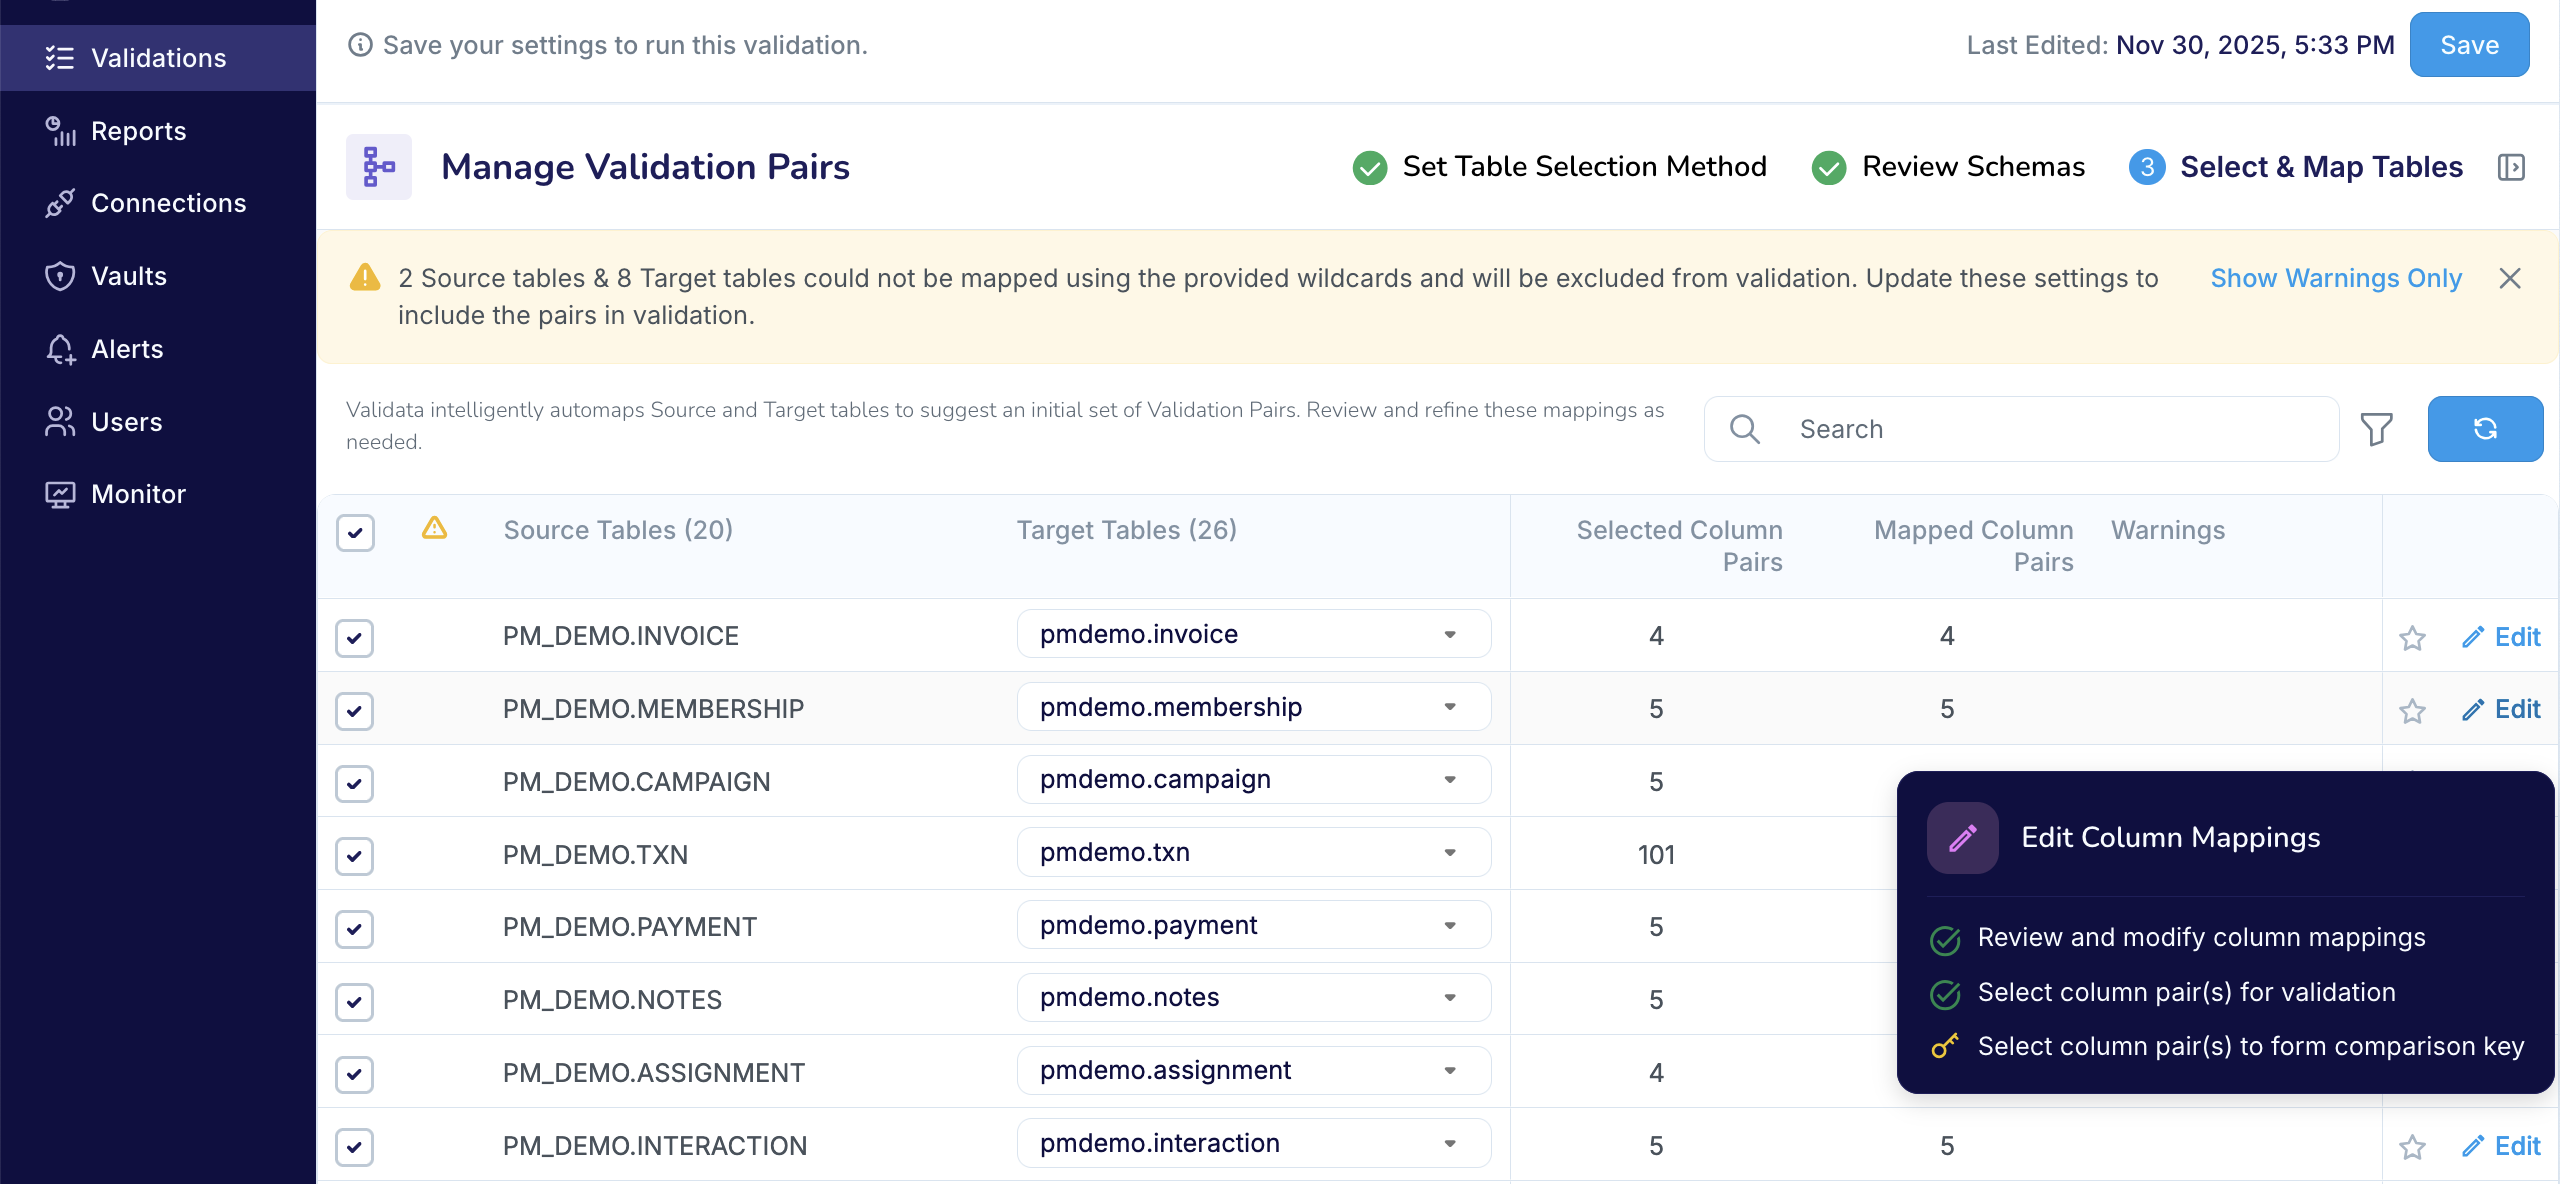
In the screenshot below, Validata mapped five column pairs and did not report any comparison key issues for the Validation Pair:
PM_DEMO.CAMPAIGN → pmdemo.campaign. When you select this Validation Pair for comparison, Validata automatically marks those five column pairs for validation.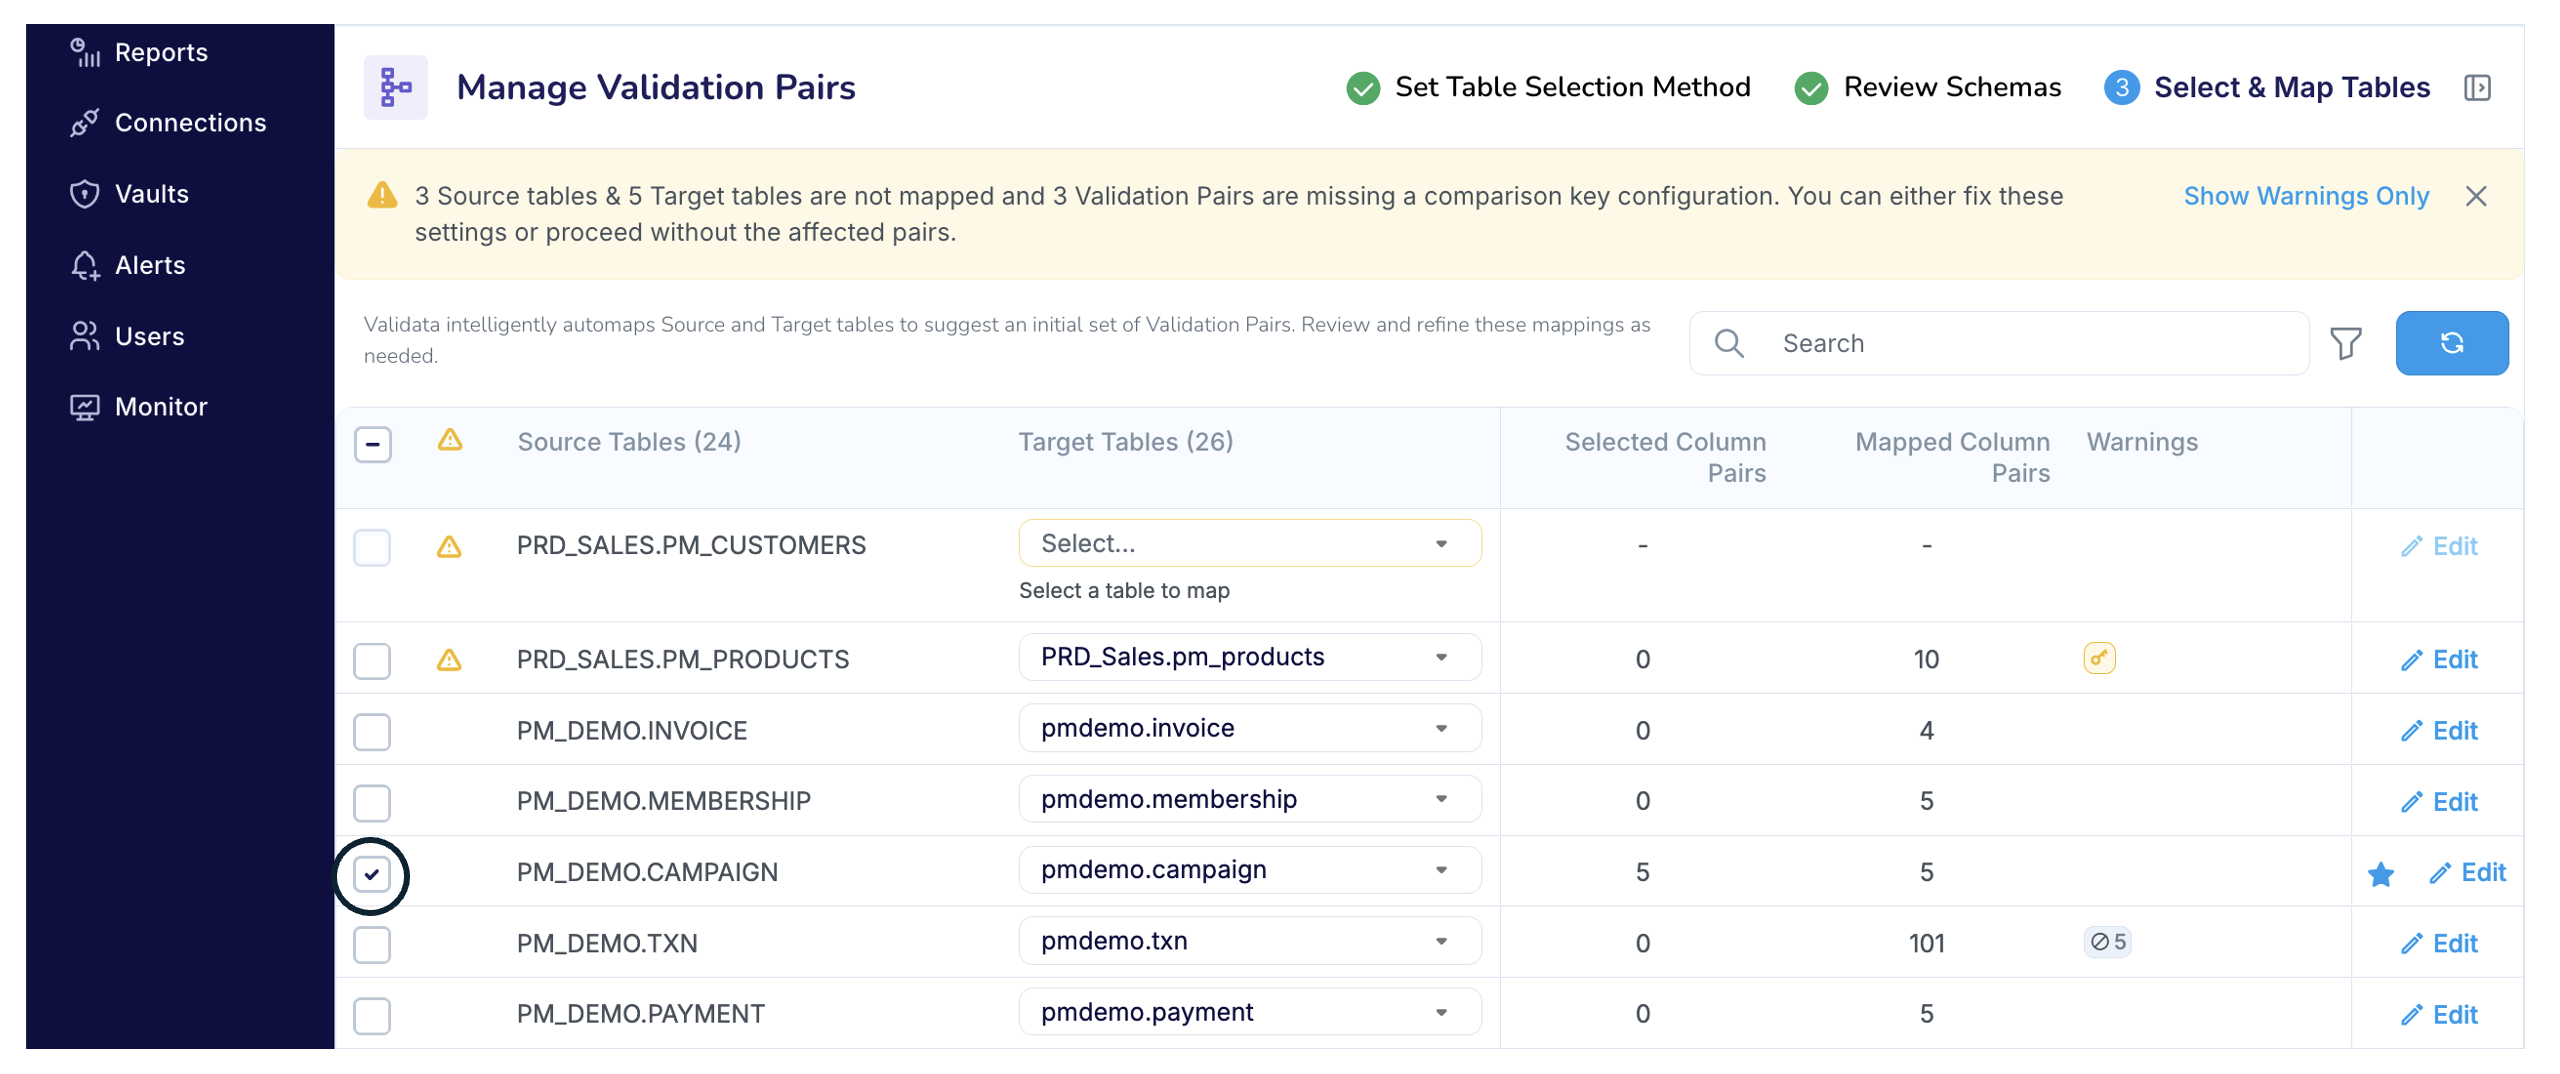
Select multiple Validation Pairs:
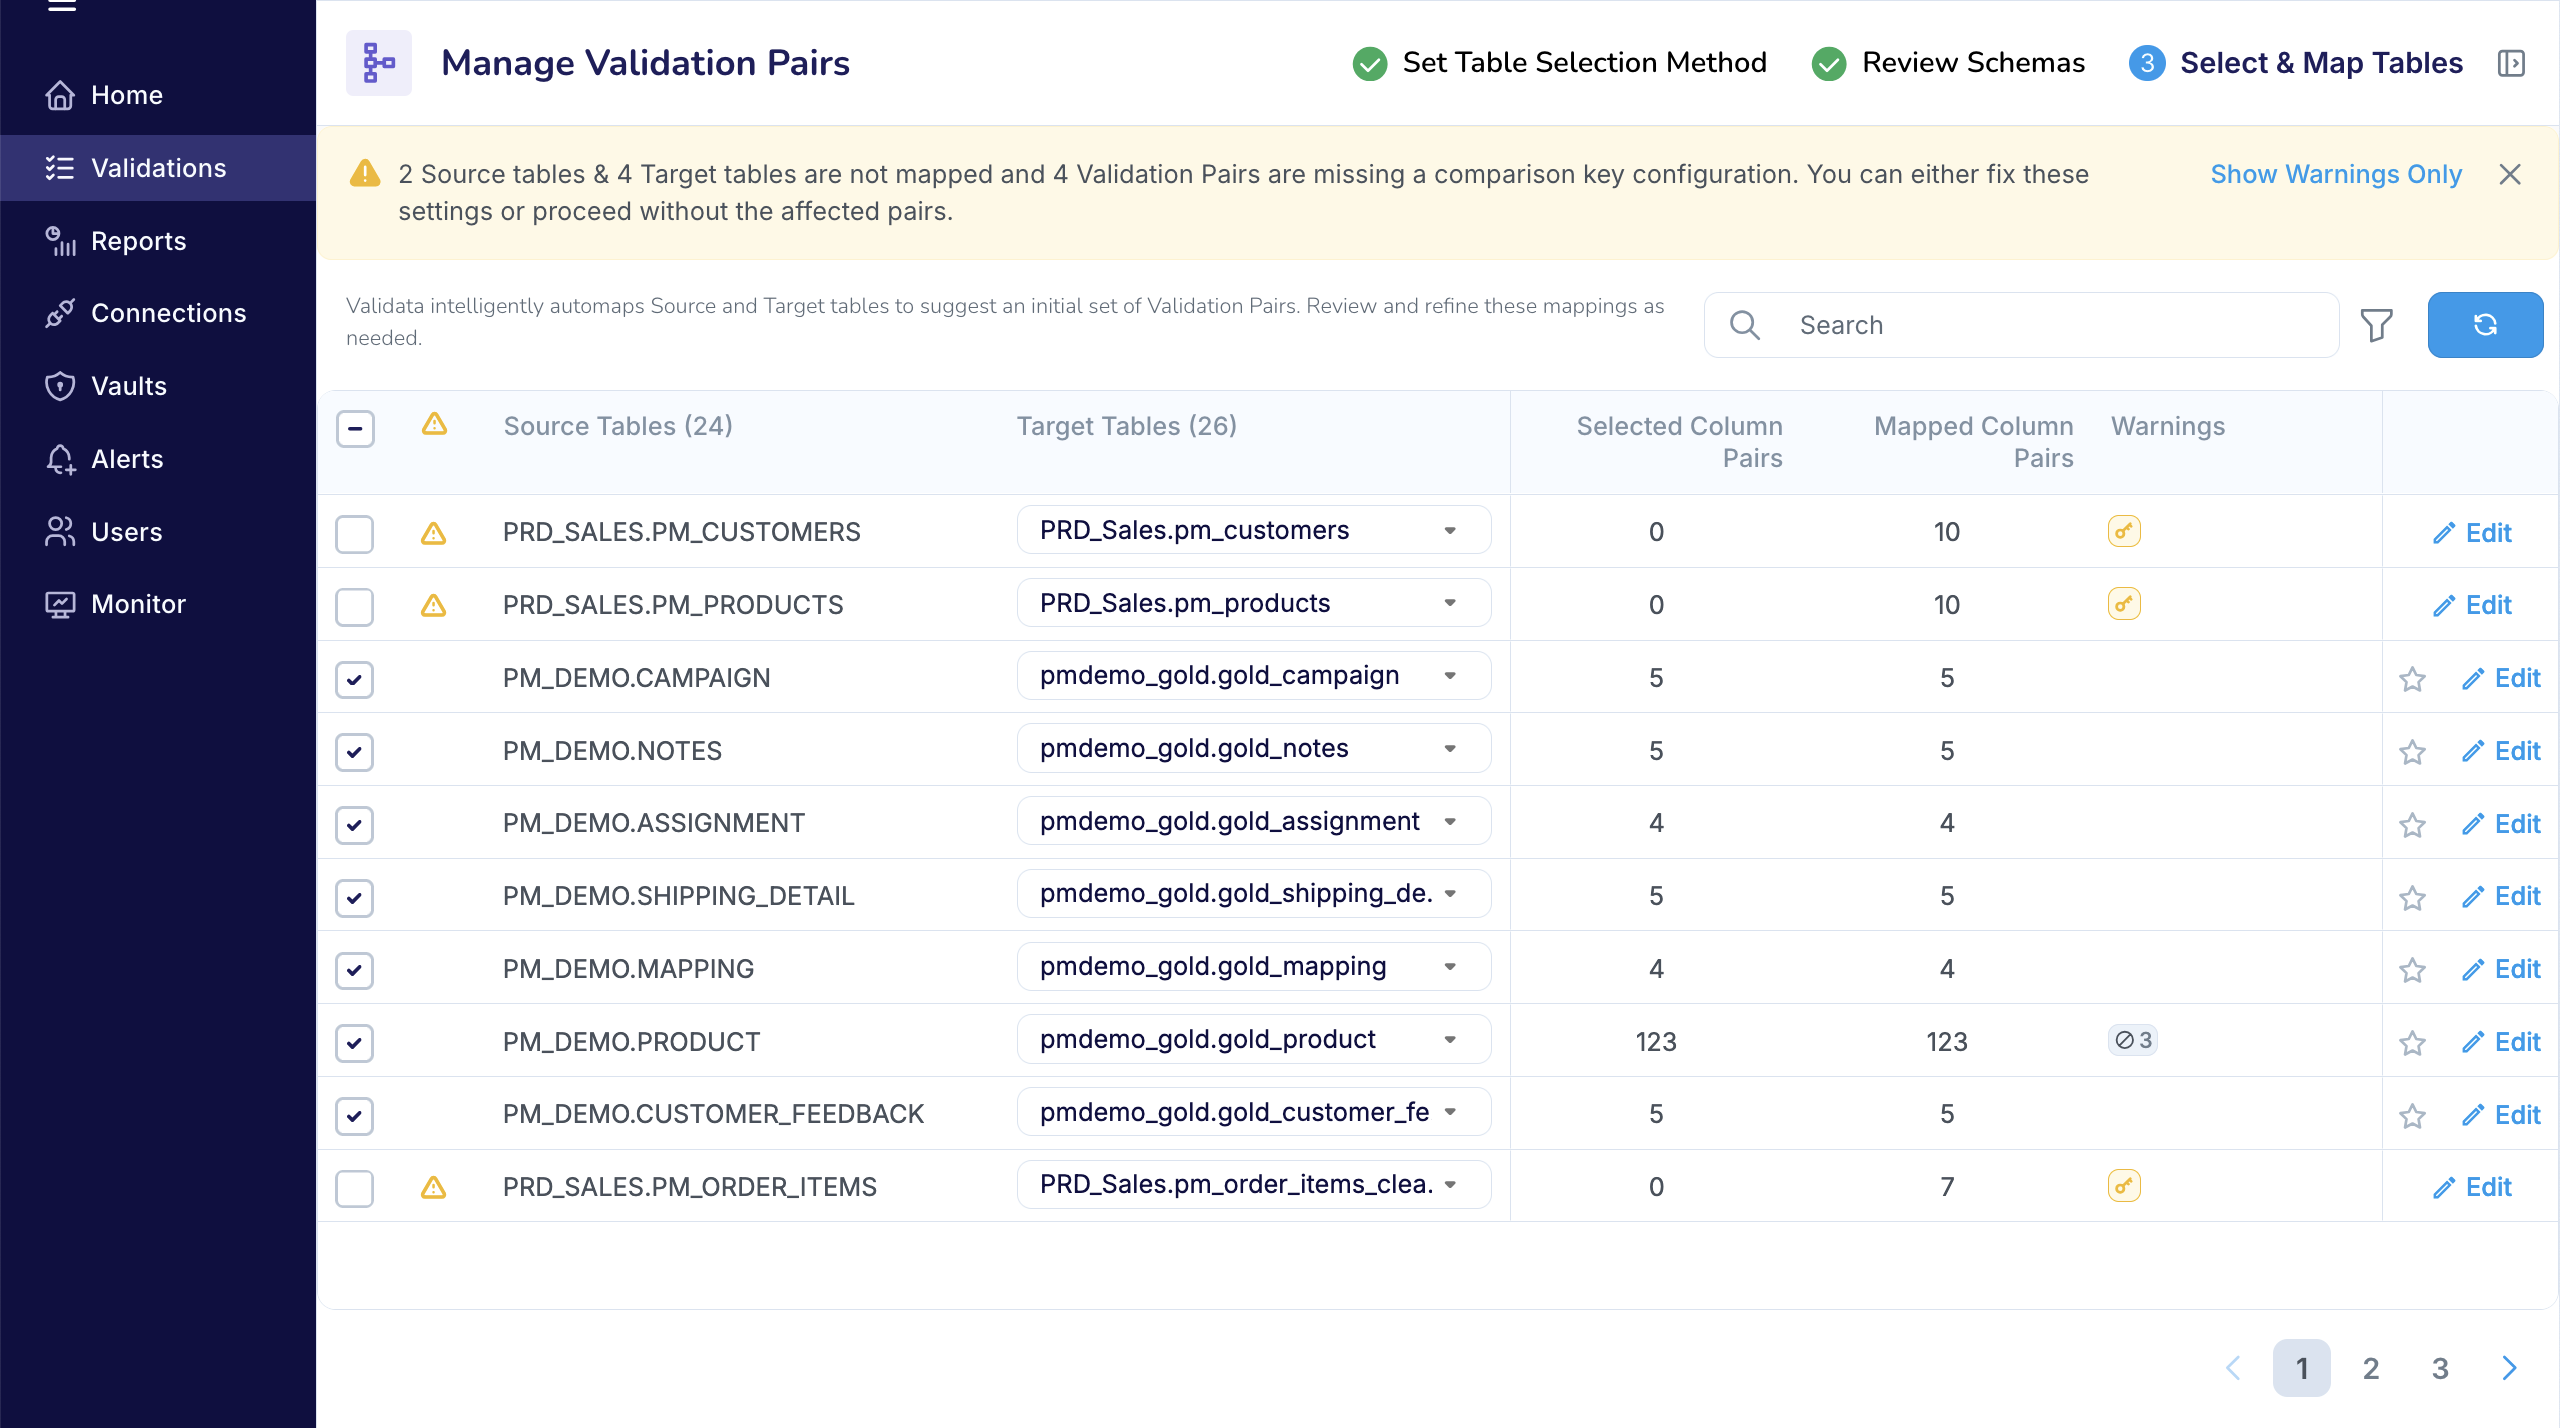
If you select the checkbox in the top-left corner (next to Source Tables in the screenshot below), Validata selects all mapped Validation Pairs for comparison, except those with configuration errors. When a Pair is selected, Validata automatically marks all mapped column pairs within that Pair for evaluation.
In the screenshot below, Validata has selected all mapped Validation Pairs, including Pairs such as
PRD_SALES.PM_PRODUCTS → PRD_Sales.pm_products, where no comparison key was detected. Validata displays a warning label for any Validation Pair missing a comparison key. If you do not resolve these key issues, you must unselect those Pairs before you can save the Validation and launch a run.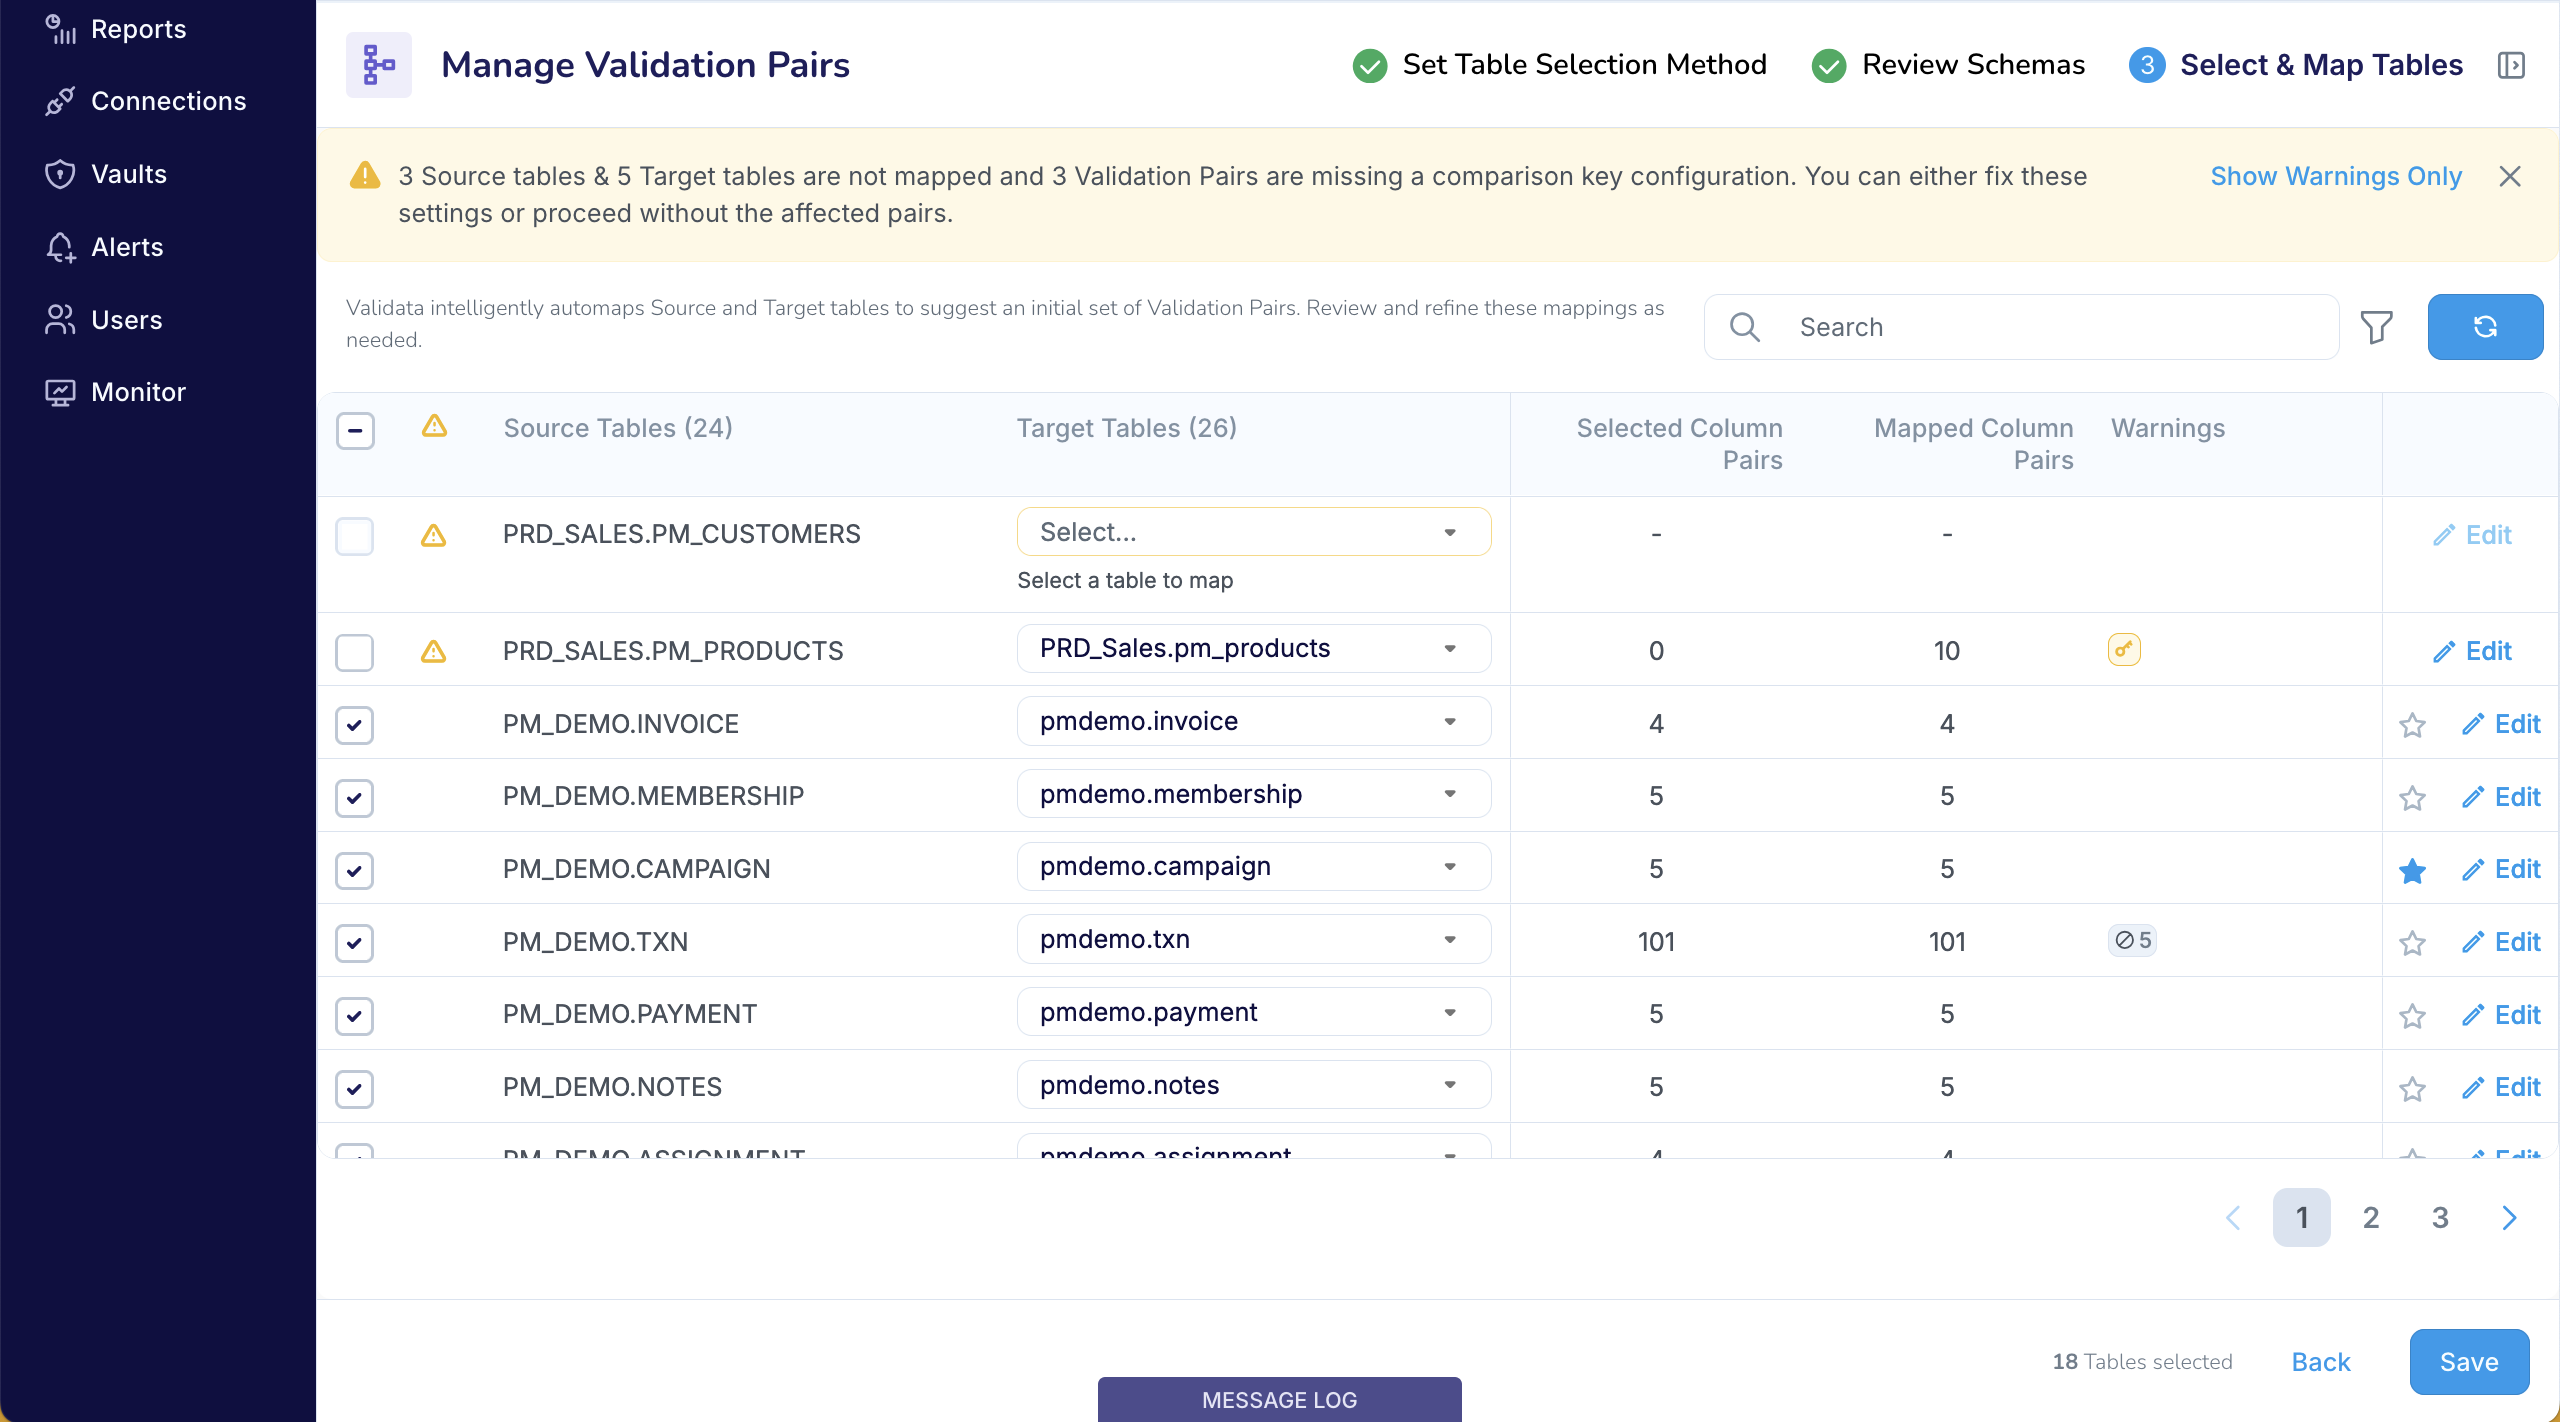
At each run, Validata evaluates only the Validation Pairs you have selected. It does not check the selected schemas for new tables. If you want to add or remove Validation Pairs, you must update the Validation configuration.
Validation Set scope with Table selection using Wildcard rules
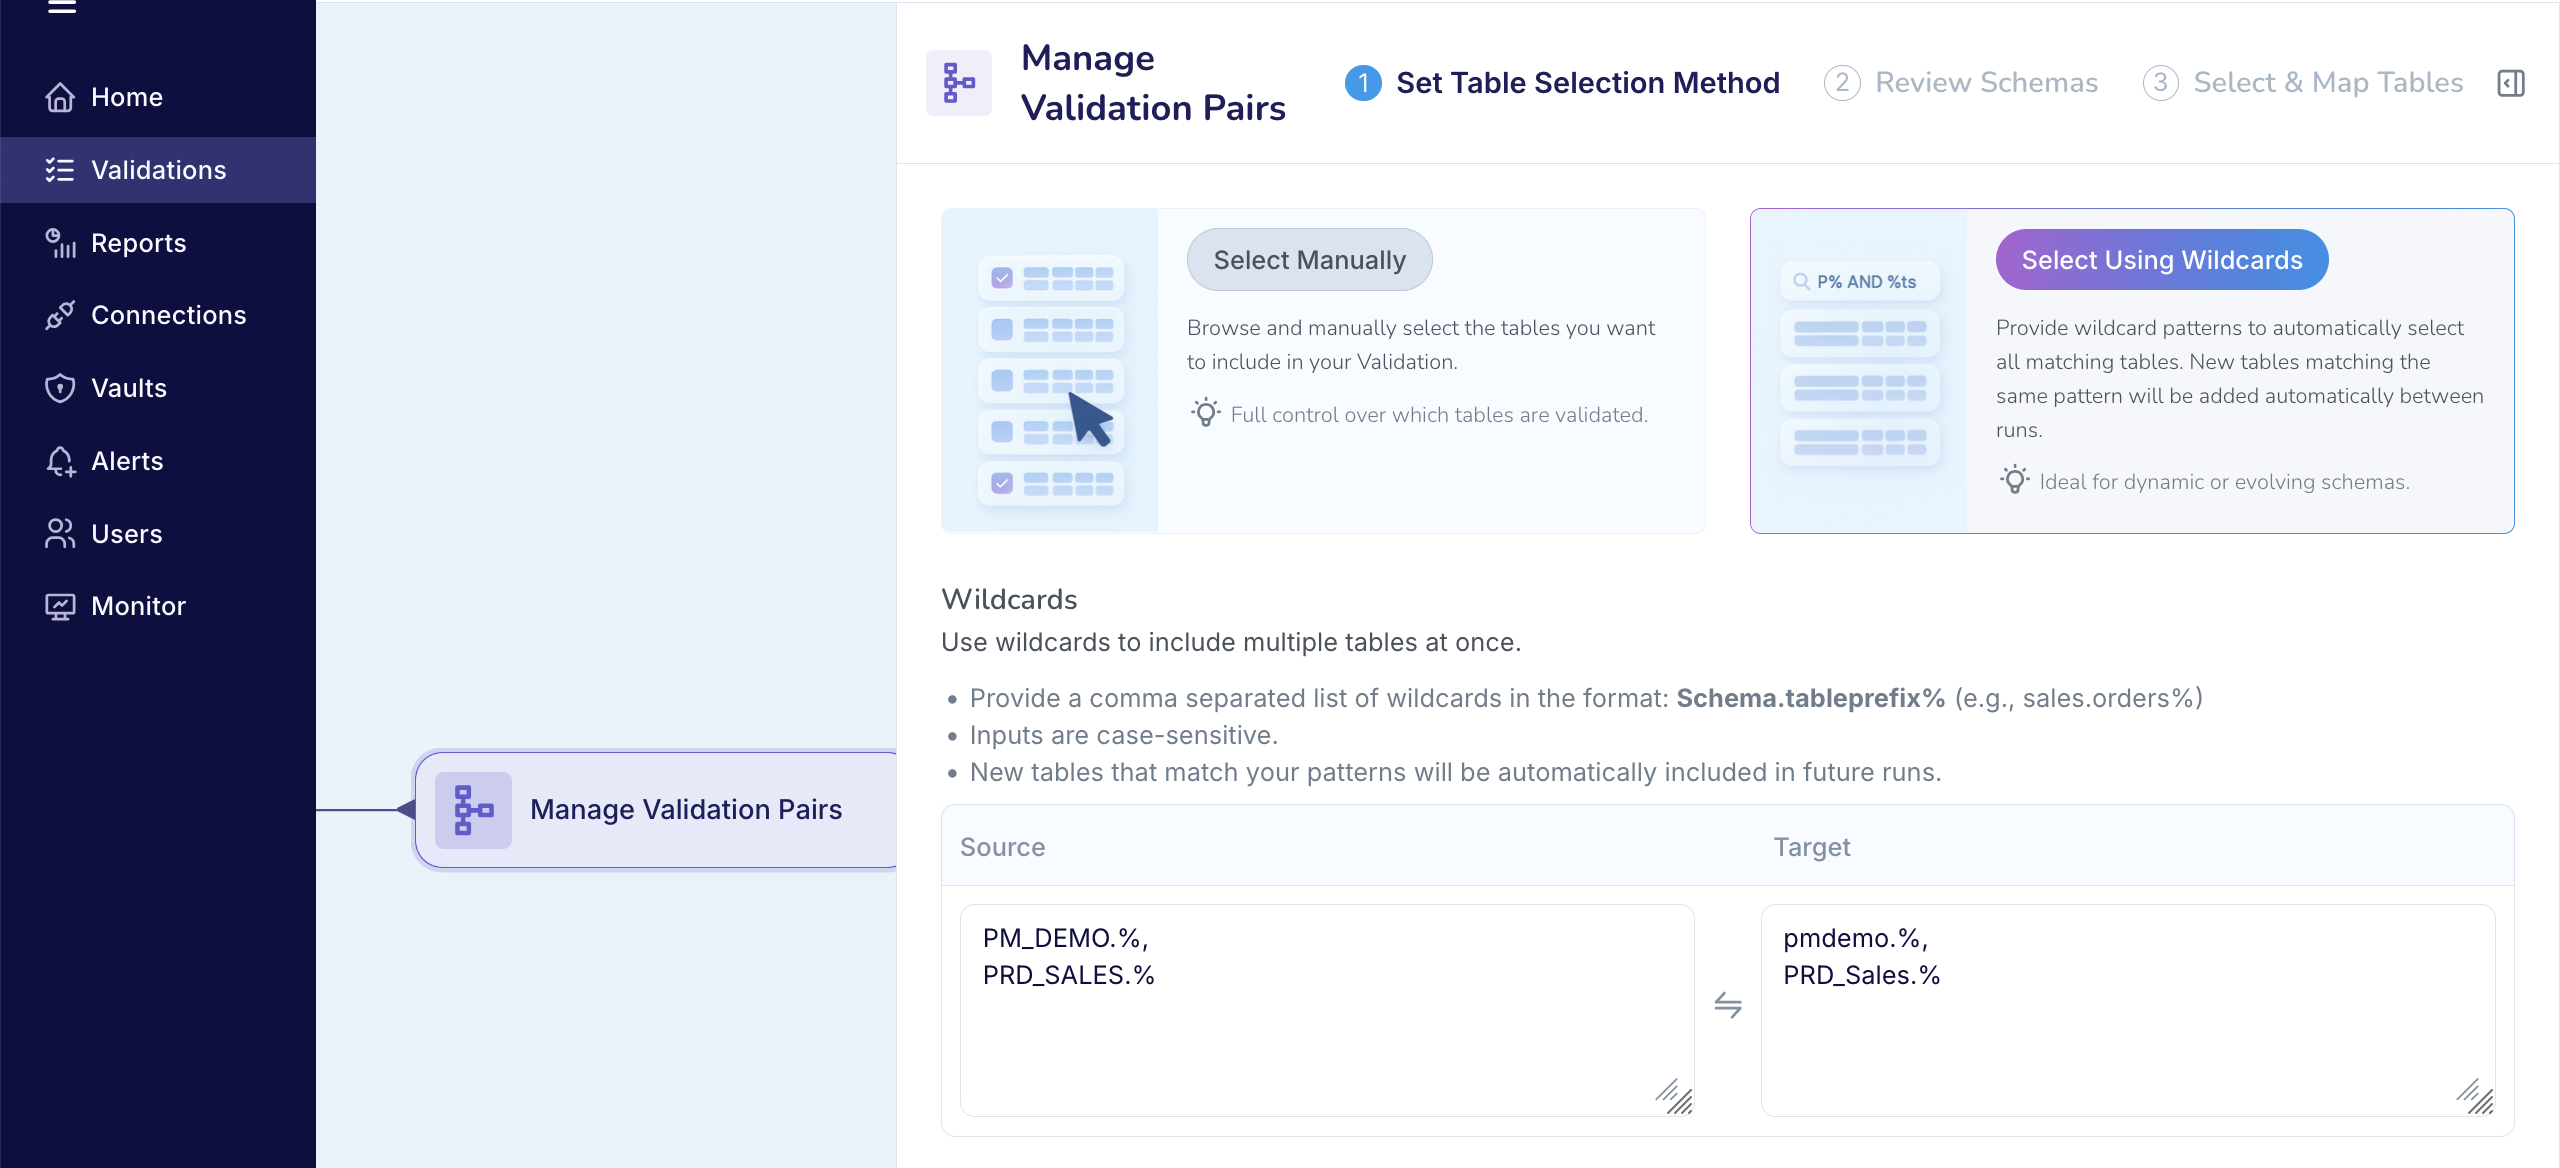
After configuring the Advanced Settings, you must decide how you want to select the tables for comparison. Earlier, we covered manual selection. Here, you will select the tables using wildcard patterns.
In the screenshot below, Validata uses your wildcard rules to identify the eligible Source and Target tables.
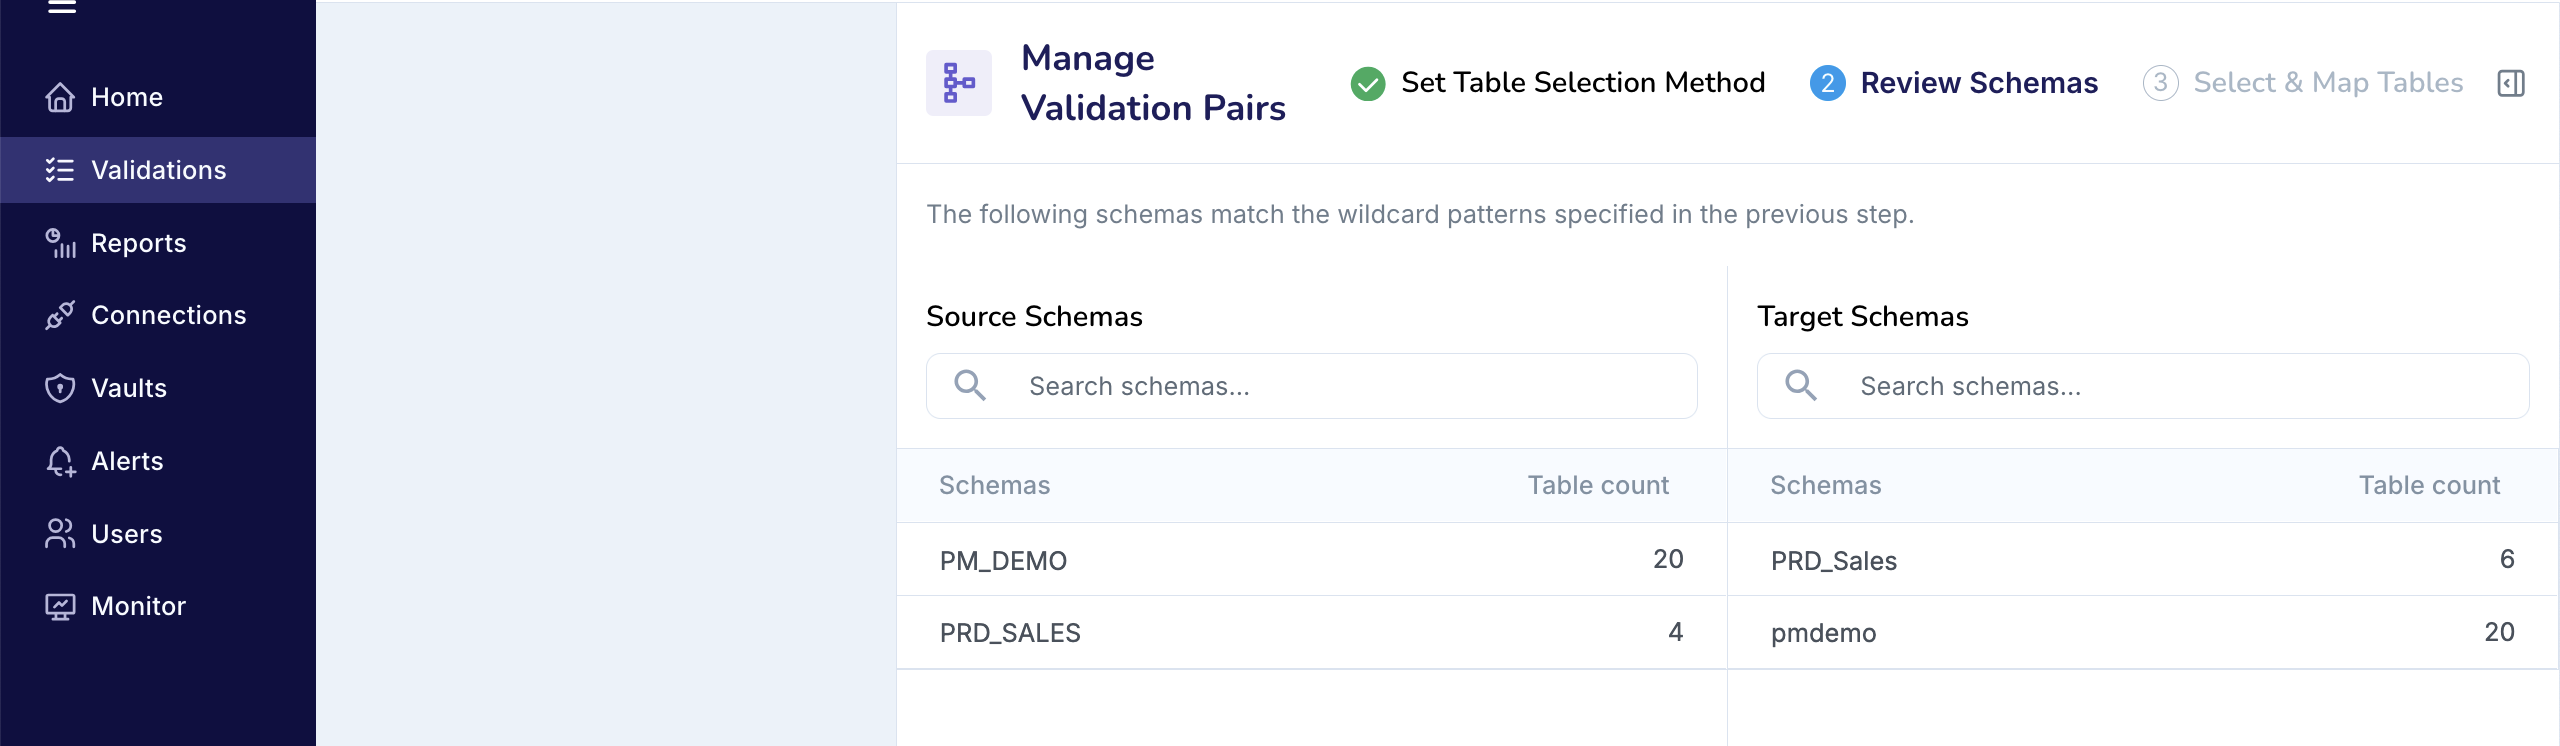
Once you provide the wildcard rules, Validata confirms the matching schemas and the number of tables found on each side.
Validata then automaps the matched tables to form an initial set of Validation Pairs. By default, Validata selects all valid Validation Pairs—Pairs with mapped columns and a valid comparison key—for comparison. Pairs that are unmapped or have configuration warnings or errors are not automatically selected. This is shown in the screenshot below.
After the first validation run, Validata evaluates the wildcard rules at the start of every subsequent run:
It re-evaluates the wildcard patterns to identify all tables that match your rules.
If it finds new or previously unmapped tables, it attempts to automap them to form new Validation Pairs.
If a new Validation Pair is valid, Validata automatically adds it to the Validation configuration for the current and future runs.
If Validata cannot automap certain tables, it reports those cases in the Validation Run report.
If you do not want a particular table to be validated, you must update the Validation configuration to deselect or remove the corresponding Validation Pair.
Wildcard rules
Only prefix-based matching is supported; suffix or mid-string matching is not allowed. For example,
PM_DEMO.A%is supported, butPM_DEMO.%Ais not.Wildcards cannot be applied to schema names. For example,
PRD%.%is not supported.You can enter multiple patterns, separated by commas. For example,
PM_DEMO.%,PRD_SALES.%.Wildcard rules are case-sensitive. For example,
PM_DEMO.%andpm_demo.%can yield different results.
Configuring a Validation Pair
Coverage
You can configure a Validation Pair for all validation scopes and methods, except when using Quick Start (Validation Pair) with Custom Validation.
The configuration rules are consistent across all methods, with Key Validation and Interval Validation requiring a few additional rules
Accessing a Validation Pair
You can access any Validation Pair from the Manage Validation Pairs screen.
If the Validation is running (see first screenshot below), you can only view the column pairs selected for comparison (see second screenshot).

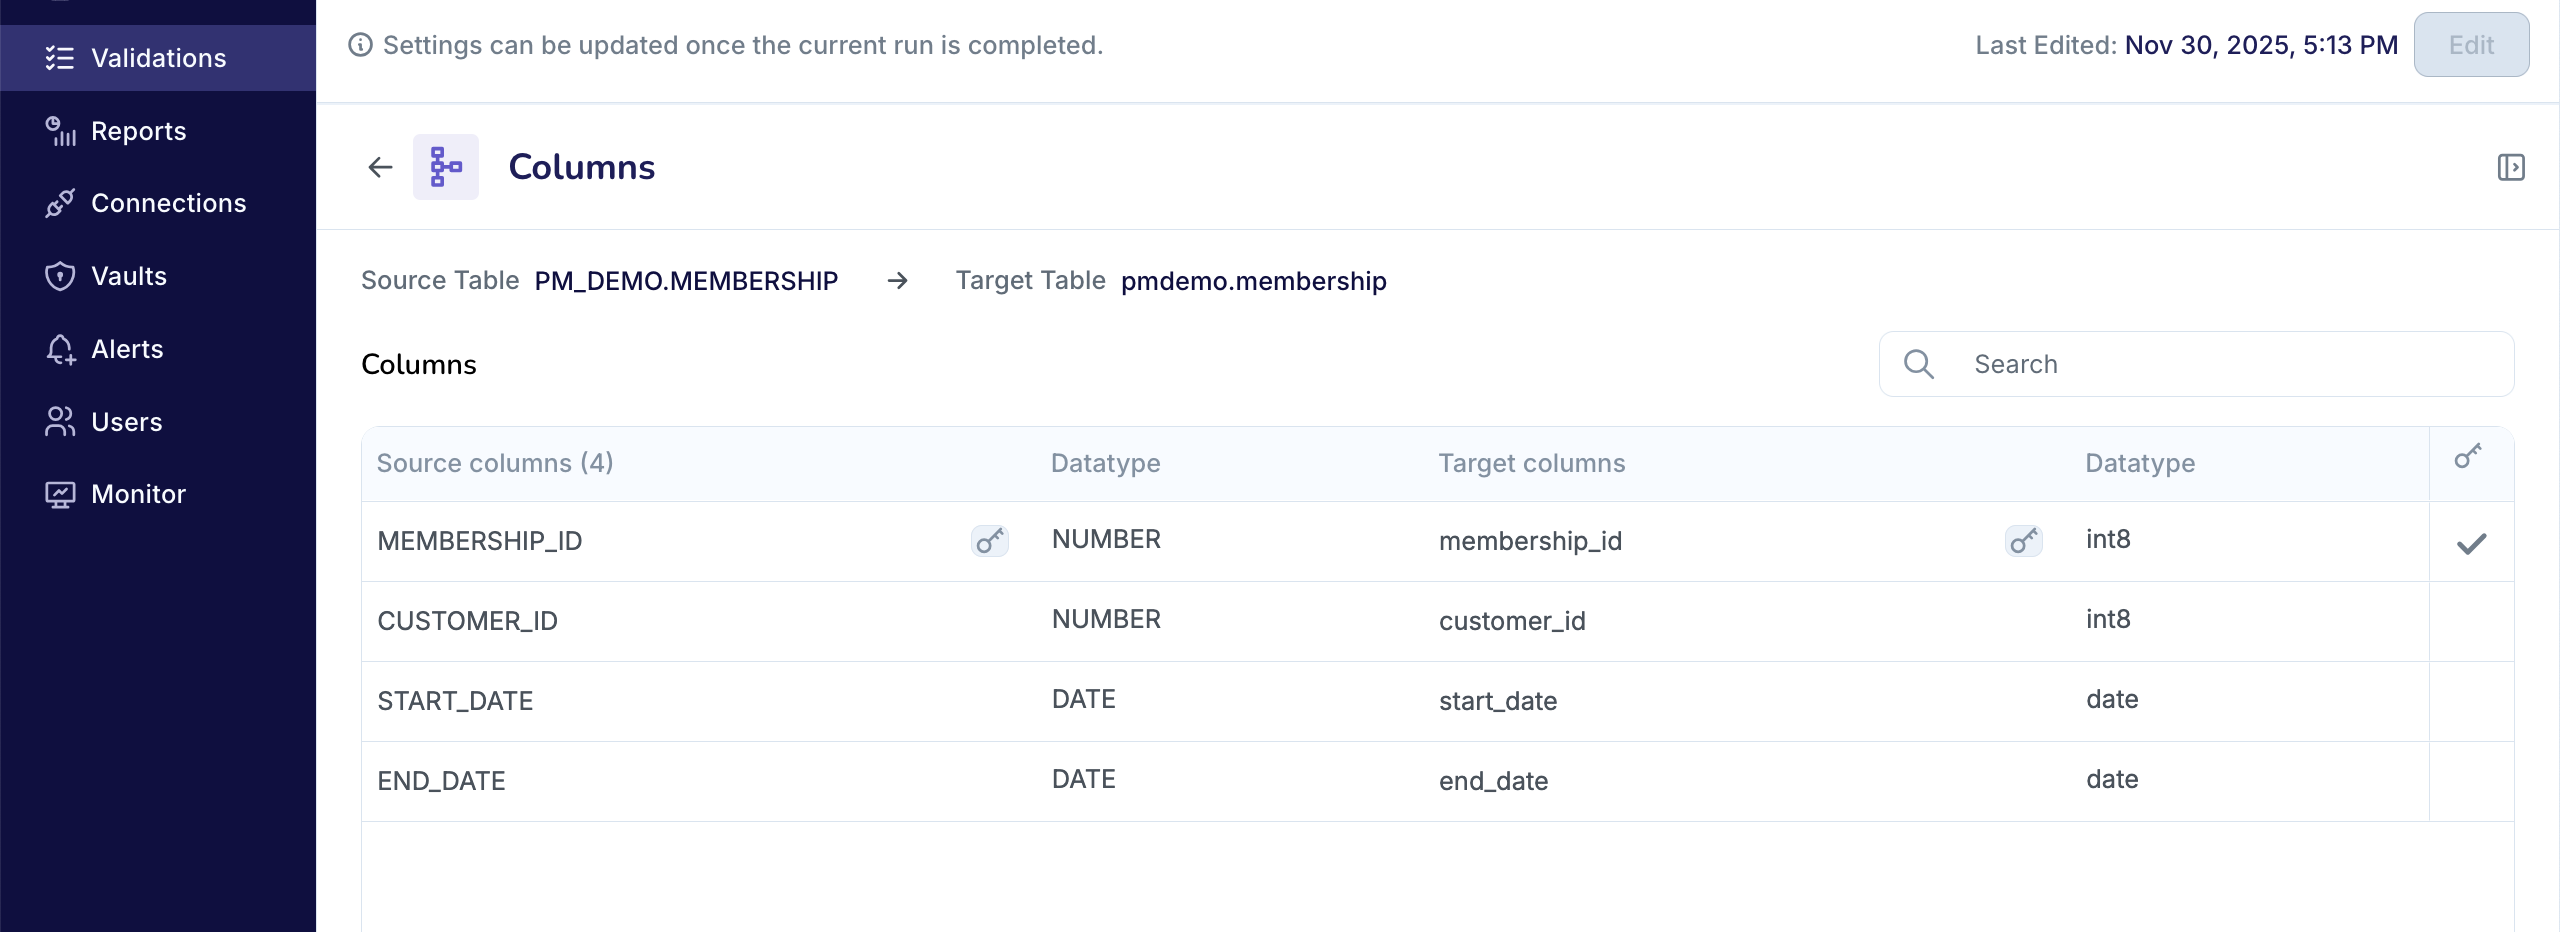
In the example shown, four column pairs are selected for validation in the Validation Pair:
PM_DEMO.MEMBERSHIP → pmdemo.membership.When the Validation is not running, you can edit the Validation configuration and the Validation Pair (see first screenshot below). In edit mode, you can see all column pairs in the Pair—both selected and unselected (see second screenshot below).
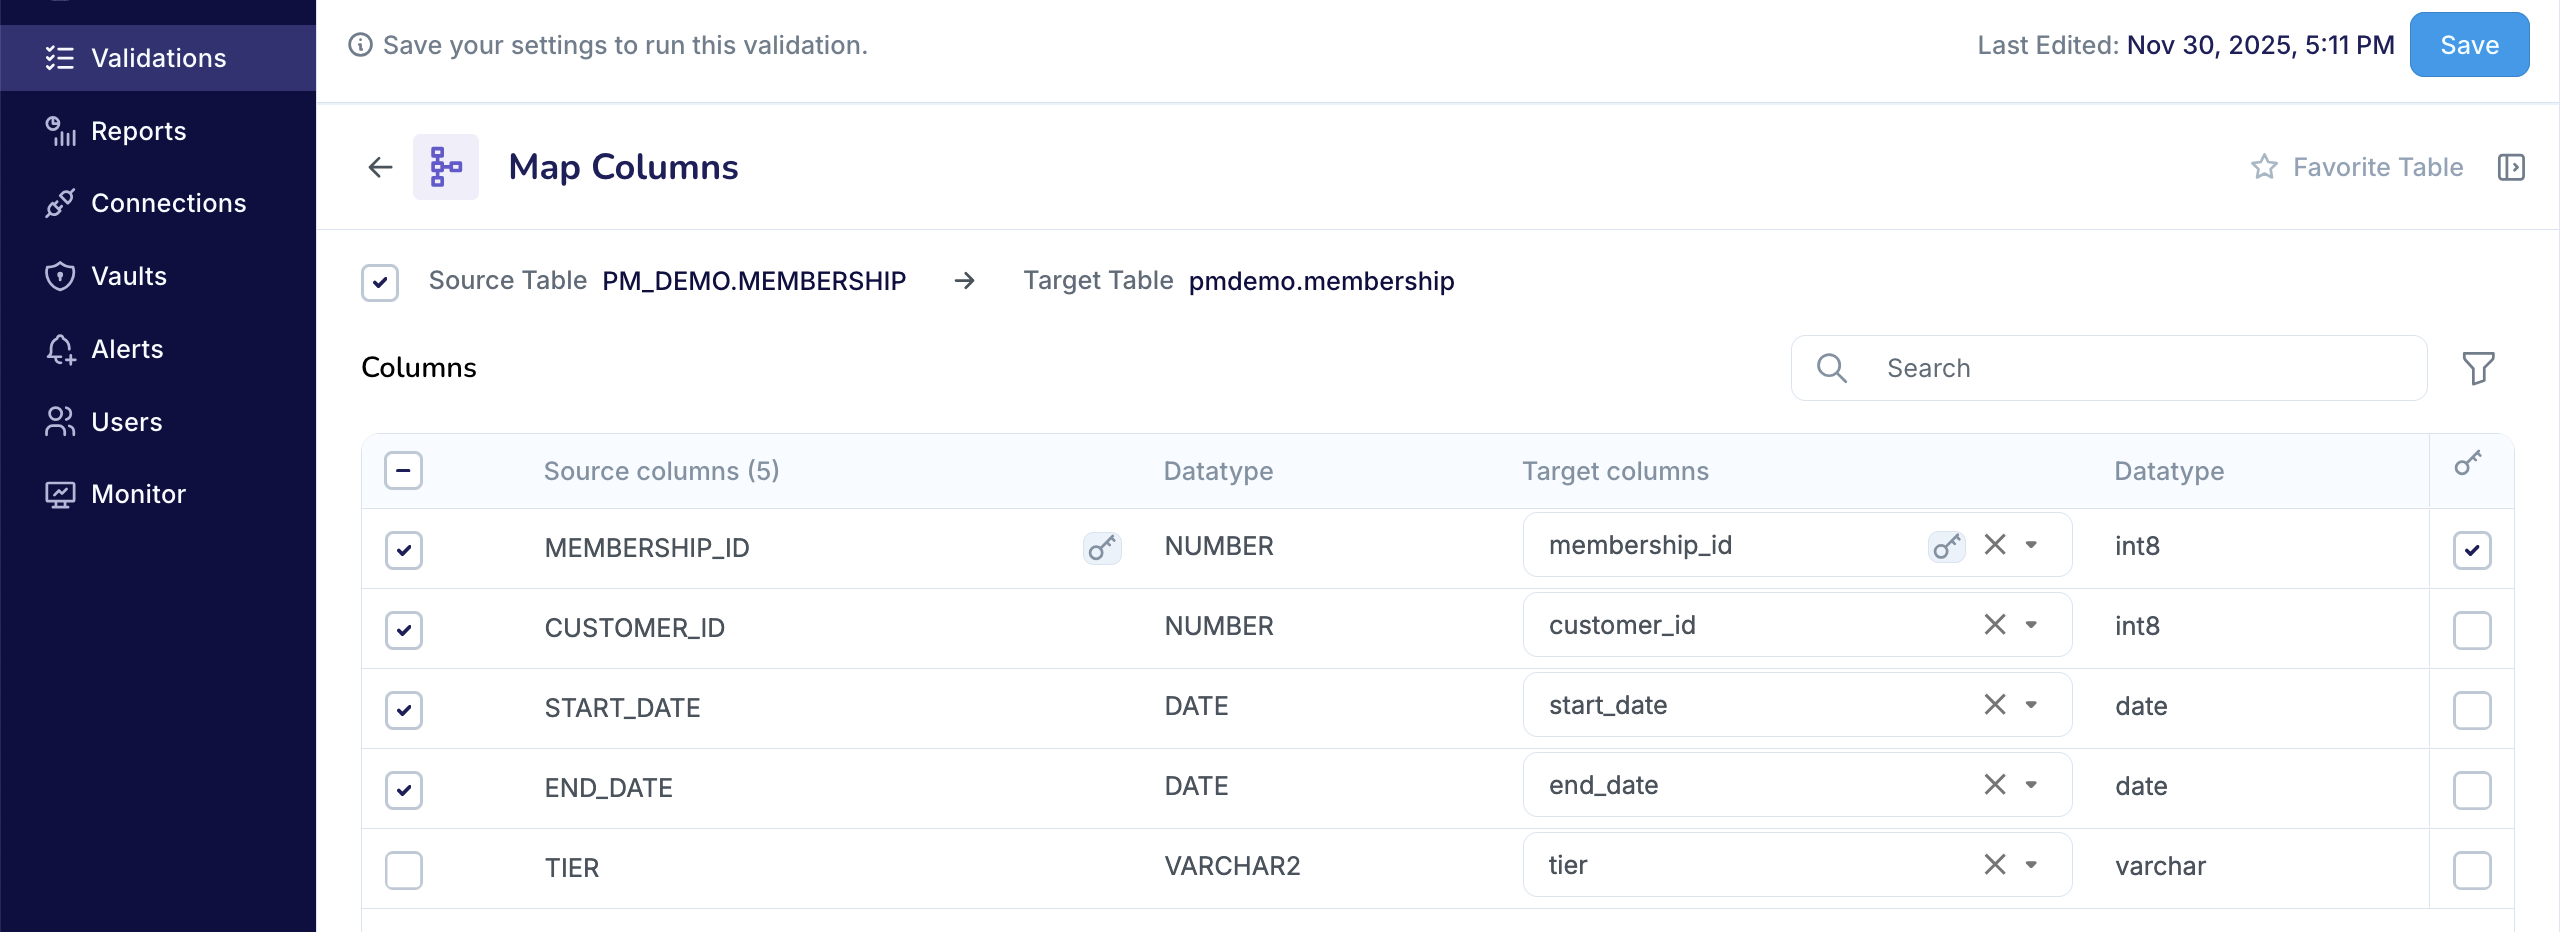
In the example shown, the Validation Pair
PM_DEMO.MEMBERSHIP → pmdemo.membershipcontains five column pairs: four selected for comparison and one unselected.
Modifying a Validation Pair
Validata automaps columns when a Validation Pair is created and assigns a comparison key where possible.
In the example:
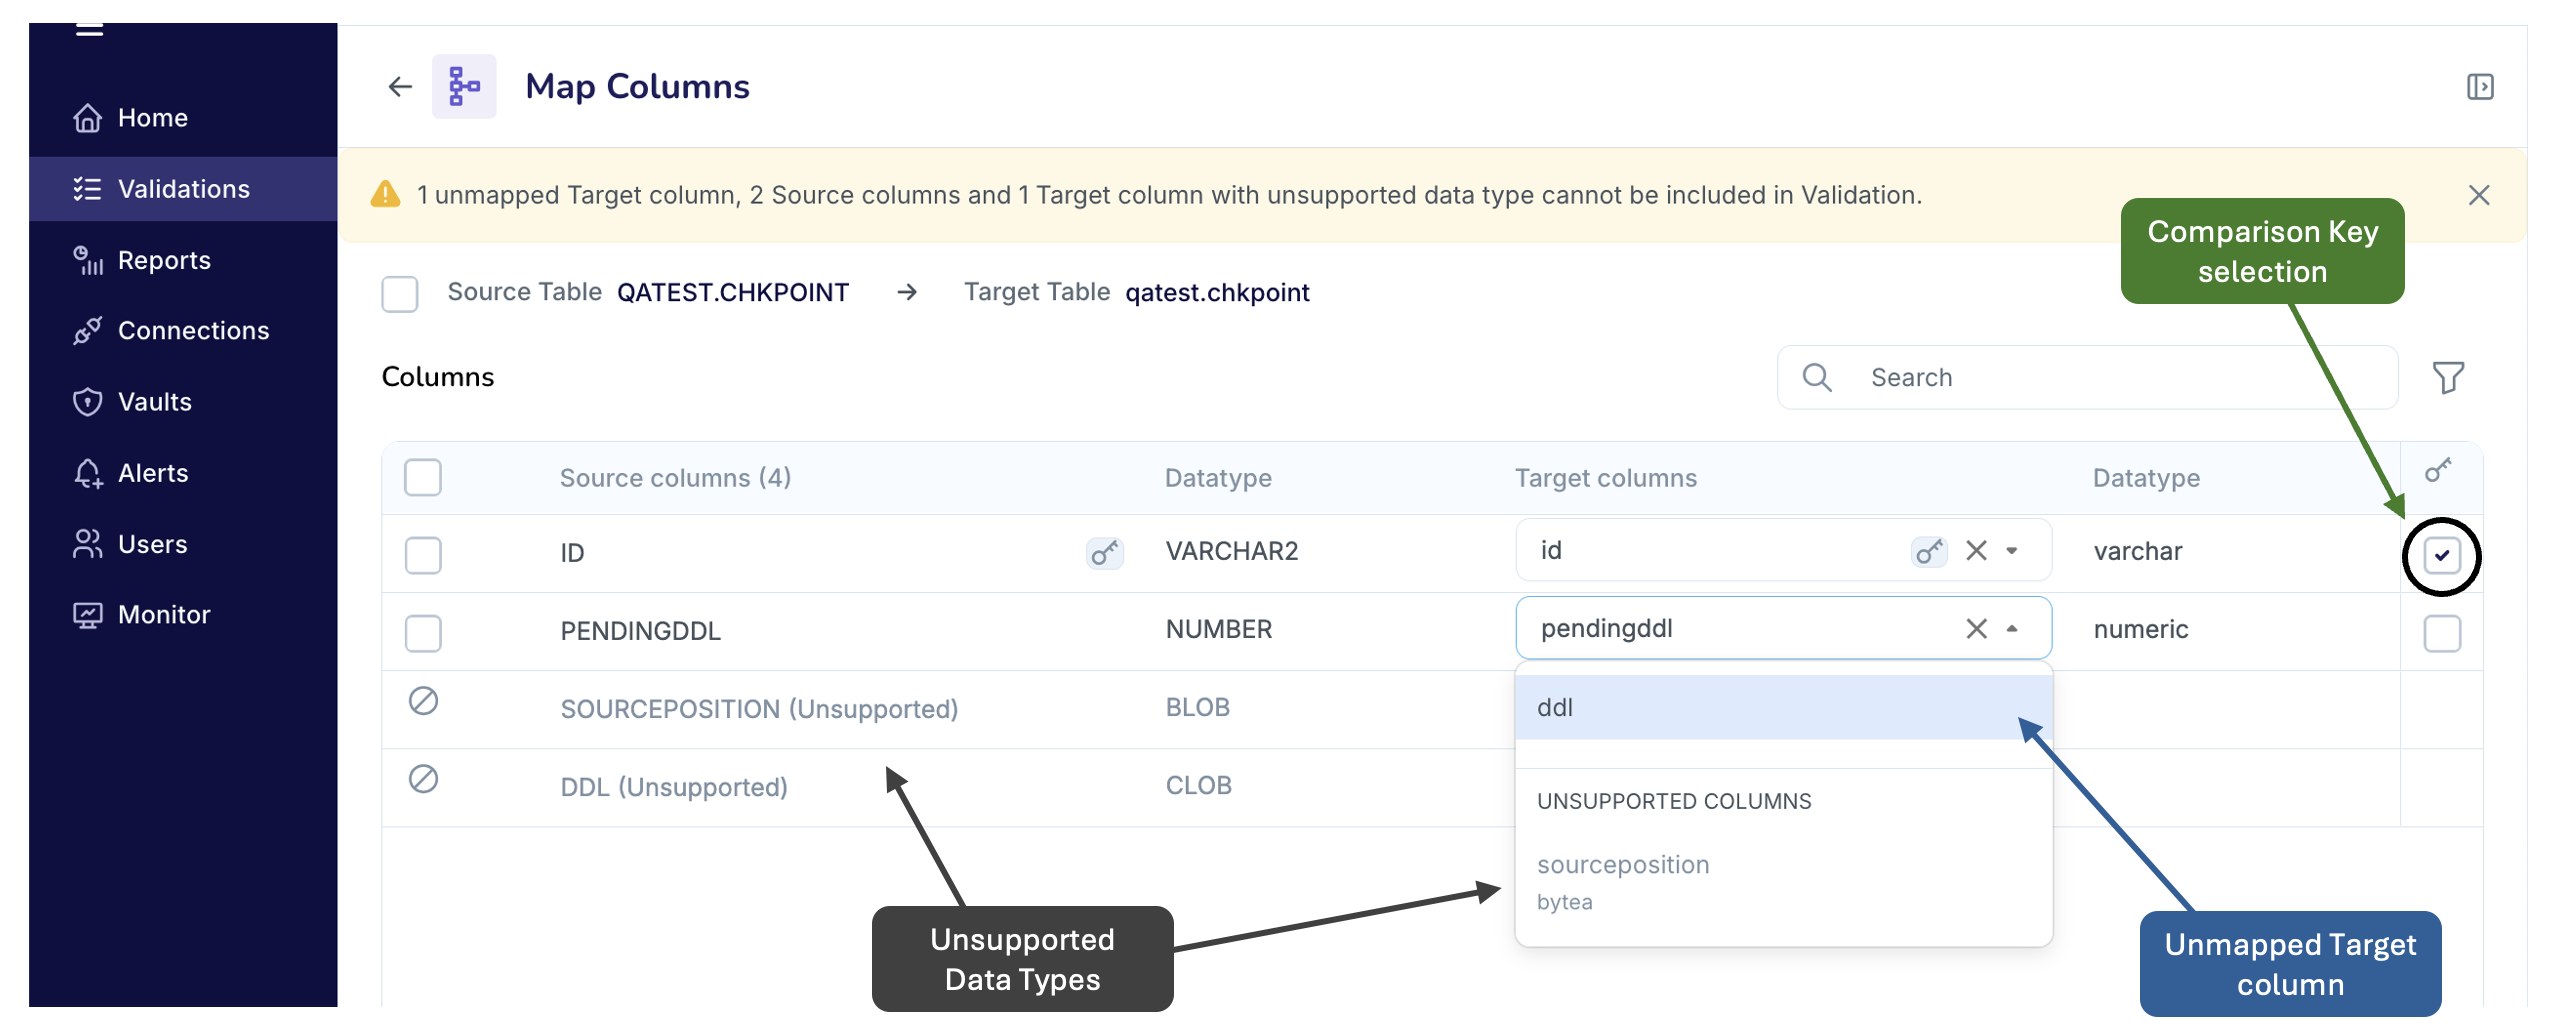
Validata mapped two Source columns—
IDandPENDINGDDL—to corresponding Target columns.Validata mapped
ID → idbecause it determined they represent the same logical key. Since both are recognized as key columns in their respective data systems, Validata marked this pair as the comparison key.Validata could not map the ddl column in the Target table to any Source column. Unmapped columns are excluded from validation. Validata lists unmapped Source columns directly, and unmapped Target columns are available through the drop-down. It also flags unmapped columns on both the Manage Validation Pairs and the Map Columns pages.
Validata detected three columns—two in the Source and one in the Target—with unsupported data types. Columns with unsupported types cannot be used for comparison.
Managing columns
You can revise column mappings and select or clear column pairs for validation at any time.
To change a mapping, adjust the Target column. Remove the current Target column using the drop-down, then map the Source column to the new Target column.
For example, to map
PENDINGDDL(Source) toddl(Target), first removependingddlfrom the existing mapping, then pairPENDINGDDL → ddl.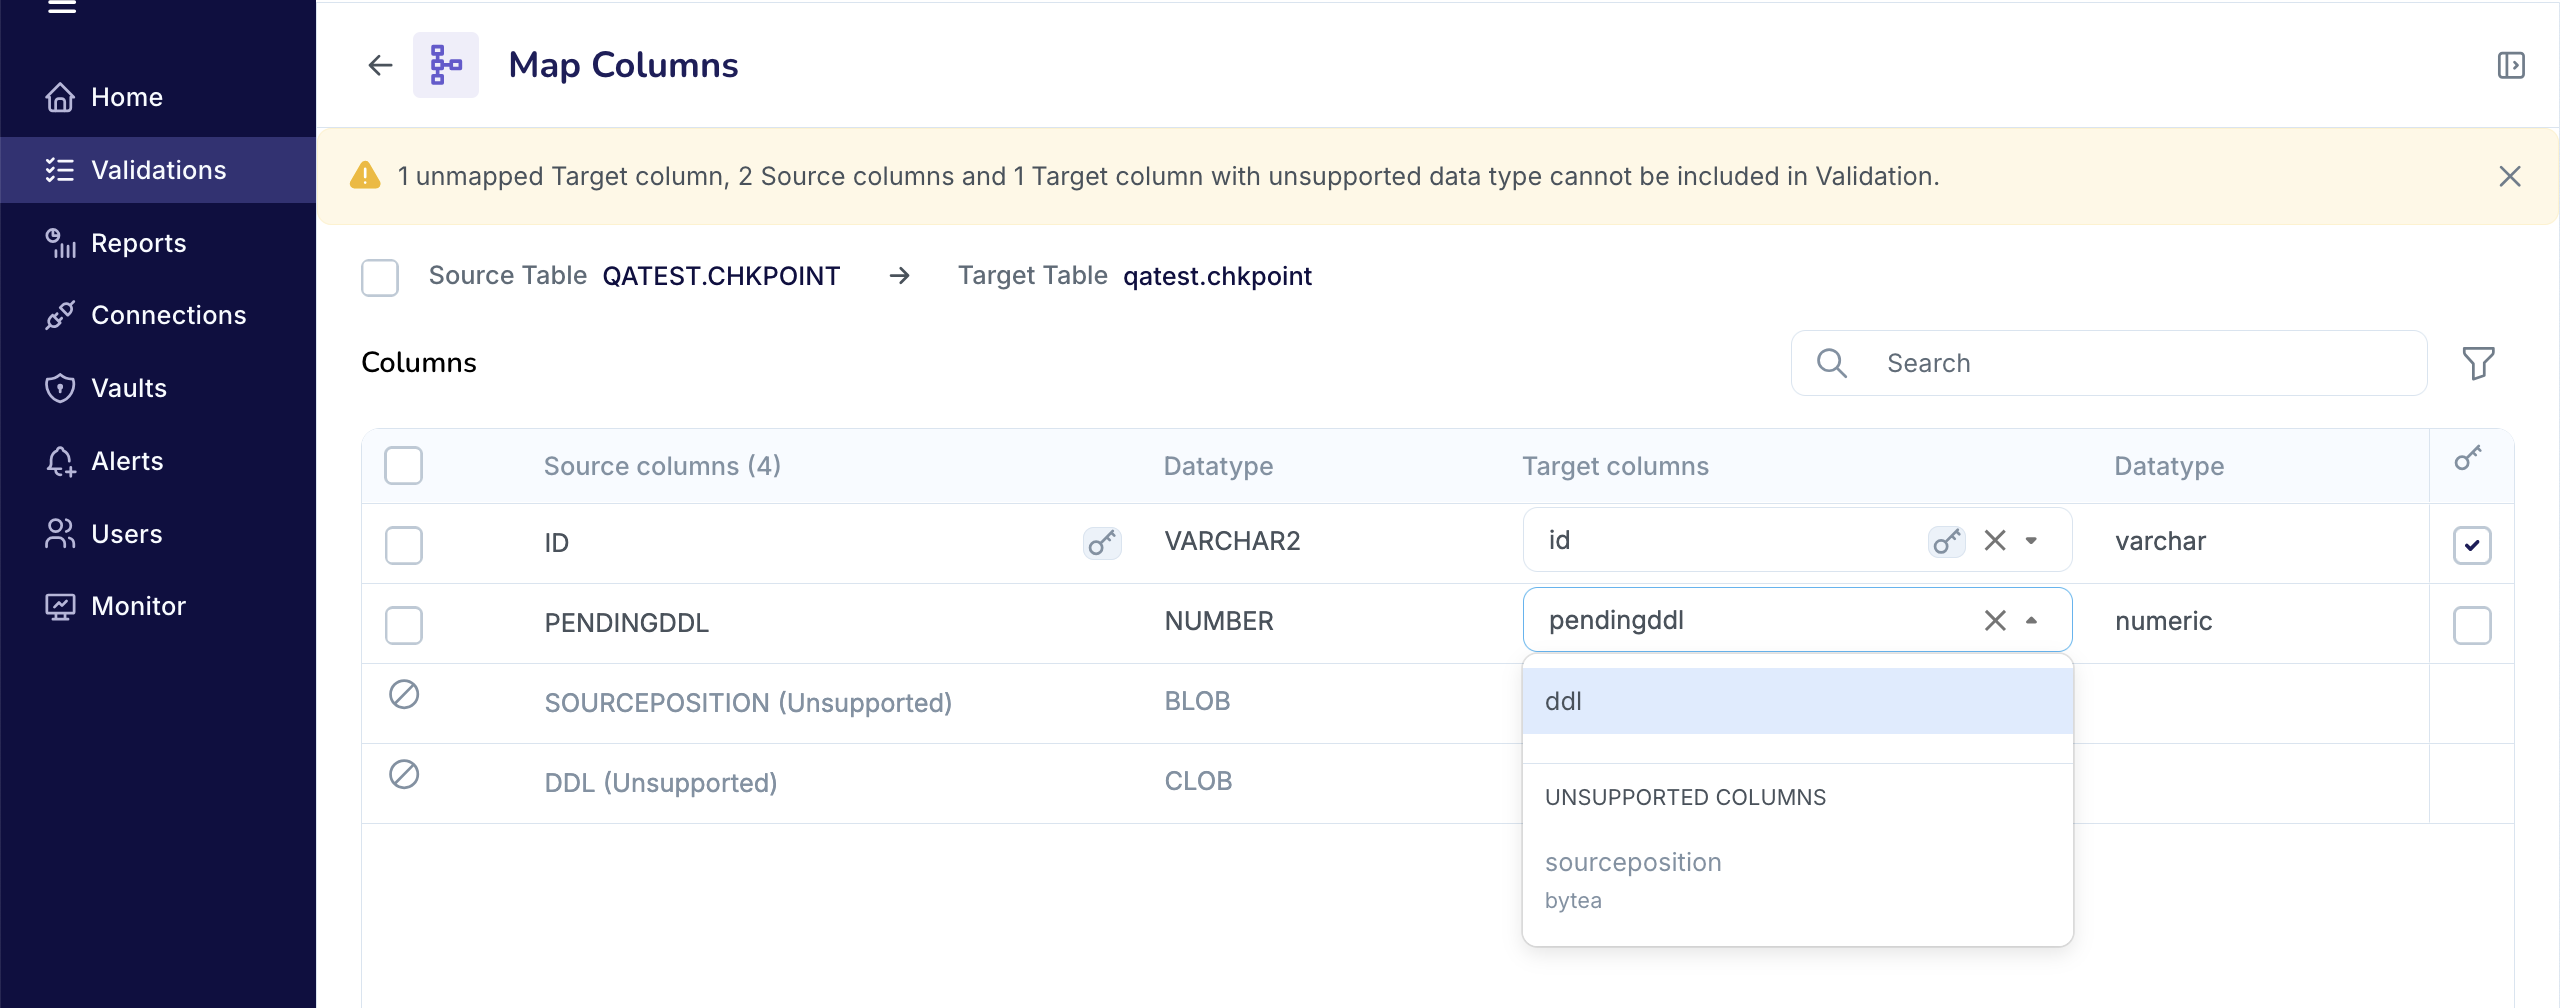
Each Source column can map to only one Target column. If the Target column you want is already mapped, you must first remove it from its current mapping before creating the new column pair.
For example, to map
ENTITY_TYPE(Source) toentity_type(Target), you must first unmapentity_idfromENTITY_ID → entity_id, then mapENTITY_TYPE → entity_type.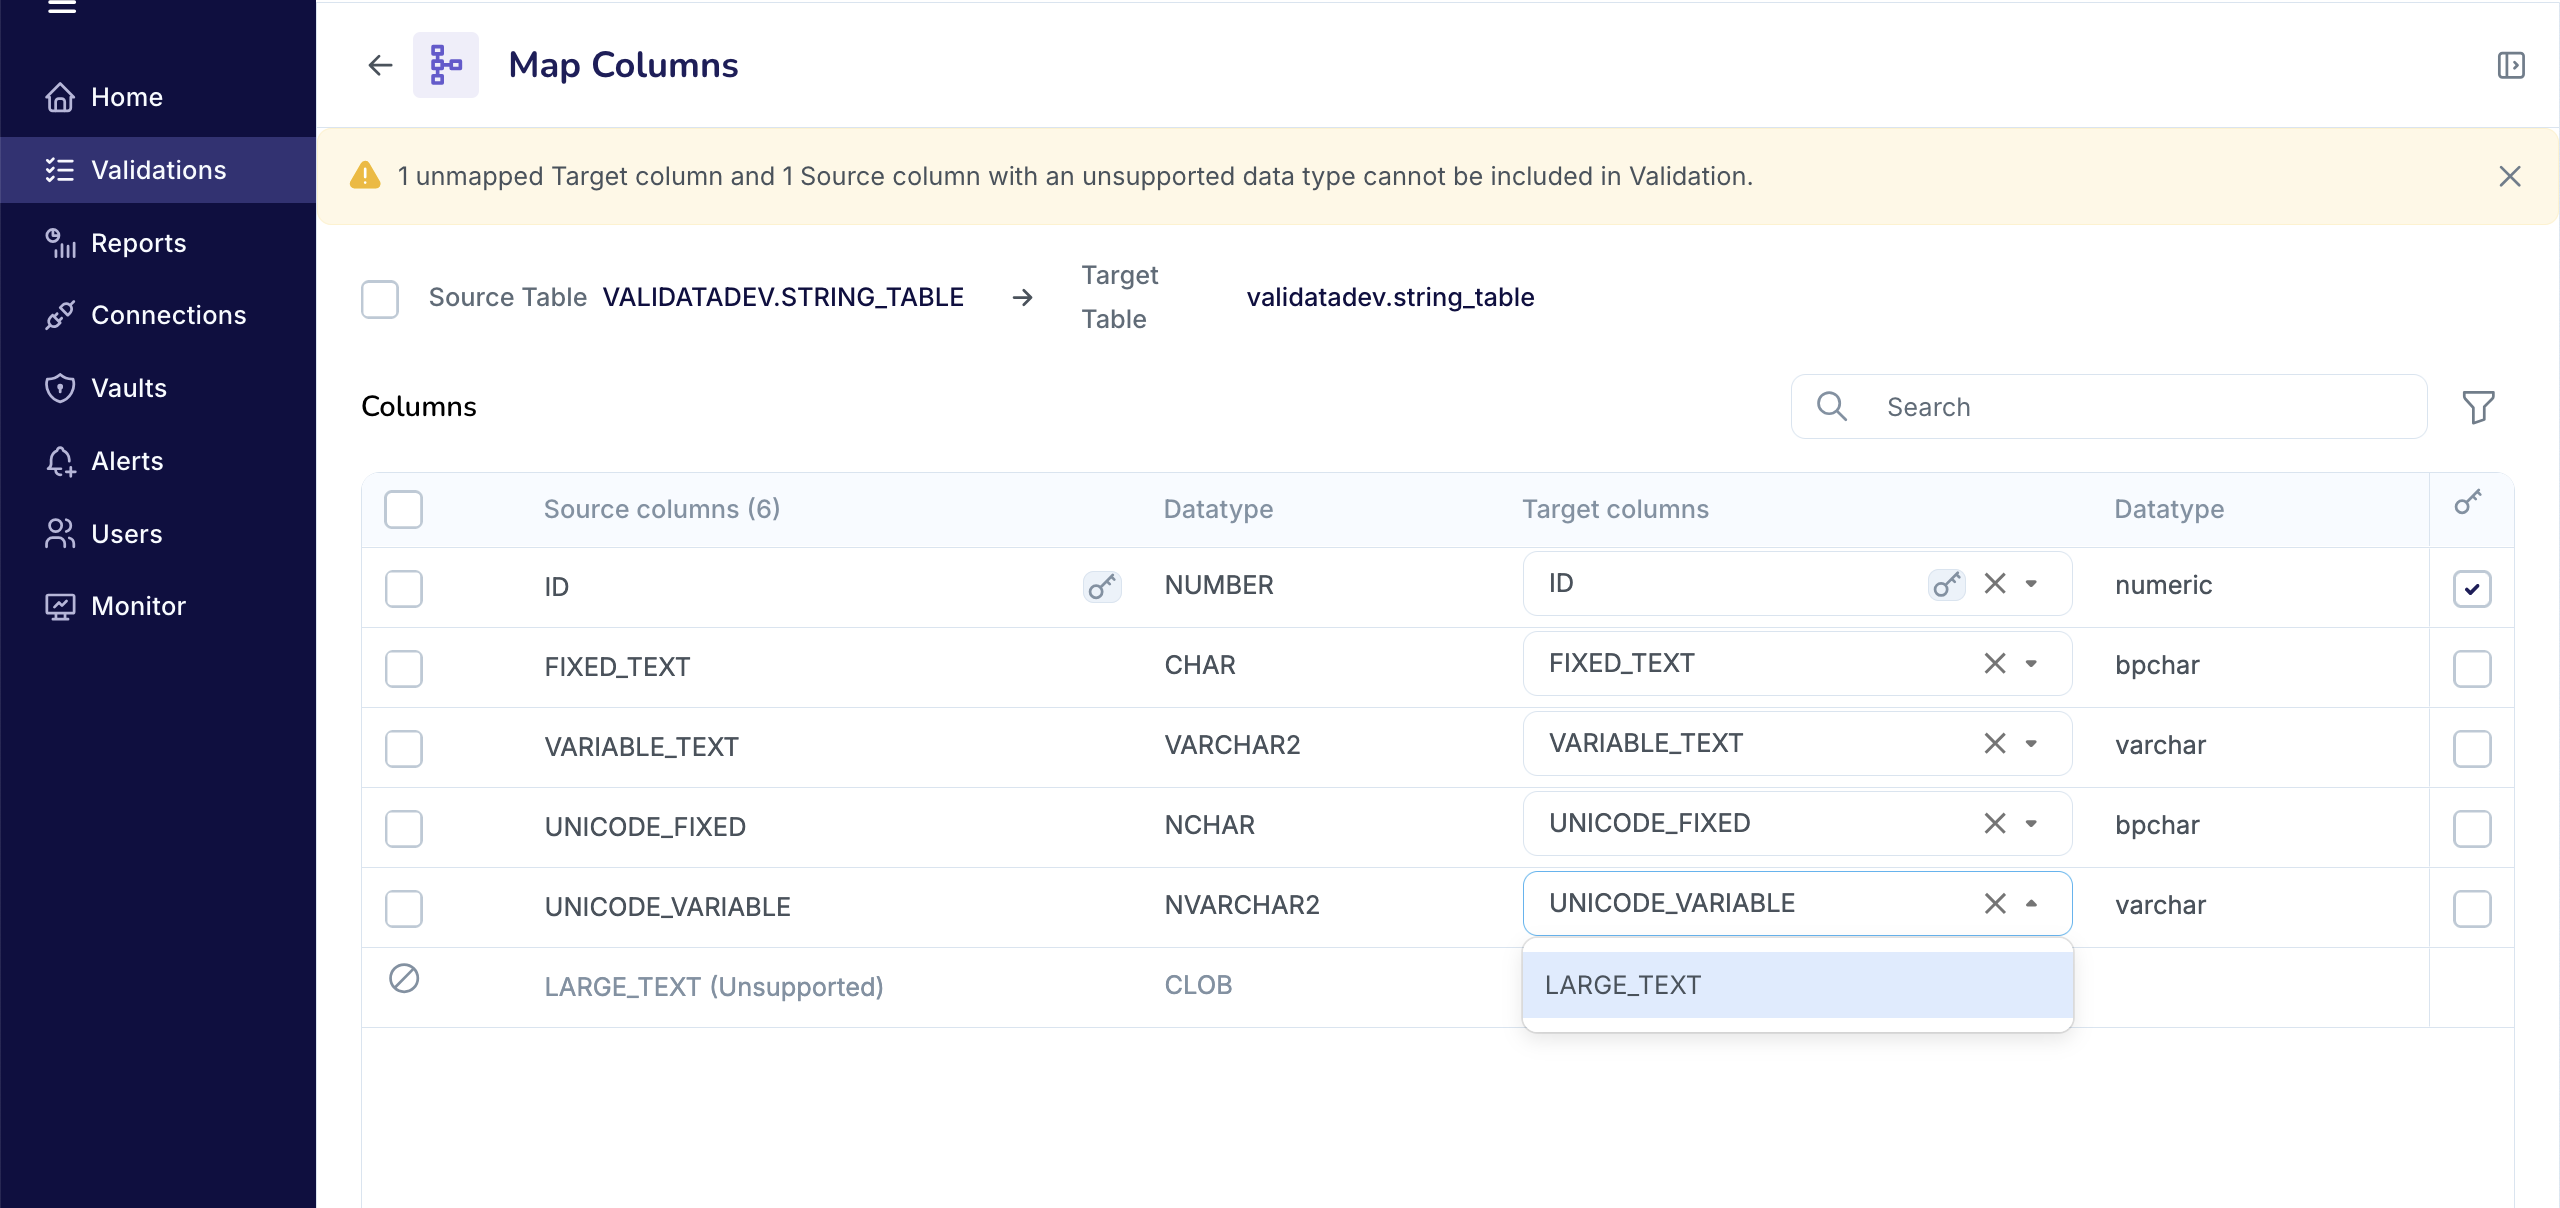
You can include or exclude any mapped column pair from validation by checking or unchecking the box on the left.
Managing the comparison key
You can designate a comparison key by selecting the key-column checkbox at the far right of the Map Columns page.
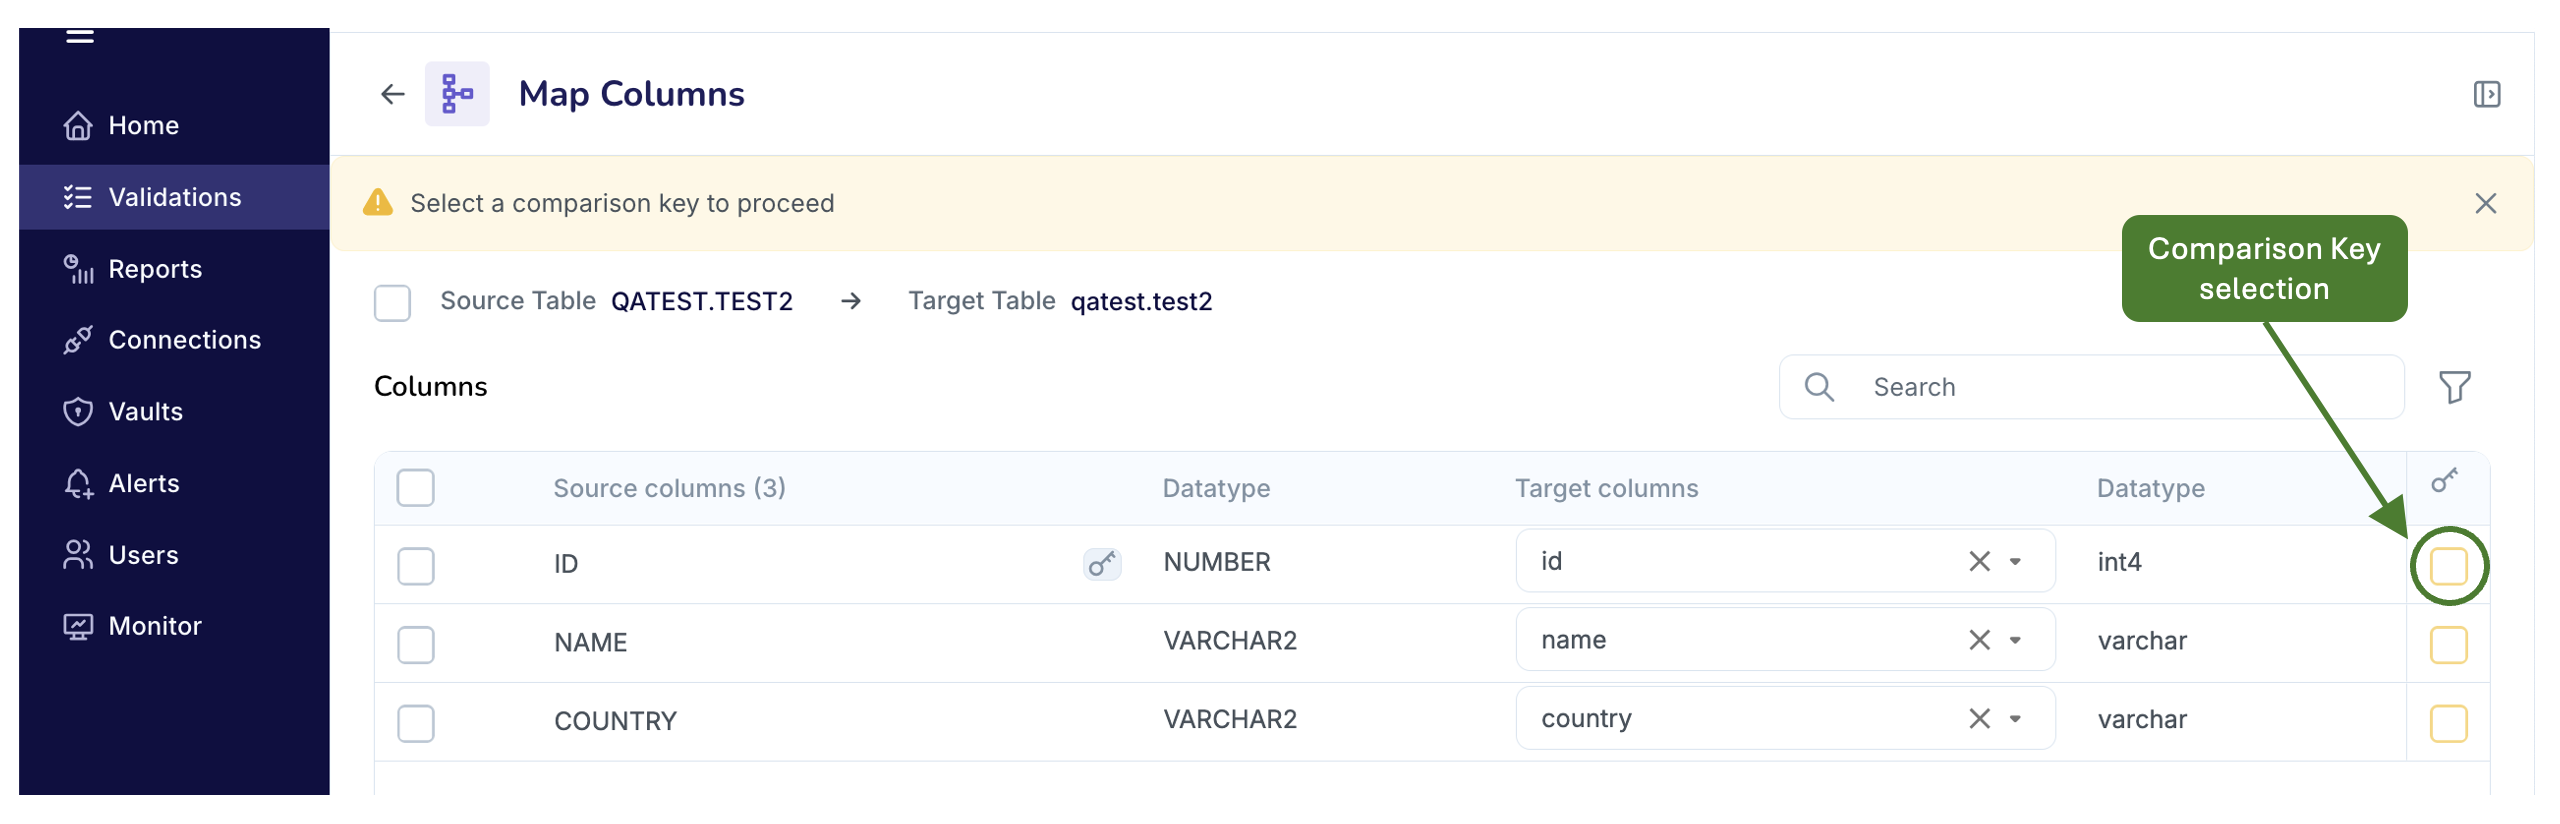
Validata automatically assigns a comparison key only when both the Source and Target columns are recognized as key columns by their respective systems.
As an example, data warehouses such as Snowflake and BigQuery do not enforce key constraints (like Primary Keys or Foreign Keys) in the same mandatory, transactional manner as relational databases like Oracle or PostgreSQL. This situation is illustrated in the screenshot below where the Source system recognizes
IDas a key, but the Target warehouse does not markidas a key. Consequently, while Validata maps ID toid, it refrains from automatically designating this column pair as the comparison key.If you want this pair to serve as the key, you must select the key-column checkbox manually.
Configuring Validation Pair for Interval Validation
A Validation Pair is eligible for Interval Validation only if both the Source and Target tables contain a
datetimeortimestampcolumn.You can select one
datetimeortimestampcolumn pair to serve as the time-filter for Interval Validation.In the example below, Validata uses
TS_LAST_MONTH → ts_last_monthto determine which records fall within the defined time window.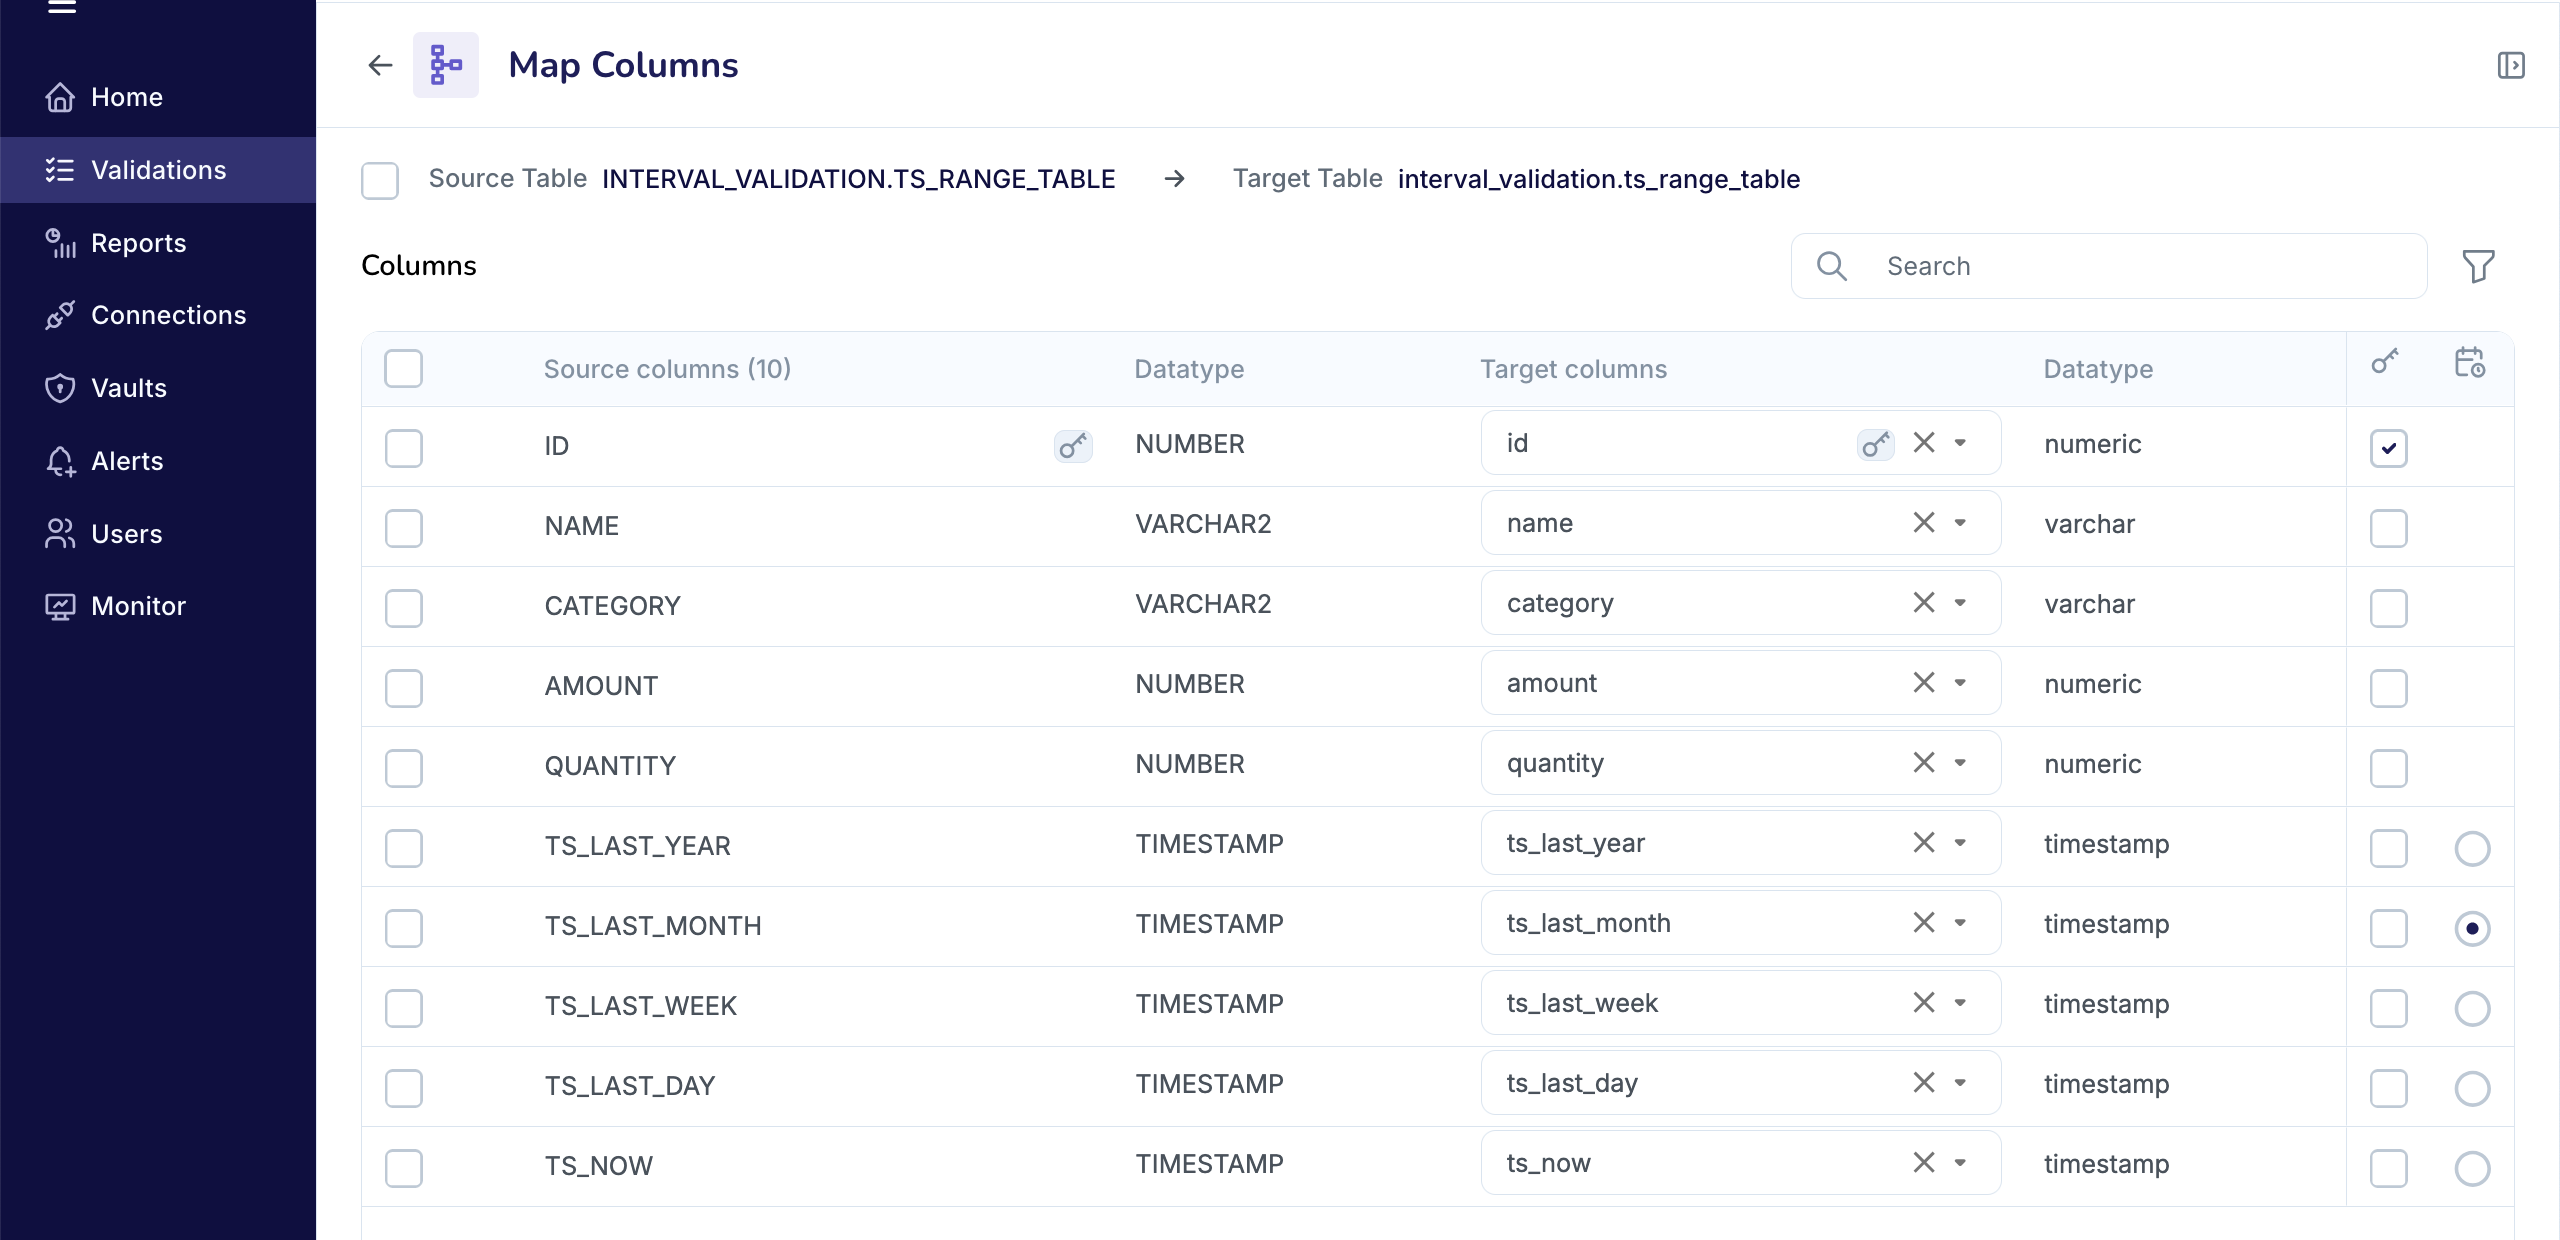
We recommend not using the
timestampordatetimecolumn as a comparison key because these values are often non-unique.We also recommend that you do not select
timestampordatetimecolumns for comparison if they include time offsets, as these will reliably produceOUT-OF-SYNCresults even when the underlying records match.
Configuring Validation Pair for Key Validation
When you mark a column pair for use as a comparison key, Validata uses that pair to match records between the Source and Target tables.
In the example below, you selected
MEMBERSHIP_ID → membership_idandCustomer_ID → customer_idas a composite comparison key. A record is consideredIN-SYNConly when both values in the Source row match the corresponding values in the Target row for these two column pairs.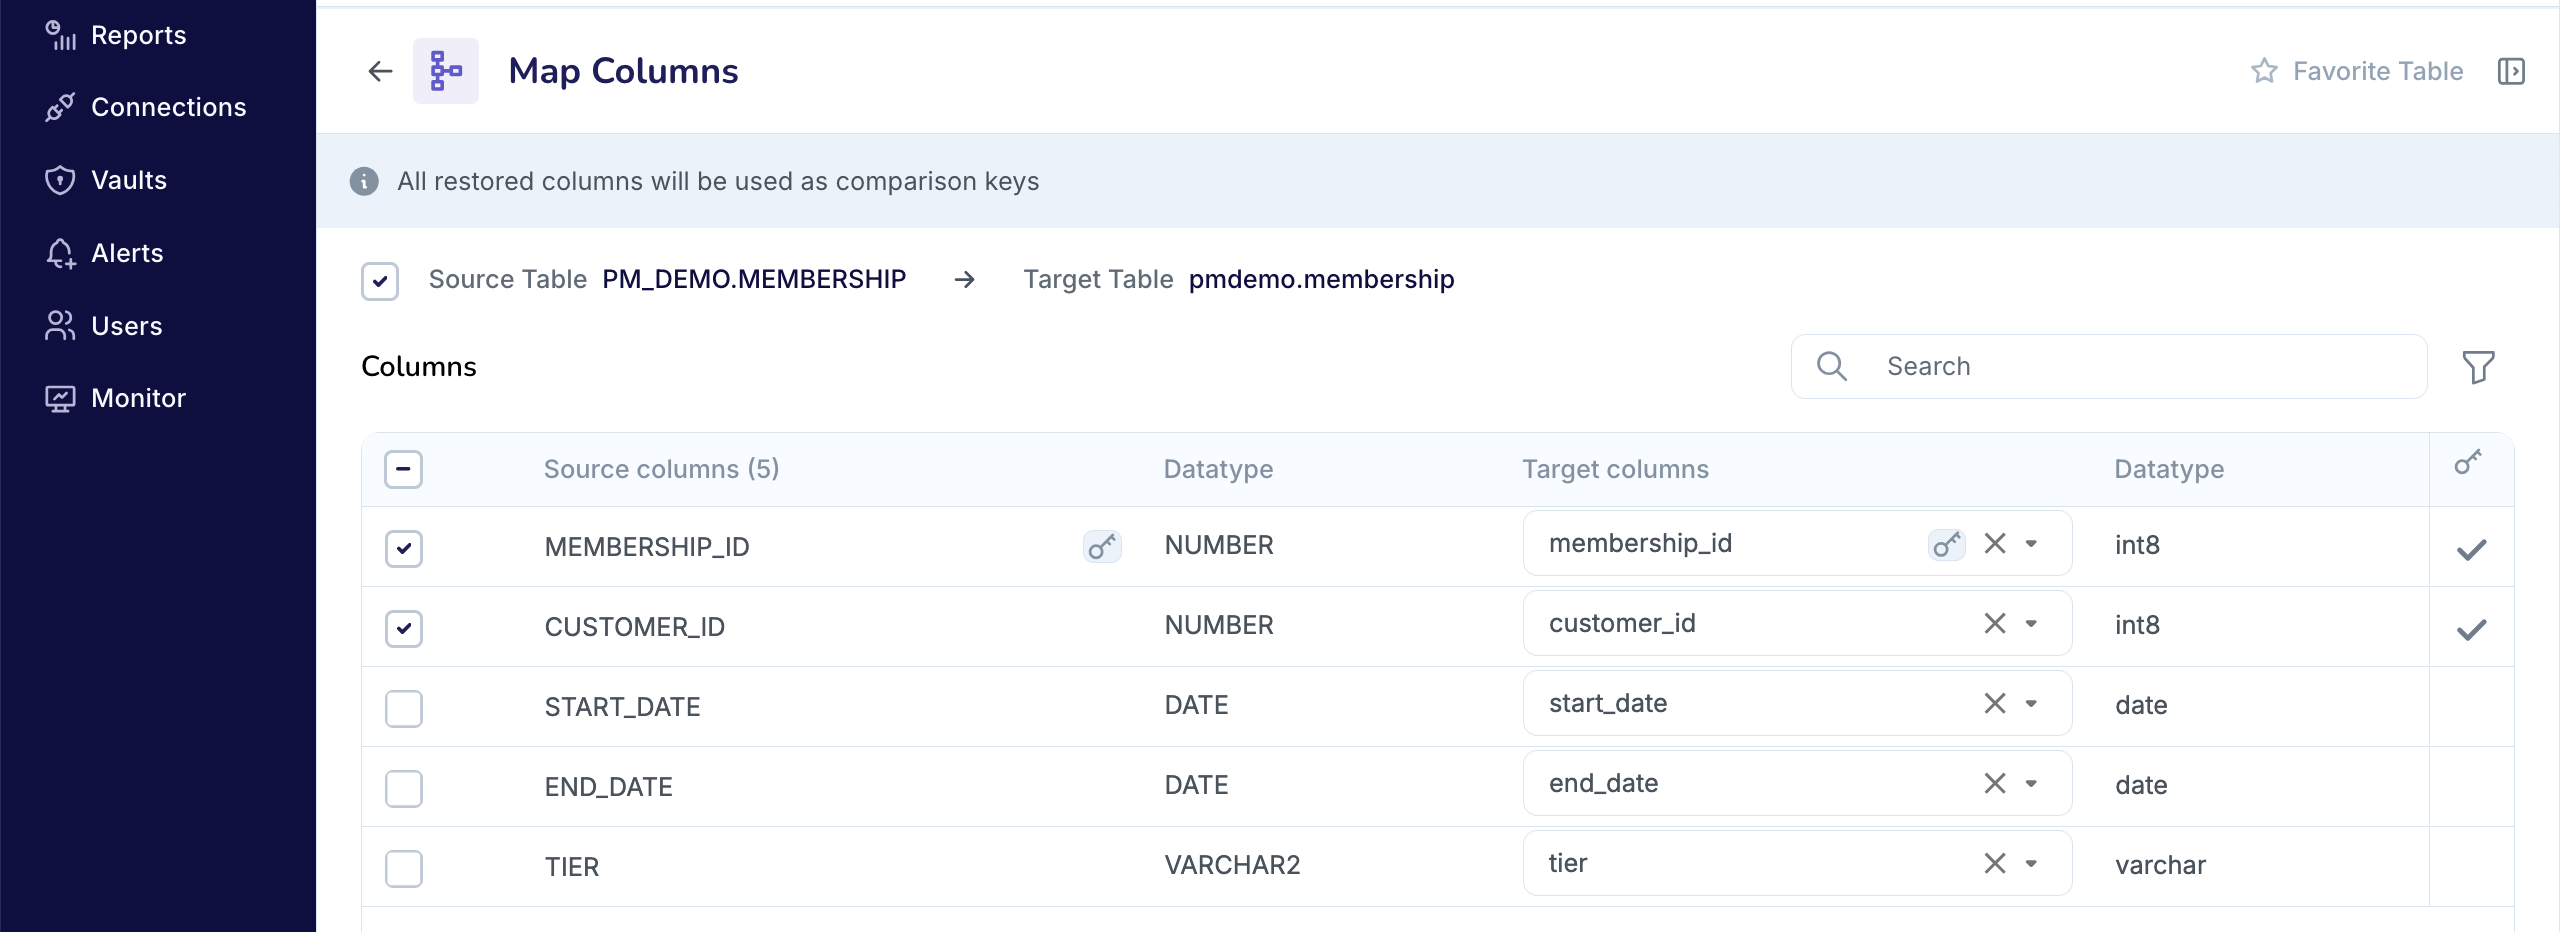
Operational considerations
If the Source or Target tables include a primary key, we strongly recommend using it as the Comparison Key, as it provides the most accurate and performant way to match records.
Validata alerts you to unresolved issues, such as unmapped tables or unsupported column types. See the icons placed against individual Validation Pairs on the Manage Validation Pairs page.
If the selected table or its structure violates the rules of the chosen Validation Type, Validata shows a clear error message instructing you to revise the selection.
Favorite Table Pairs
To streamline repetitive validations, you may mark table pairs as Favorites using the icon. Favorite pairs appear prominently in UI workflows and reports to simplify future access.
Saving the Validation
Once all configuration steps are complete—including schema selection, table mapping, and column mapping—click Save to finalize the Validation. Validata stores all selected Validation Pairs and applies these mappings during future Validation Runs.
You can launch a Validation Run after you have saved the Validation.