Automating the Google Private Service Connect integration
Striim provides a Terraform automation to set up private connectivity for on-premises and cross-cloud databases through your GCP project. The automation is available in the GitHub repository at https://github.com/striim/gcp-psc-resource-setup-terraform.
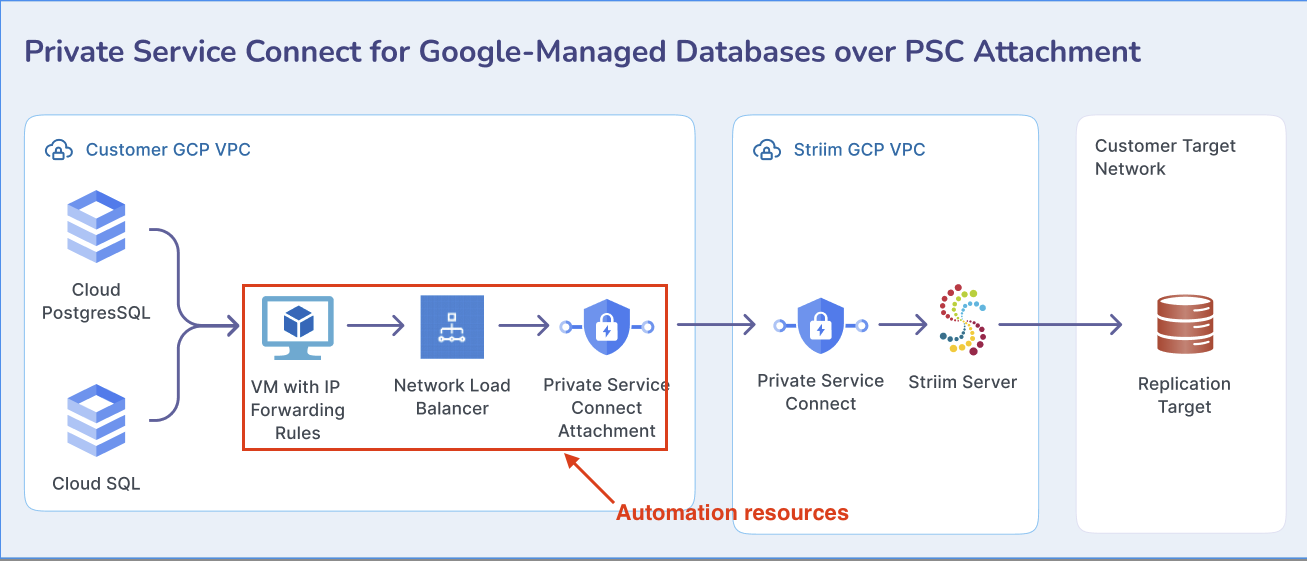
This automation deploys a producer-side PSC service backed by an Internal TCP Load Balancer and a forwarding VM (Linux or Windows) that NAT-forwards traffic to private database targets. It's intended for scenarios where Striim Cloud connects privately to customer-managed databases via PSC.
What this module creates
The Terraform module provisions the required GCP infrastructure:
Compute VM with IP forwarding enabled.
Linux (iptables DNAT/SNAT) or Windows (netsh portproxy).
Optional public NAT IP for admin access (SSH/RDP) restricted to your IP.
Firewall rules for admin access and health checks.
Internal TCP Load Balancer (ILB) targeting the VM NIC.
PSC Service Attachment on the ILB.
Optional auto-accept for a whitelist of consumer projects.
Health check using the first port from ip_forwarding_targets.
Note
The VM config script runs at creation time only. Adjusting forwarding rules later requires reprovisioning the VM or manually editing rules on the VM.
Prerequisites
GCP project with billing enabled.
APIs:
compute.googleapis.com
servicenetworking.googleapis.com
Network:
Existing VPC + subnet for the VM.
Pre-created PSC NAT subnet in the same region (for service attachment).
Permissions (typical minimum for the deployer SA/user):
roles/compute.admin (or a combination of instanceAdmin.v1, networkAdmin, loadBalancerAdmin, securityAdmin).
Admin access:
For Linux: SSH public key.
For Windows: allowlist your public IP for RDP.
Ensure the VM has network reachability (routes/VPN/Interconnect/firewalls) to each ip_forwarding_targets[*].ip.
Variables (inputs)
Variable | Description | Example |
|---|---|---|
project_id | Your GCP project ID | "acme-prod123" |
region | GCP region | "us-central1" |
zone | GCP zone | "us-central1-a" |
vpc_name | Existing VPC name | "vpc-main" |
subnet_name | Existing subnet name | "subnet-apps-a" |
psc_nat_subnet_name | Existing PSC NAT subnet name | "subnet-psc-nat-a" |
admin_public_ip | CIDR for SSH/RDP allow | "203.0.113.XX/32" |
base_name | Resource name prefix | "striim-int" |
admin_username | VM admin username | "gcpuser" |
ssh_public_key_path | Path to public SSH key (Linux only) | "~/.ssh/id_rsa.pub" |
vm_size | Machine type | "e2-standard-2" |
vm_os_type | "linux" or "windows" | "windows" |
vm_image | Image self-link or family/image | "windows-cloud/windows-server-2025-dc-v20250515" |
enable_nat_ip | Public IP for admin access | true |
psc_consumer_projects | Project IDs auto-accepted for PSC | ["consumer-proj-1","consumer-proj-2"] |
ip_forwarding_targets | List of { ip, port } to forward | [{ip="192.168.0.1",port=1433}, ...] |
Example configuration file
Create a file named pass_values.tfvars with your configuration:
project_id = "acme-prod-123"
region = "us-central1"
zone = "us-central1-a"

vpc_name = "vpc-main"
subnet_name = "subnet-apps-a"
psc_nat_subnet_name = "subnet-psc-nat-a"

admin_public_ip = "203.0.113.10/32"
base_name = "striim-int"
admin_username = "gcpuser"
ssh_public_key_path = "~/.ssh/id_rsa.pub"

vm_size = "e2-standard-2"

# Choose ONE OS path
# vm_os_type = "linux"
# vm_image = "ubuntu-os-cloud/ubuntu-2004-focal-v20240808"

vm_os_type = "windows"
vm_image = "windows-cloud/windows-server-2025-dc-v20250515"

enable_nat_ip = true

psc_consumer_projects = [
  "consumer-proj-1",
  "consumer-proj-2"
]

ip_forwarding_targets = [
  { ip = "192.168.0.1", port = 1433 },
  { ip = "192.168.0.2", port = 1435 },
  { ip = "192.168.0.3", port = 1438 },
  { ip = "192.168.0.4", port = 1440 }
]
Deploy the infrastructure
Clone the Striim GCP PSC Terraform repository and deploy the infrastructure using the following commands:
Clone the repository:
git clone https://github.com/striim/gcp-psc-resource-setup-terraform.git
cd gcp-psc-resource-setup-terraform
Initialize Terraform:
terraform init
Plan the deployment:
terraform plan -var-file="pass_values.tfvars"
Apply the configuration:
terraform apply -var-file="pass_values.tfvars" -auto-approve
The deployment outputs the following values:
vm_name
vm_public_ip (if enable_nat_ip = true)
internal_load_balancer_name
psc_service_attachment_url
ssh_key_info
Validate the deployment
After deploying the infrastructure, verify that all components are functioning correctly.
VM and forwarding
Linux:
ssh -i ~/.ssh/<key> <admin_username>@<vm_public_ip>
sudo iptables -t nat -nvL
Windows (RDP):
netsh interface portproxy show all
ILB and backend health
gcloud compute backend-services list --regions <region>
gcloud compute health-checks list
PSC service attachment
gcloud compute service-attachments list --regions <region>
gcloud compute service-attachments describe <psc-attachment-name> --region <region>
Confirm:
Attachment status is ACCEPTING or shows auto-accepted consumers.
Consumers in psc_consumer_projects can create PSC endpoints targeting the attachment.
Consumer onboarding (overview)
Once the producer-side infrastructure is deployed and validated, consumers can connect to the PSC service.
In the consumer project/VPC, create a PSC endpoint targeting the producer's service attachment URL (psc_service_attachment_url output).
If the consumer project is whitelisted in psc_consumer_projects, it's auto-accepted. Otherwise, approve the endpoint manually on the producer side.
Consumer receives a private IP; traffic to that IP is privately routed to your ILB → forwarding VM → target DB IP:port.
Operations
After deployment, you may need to perform operational tasks such as updating forwarding rules or accessing the VM for troubleshooting.
Update forwarding rules
To add/change ip_forwarding_targets, re-create the VM so startup config re-runs:
terraform destroy -target=google_compute_instance.<name> -var-file=pass_values.tfvars -auto-approve
terraform apply -var-file=pass_values.tfvars -auto-approve
(Or edit rules directly on the VM using the commands below.)
Admin access commands
Linux:
# Show rules
sudo iptables -t nat -nvL
# Add rule (example)
sudo iptables -t nat -A PREROUTING -p tcp --dport <SRC_PORT> -j DNAT --to-destination <DEST_IP>:<DST_PORT>
sudo iptables -t nat -A POSTROUTING -p tcp -d <DEST_IP> --dport <DST_PORT> -j SNAT --to-source $(hostname -i)
sudo iptables-save
Windows:
netsh interface portproxy show all
netsh interface portproxy add v4v4 listenport=<PORT> listenaddress=0.0.0.0 connectport=<PORT> connectaddress=<DEST_IP>
type C:\portproxy.log
Troubleshooting
If you encounter issues with the PSC deployment or connectivity, consult the following common problems and solutions.
- PSC endpoint can't connect
Verify consumer project is auto-accepted or manually approved.
Check firewalls from VM → target DB IPs/ports.
Confirm routes/VPN/Interconnect to target IPs.
- ILB unhealthy
Health check uses the first port in ip_forwarding_targets.
Ensure forwarding is listening on that port and responds.
- Admin access blocked
Confirm admin_public_ip CIDR matches your current IP.
If Linux, confirm SSH key was baked onto the instance.
Cleanup
To remove all resources created by the Terraform module:
terraform destroy -var-file="pass_values.tfvars" -auto-approve
Cost and security notes
All resources are billable: VM, disk, ILB, PSC, static IP (if reserved), egress.
Limit admin exposure: set enable_nat_ip = false for private-only, or tightly scope admin_public_ip.
Principle of least privilege for deployer/service accounts.
Disclaimer
This module is provided as-is for demonstration purposes. Striim Inc. is not responsible for infrastructure costs or operational consequences. You agree that Striim is not responsible for creating, deleting, or managing any GCP resources and is not liable for any associated costs in your Google account.