Using Azure private endpoints with self-managed services
Note
This topic applies only to Striim Cloud on Azure (Enterprise and Mission Critical).
Use cases supported
The following are the supported use cases for integrating Azure Private Link with self-managed services:
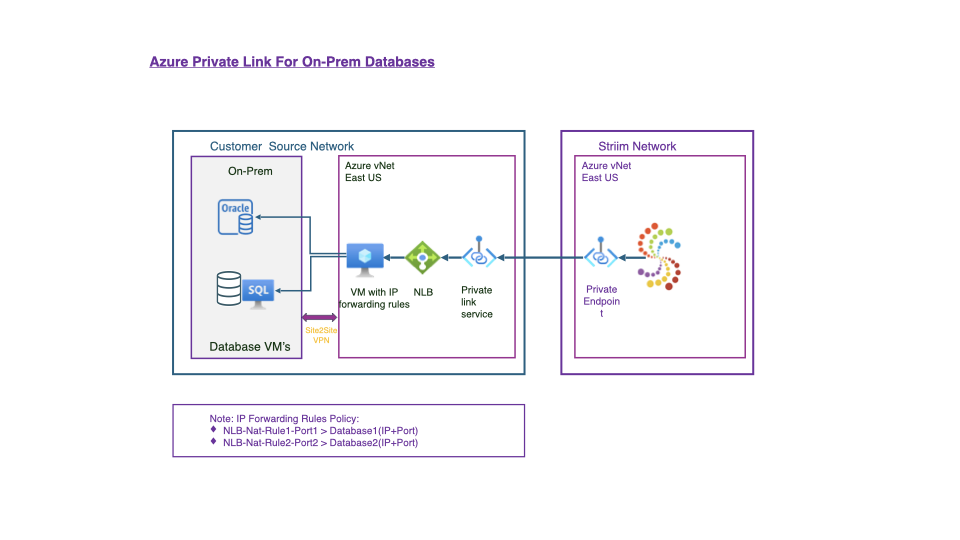
Connecting to on-premise sources and targets.
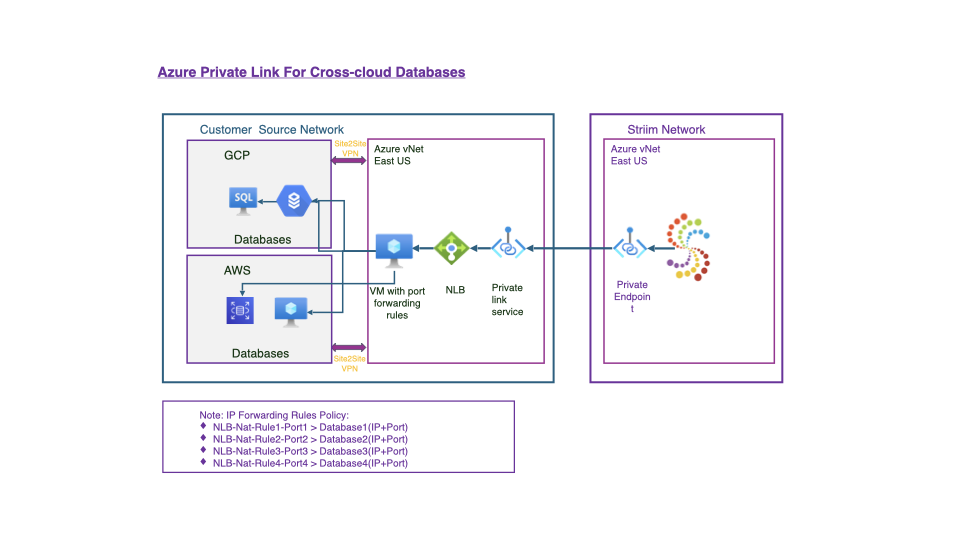
Connecting to sources and targets hosted on Amazon EC2 and Google Cloud VM.
Connecting to sources and targets hosted on an-Azure VM.

Connecting to sources and targets that are AWS and GCP managed services.
Required Azure services
The following Azure services are required to configure your Azure Private Link connection:
Azure Virtual Network (VNet): a foundational component of Azure networking, providing private, isolated network space for resources in Azure. It provides secure, flexible communication between Azure resources, on-premises environments, and the internet. See Create a virtual network.
A subnet with a CIDR (Classless Inter-Domain Routing) block with a prefix of /24 is recommended for Azure Virtual Networks (VNets) because it provides a good balance between scalability, resource allocation, and simplicity in subnetting. For more information on creating subnets with CIDR, see Understanding CIDR Notation when designing Azure Virtual Networks and Subnets.
Site-to-Site VPN: ensures that data transmitted between Azure and other networks is encrypted, private and secure, protecting sensitive information from unauthorized access and potential cyber threats that are prevalent over the public internet. See Create a Site-to-Site VPN.
An Azure Virtual Machine: handles inbound port forwarding and network address translation rules. You can configure the VM with forwarding rules to allow it to accept and process traffic destined for addresses other than its own, such as those assigned by the Private Link configuration. See Create a virtual machine and Configure IP forwarding rules in the VM.
Internal Load Balancer: to set up a Private Link Service, an Internal Load Balancer is essential. The load balancer distributes traffic to the downstream virtual machines (VMs). Additionally, Inbound NAT rules are used to forward specific traffic directly to the appropriate downstream VM. See Create a load balancer.
Private Link Service: this service enables secure access to your downstream databases by exposing them to the Striim service, ensuring seamless connectivity. See Create an Azure Private Link service.
Private Endpoint. See Create a Private Endpoint in Striim.
Create a virtual network
In this procedure you create an Azure Virtual Network (VNet) with two default subnets that do not overlap with your external network.
Log in to the Azure portal.
Navigate to the Virtual Networks page.
Choose Create to create a new virtual network.

In the IP Addresses page, create two subnets (subnet1 and subnet2) by choosing Add subnet and providing the subnet name and address range. Click Next.
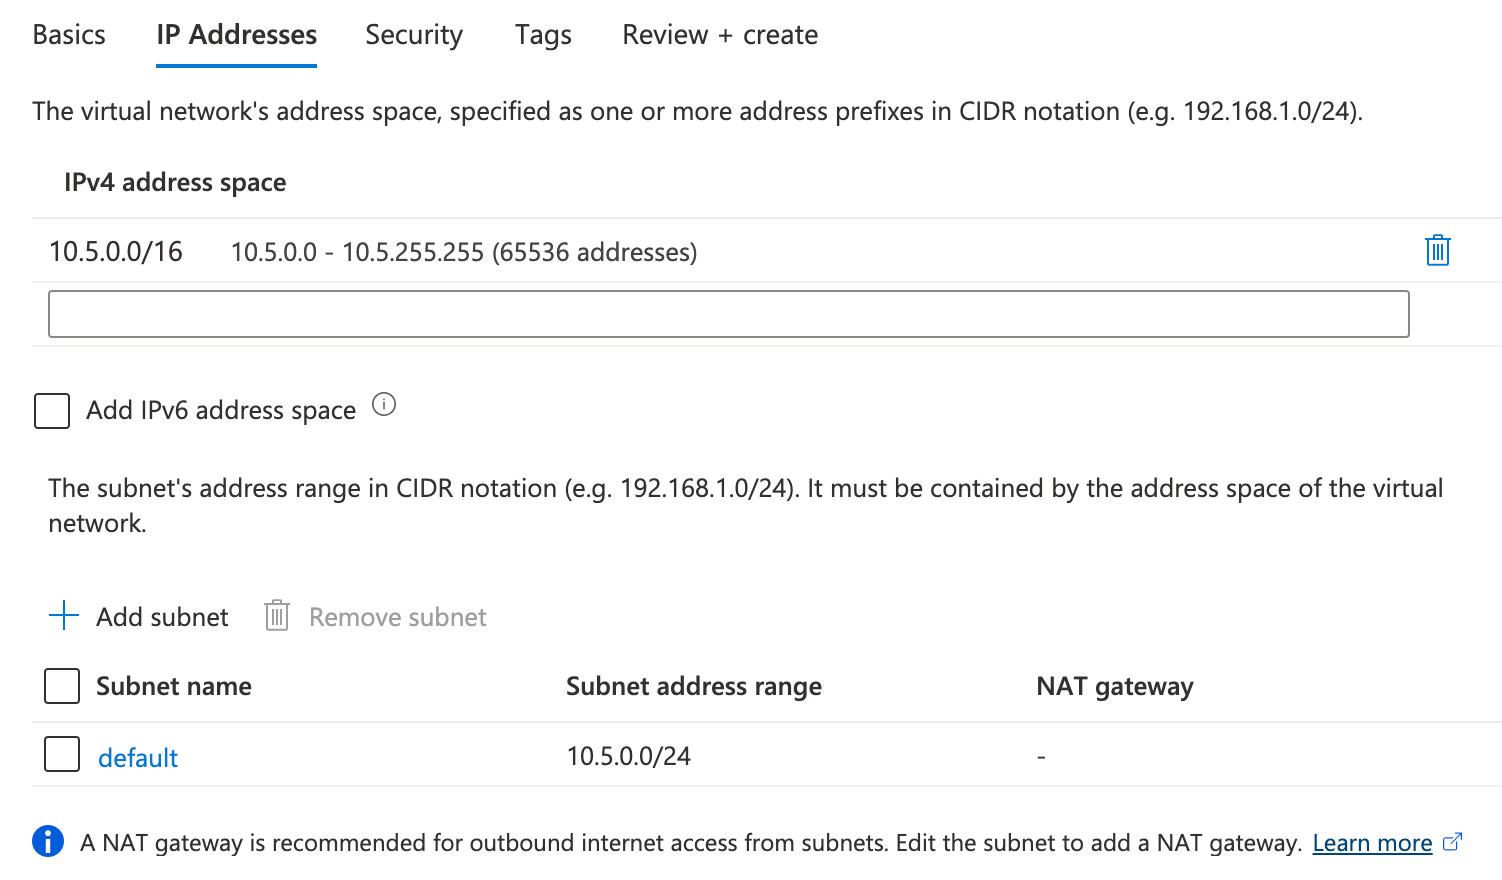
No other modifications are required in any other tabs. Choose Create. The virtual network will be created.
Create a Site-to-Site VPN
A Site-to-Site VPN ensures that data transmitted between Azure and other networks is encrypted, private and secure, protecting sensitive information from unauthorized access. To create this VPN with your Azure Virtual Network (vNet) follow one of the following:
Between Azure vNet and AWS VPC: Static Site-to-Site VPN between Azure vNet and AWS VPC.
Between Azure vNet and on-premise: Tutorial: Connect an on-premises network and a virtual network.
Between Azure vNet and GCP VPC: Configure Site-to-Site VPN: Azure vNet to GCP VPC.
Create a virtual machine
A VM will manage all incoming traffic and route it to specific databases using predefined port forwarding rules.
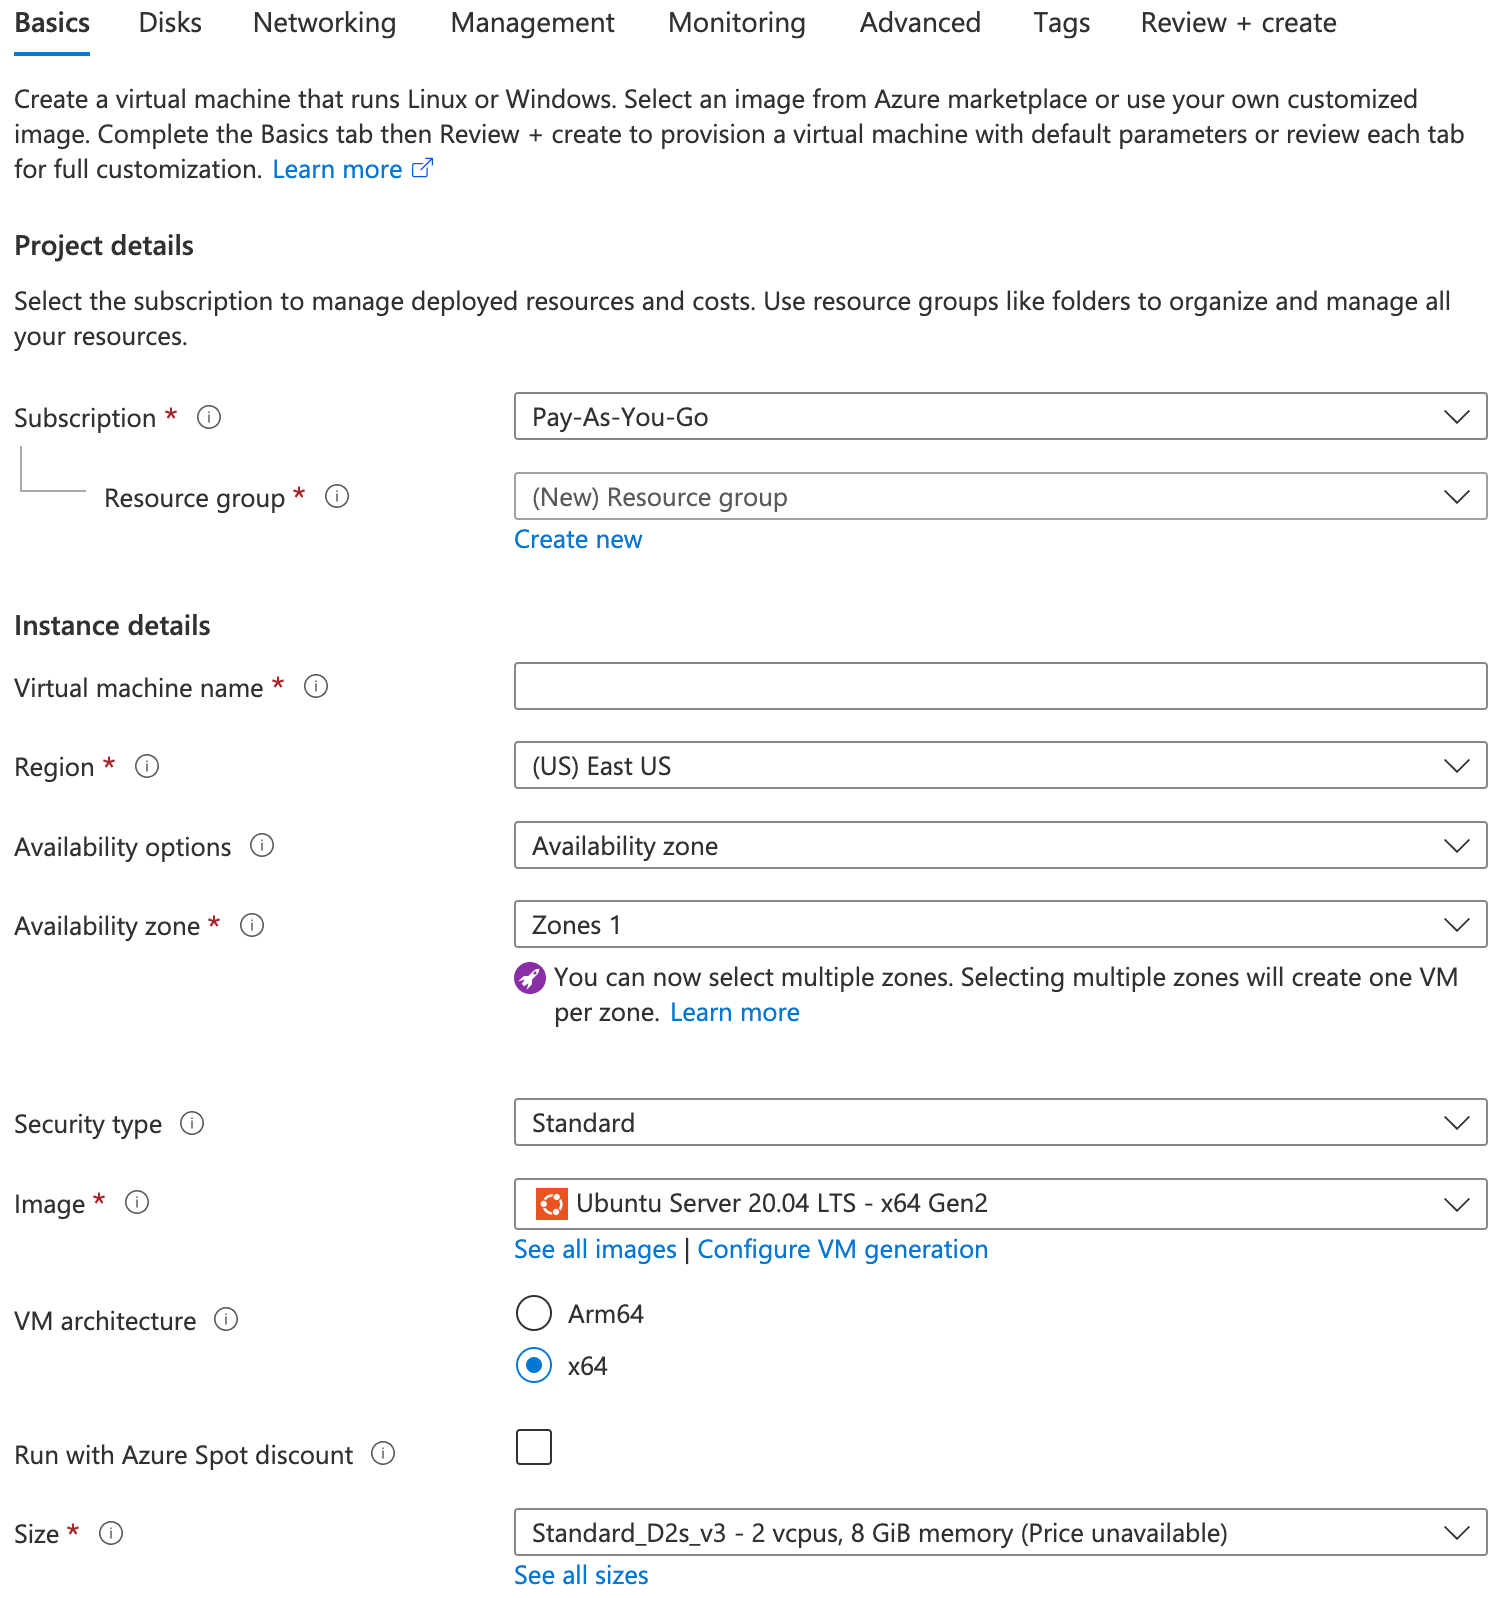
This procedure describes how to create an Azure Virtual Machine with an Ubuntu Server image.
Search for Azure Virtual Machine and then choose Create.
You are redirected to the Virtual Machines page. Fill the details as follows and choose Next.
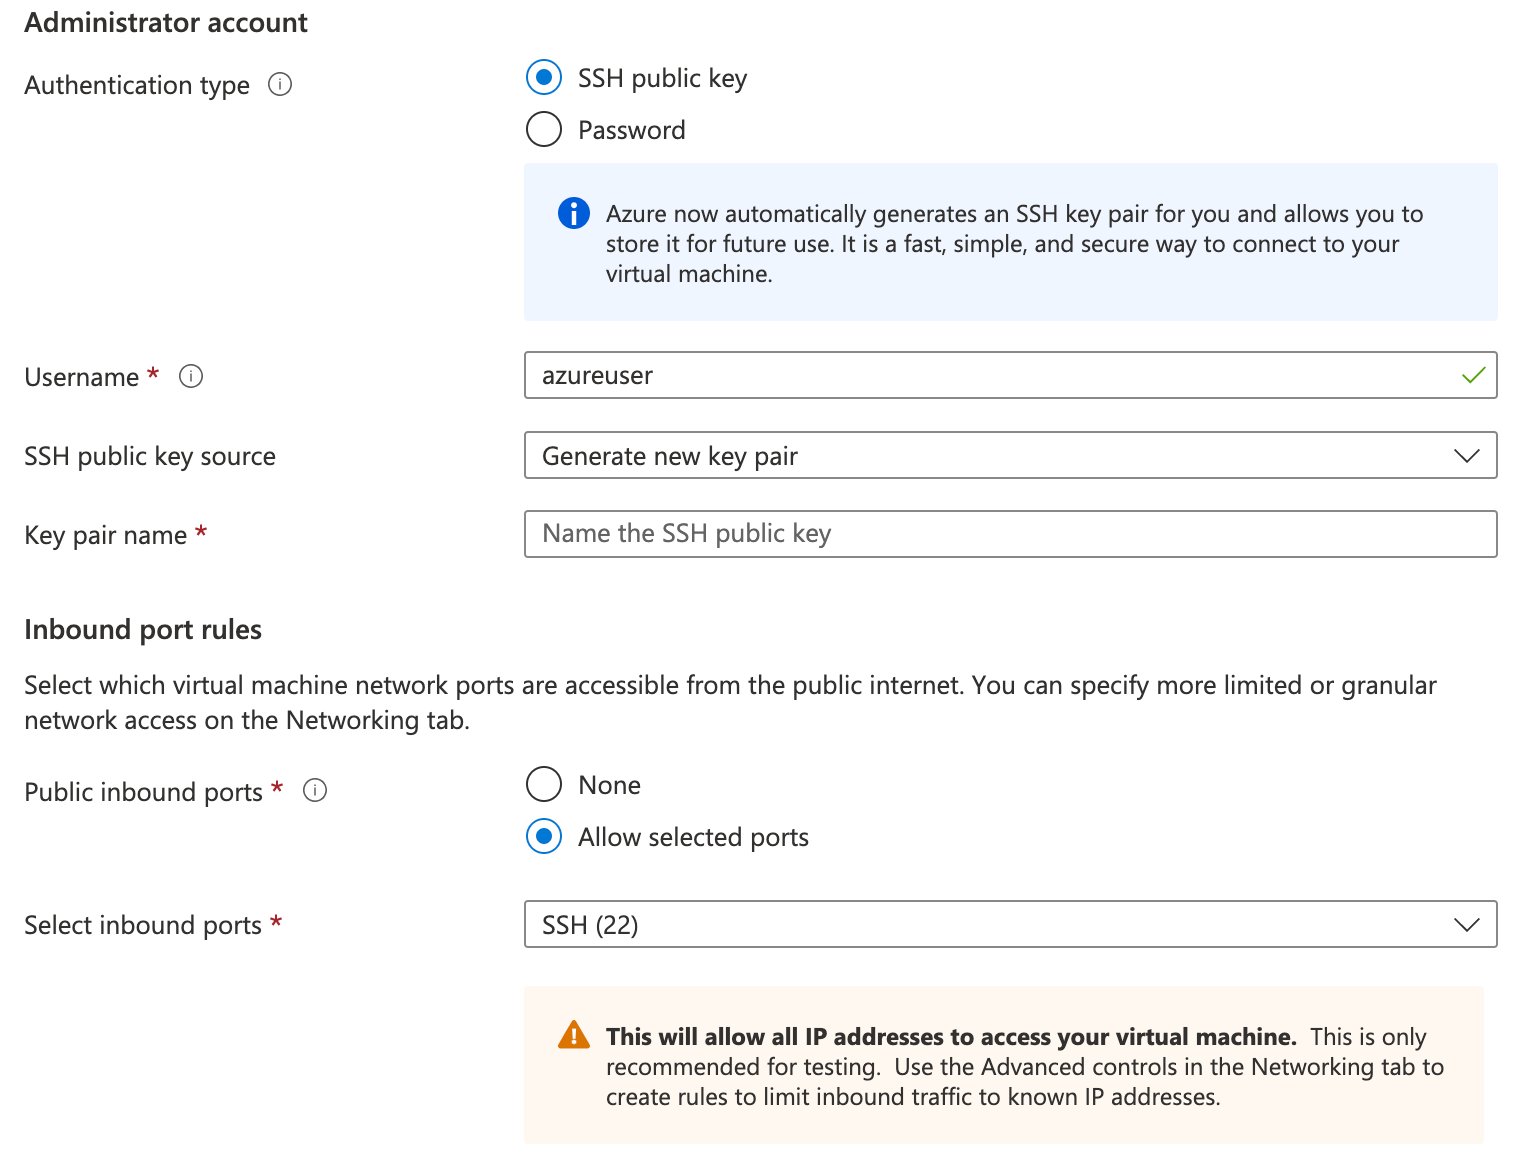
Under Networking, provide the following details and choose Next.
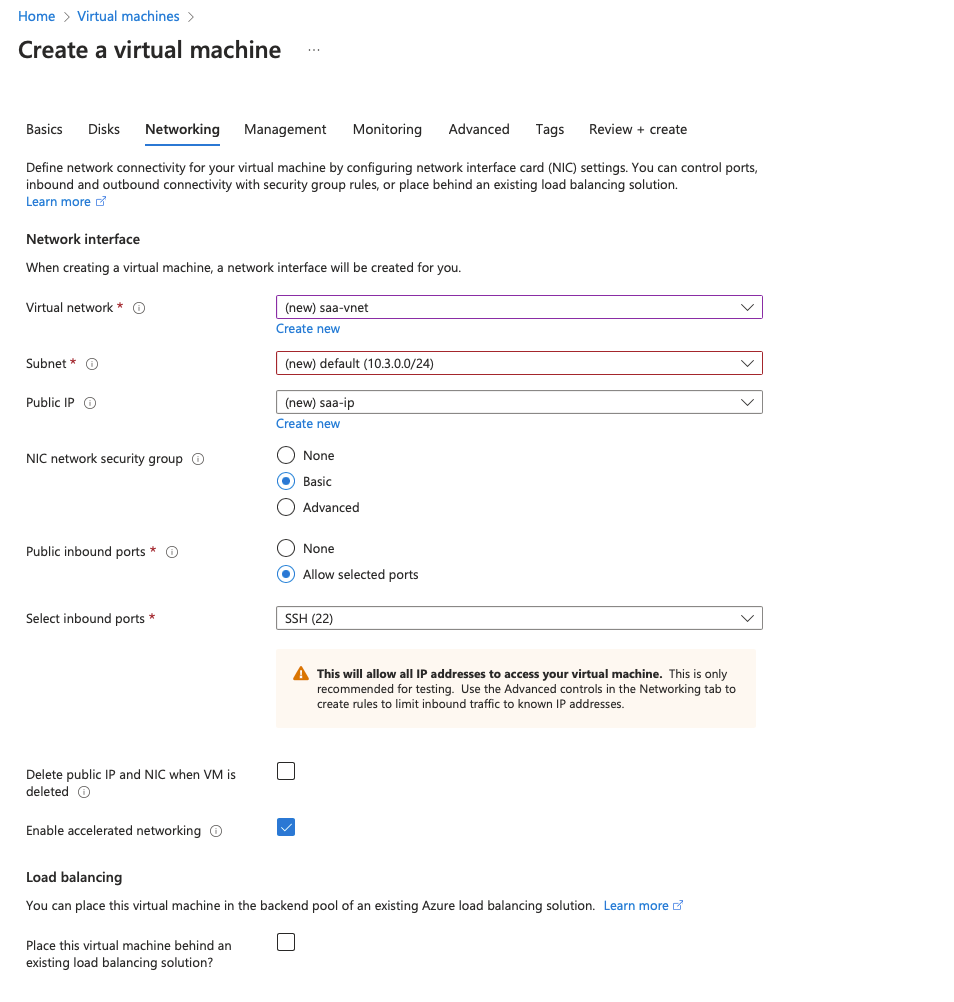
Keep all the other options unedited and then choose Create.
Configure IP forwarding rules in the VM
Once you have configured the virtual network and virtual machine, and set up the VPN, you should verify that you are able to access your database from the proxy VM over the VPN. See this Azure Private Link topic for information on testing connectivity.
You can then configure IP forwarding rules in the Virtual Machine (VM) in Azure to enable the VM to act as a network intermediary, allowing it to forward traffic that it receives from one network interface (NIC) to another.
Log in to the VM using the Secure Shell (SSH) network protocol.
Execute the following commands to create IP forwarding rules as the root user:
# local port where Load Balancer sends traffic to:
SOURCE_PORT=<portT1>
# destination server inside the internal network:
DESTINATION_IP=<databaseT1_IP>
DESTINATION_PORT=<portT1>

# enable IP forwarding on the host:
echo 1 > /proc/sys/net/ipv4/ip_forward

# clear the existing iptables rules and chains:
iptables -F
iptables -t nat -F
iptables -X

# change the packet recipient from local to destination socket (host & port):
iptables -t nat -A PREROUTING -p tcp --dport ${SOURCE_PORT} -j DNAT --to-destination ${DESTINATION_IP}:${DESTINATION_PORT}

# change the source IP address from the LB NAT IP address to the IP of this LB-backend host:
iptables -t nat -A POSTROUTING -p tcp -d ${DESTINATION_IP} --dport ${DESTINATION_PORT} -j SNAT --to-source $(hostname -i)

# to save the iptables rules:
iptables-save

# to make this rule persistent during reboot, download the iptables-persistent package (press yes in the popup window to acknowledge):
apt install iptables-persistent

# to review iptables rules:
iptables -t nat -nvL
To create additional rules, use the following commands:
# local port where Load Balancer sends traffic to:
SOURCE_PORT2=<portT2>
# destination server inside internal network:
DESTINATION_IP2=<databaseT2_IP>
DESTINATION_PORT2=<portT2>

# do not clear the existing iptables rules and chains

# change the packet recipient from the local to destination socket (host and port):
iptables -t nat -A PREROUTING -p tcp --dport ${SOURCE_PORT2} -j DNAT --to-destination ${DESTINATION_IP2}:${DESTINATION_PORT2}

# change the source IP address from the LB NAT IP address to the IP of this LB-backend host:
iptables -t nat -A POSTROUTING -p tcp -d ${DESTINATION_IP2} --dport ${DESTINATION_PORT2} -j SNAT --to-source $(hostname -i)

# to save the iptables rules:
iptables-save

# to review the iptables rules:
iptables -t nat -nvL
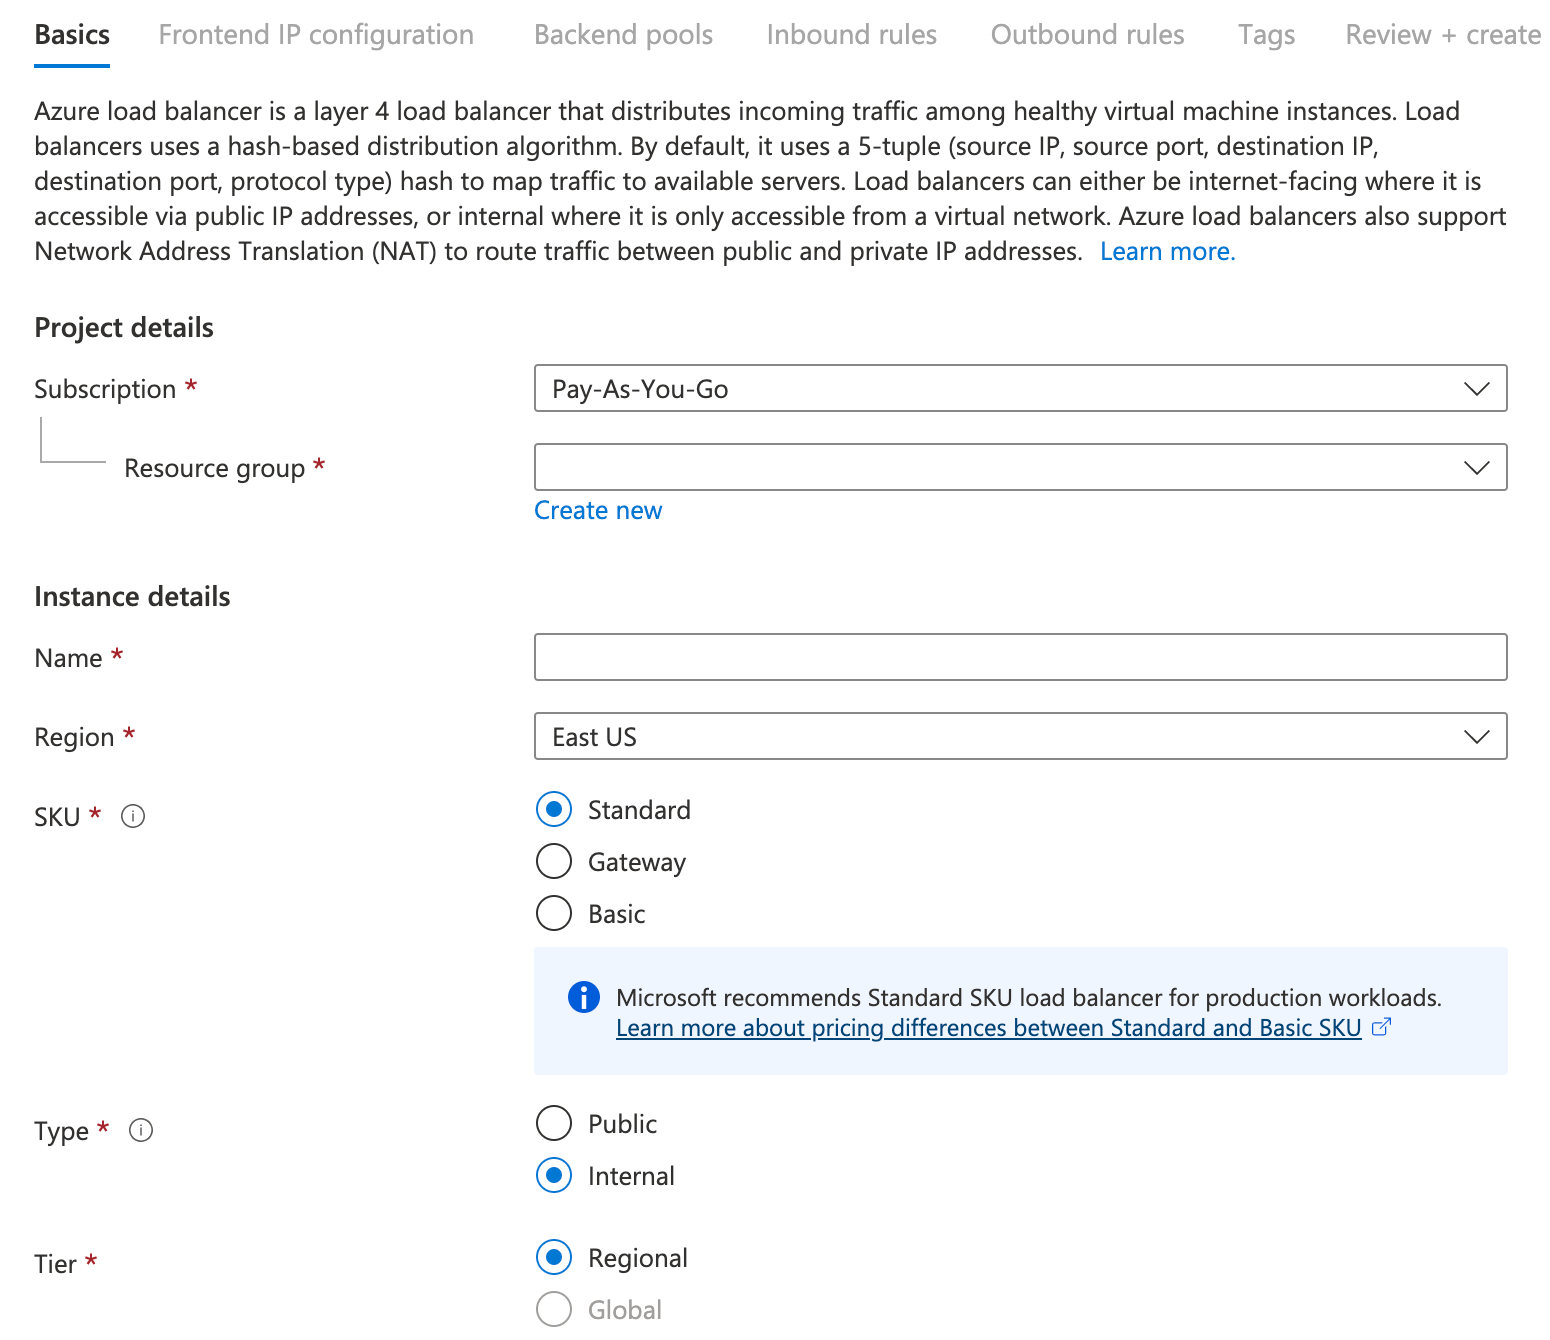
Create a load balancer
Create an internal load balancer with inbound NAT rules to forward traffic from the load balancer to the VM.
Navigate to the Azure load balancer page and choose Create.
In the Basics page, configure the following settings for the load balancer, then choose Next:
The subscription.
The Resource group that you used for the previous resource creation.
The name
The region
SKU:
StandardType:
InternalTier:
Regional.
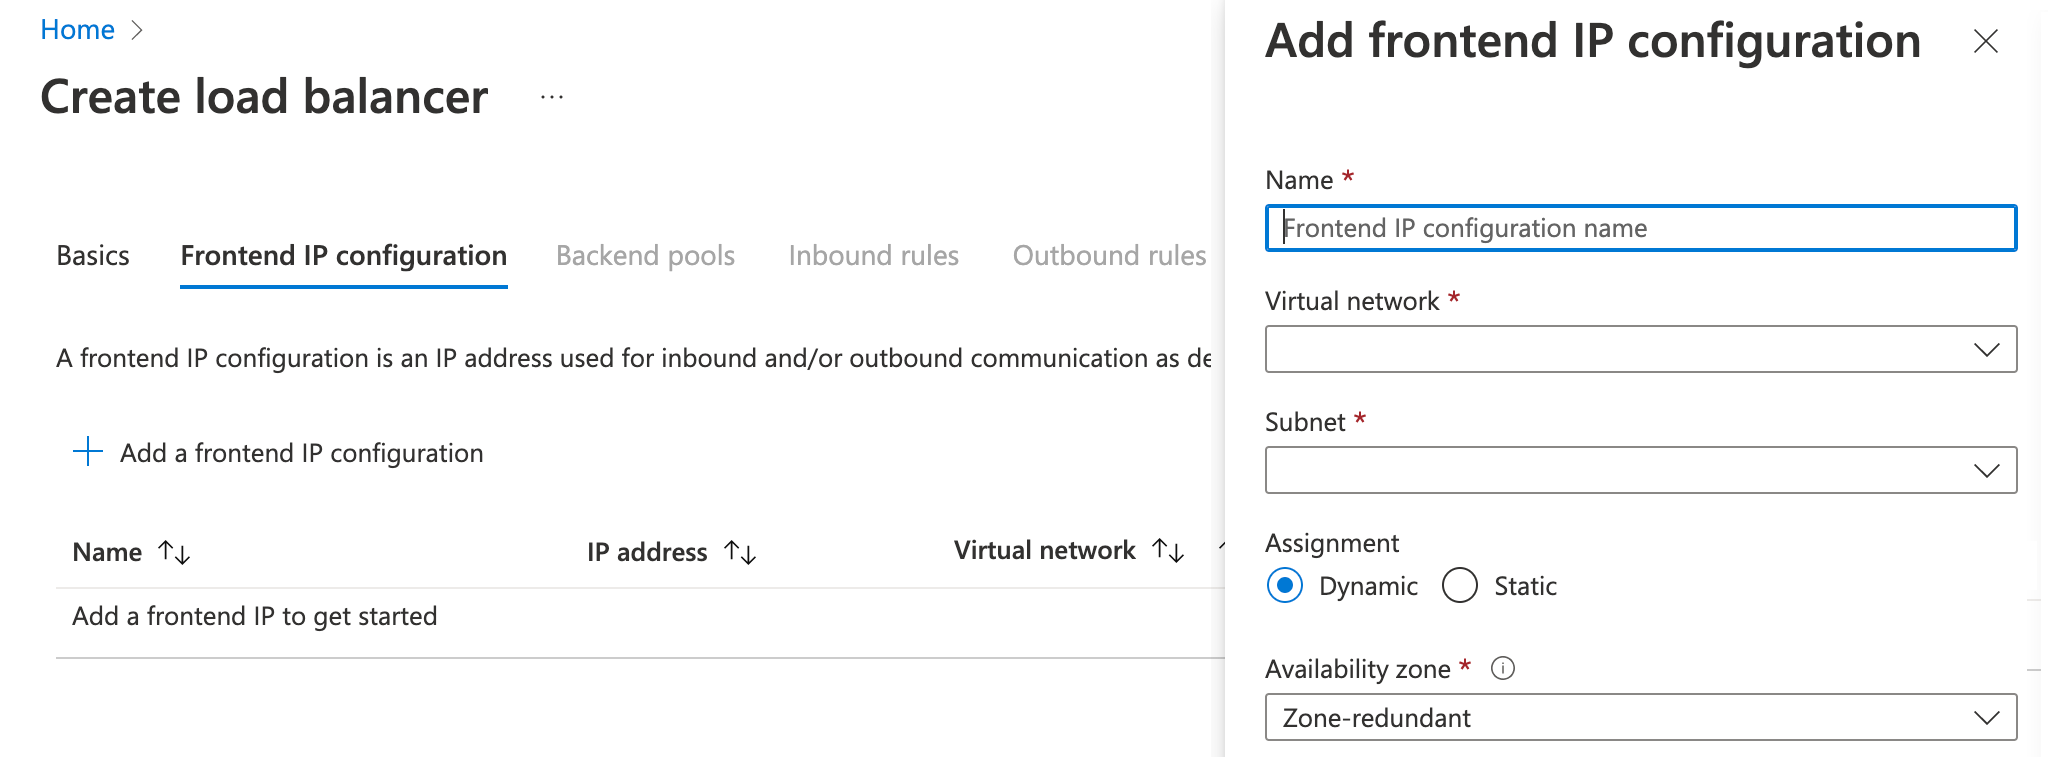
In the Frontend IP configuration page, choose Add a Frontend IP Configuration, provide the details and choose Add.
Name
Virtual network
Subnet
Assignment: Dynamic
Availability zone
In the Backend pool page, choose Add a Frontend IP Configuration, provide the details and choose Next.
Name
Virtual network
Backend Pool Configuration: NIC
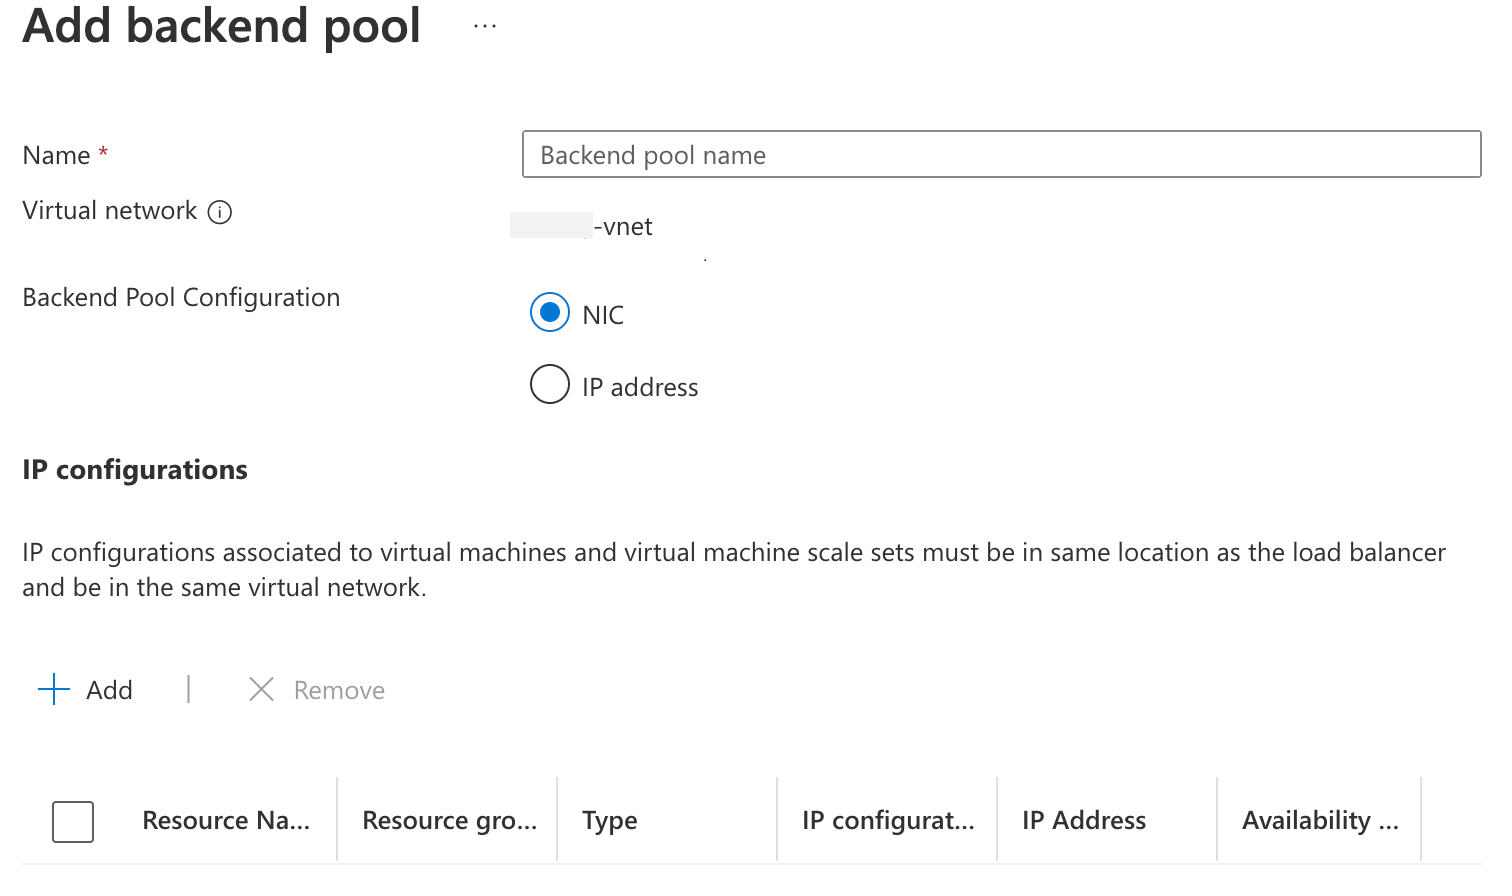
Leave the other options unedited and then choose Create. The load balancer will be deployed and then available.
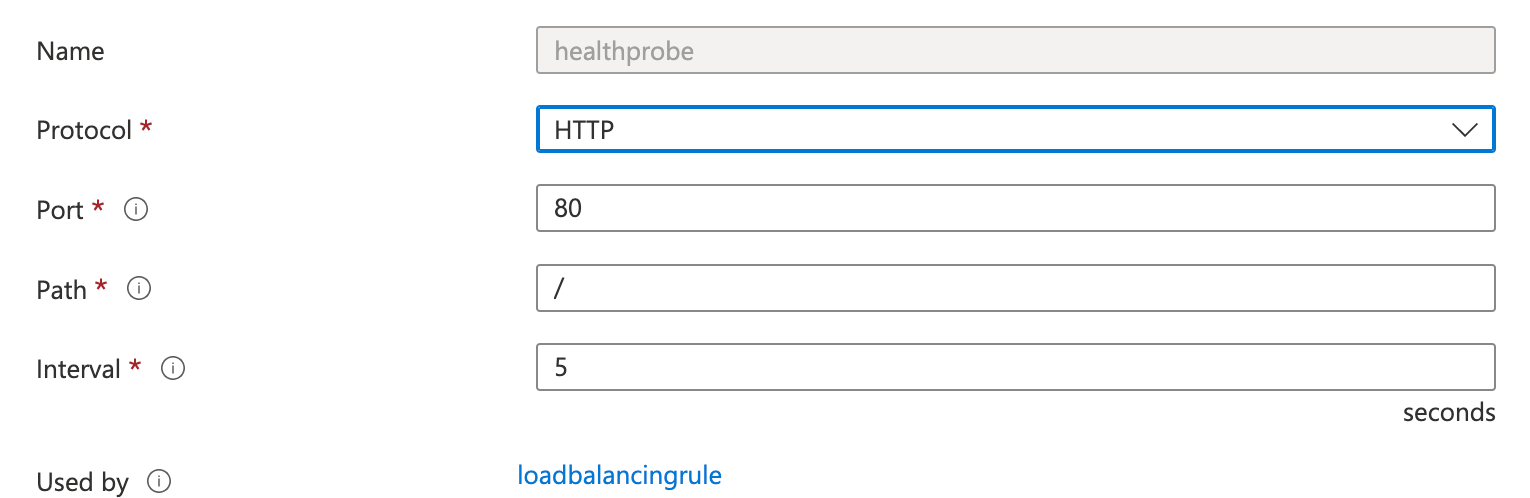
Open the Load Balancer created and then choose Health Probes from the left menu.
Choose Add and then provide the following health probe properties.
Name
Protocol: HTTP
Port: for example, 80
Path: /
Interval: for example, 5
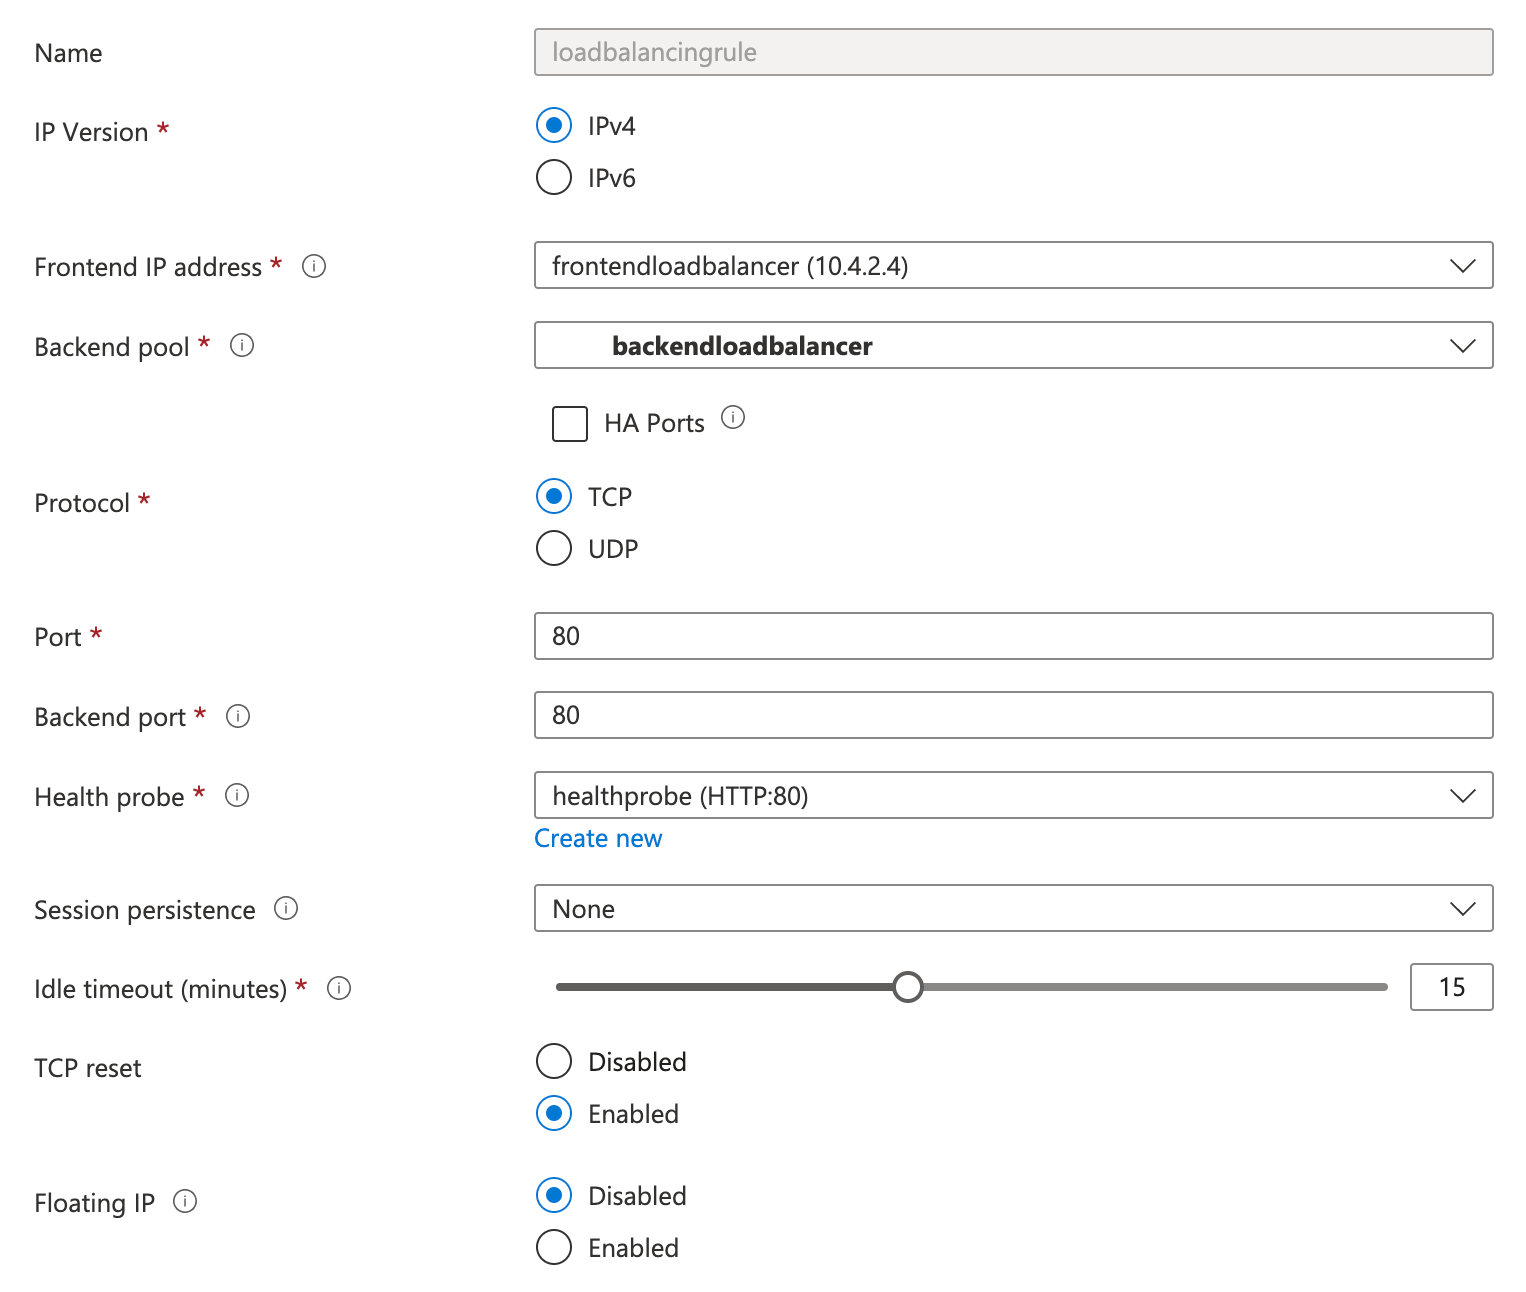
Choose Load Balancing Rule from the left menu and then add the following details.
Name
IP Version: IPv4
Frontend IP address: <select the frontend load balancer you created>
Backend pool
Protocol: TCP
Port: for example, 80
Backend port: for example, 80
Health probe: <select the health probe you created>
Session persistence: None
Idle timeout: specify a timeout in minutes such as 15 minutes
TCP reset: Enabled
Floating IP: Disabled
Choose Inbound NAT Rules from the left menu and fill the below details and choose Create.
Name
Type: Azure virtual machine
Target virtual machine: <select the virtual machine you created>
Network IP configuration
Frontend IP address: <select the frontend load balance you created>
Frontend port
Service Tag
Backend port
Protocol: TCP
Enable TCP Reset: selected
Idle timeout: specify a timeout in minutes such as 15 minutes
Enable Floating IP: unchecked

Create additional rules if you have more than one database source/target using the same load balancer. Note that each database should have a unique port and you need to create rules for each port.
Review the load balancer configuration.
Create an Azure Private Link service
To create the Private Link service to enable secure access to your downstream databases:
Navigate to the Azure Private link service page, and choose Create.
Add the subscription, the resource group, and the name and region of the load balancer. Choose Next.
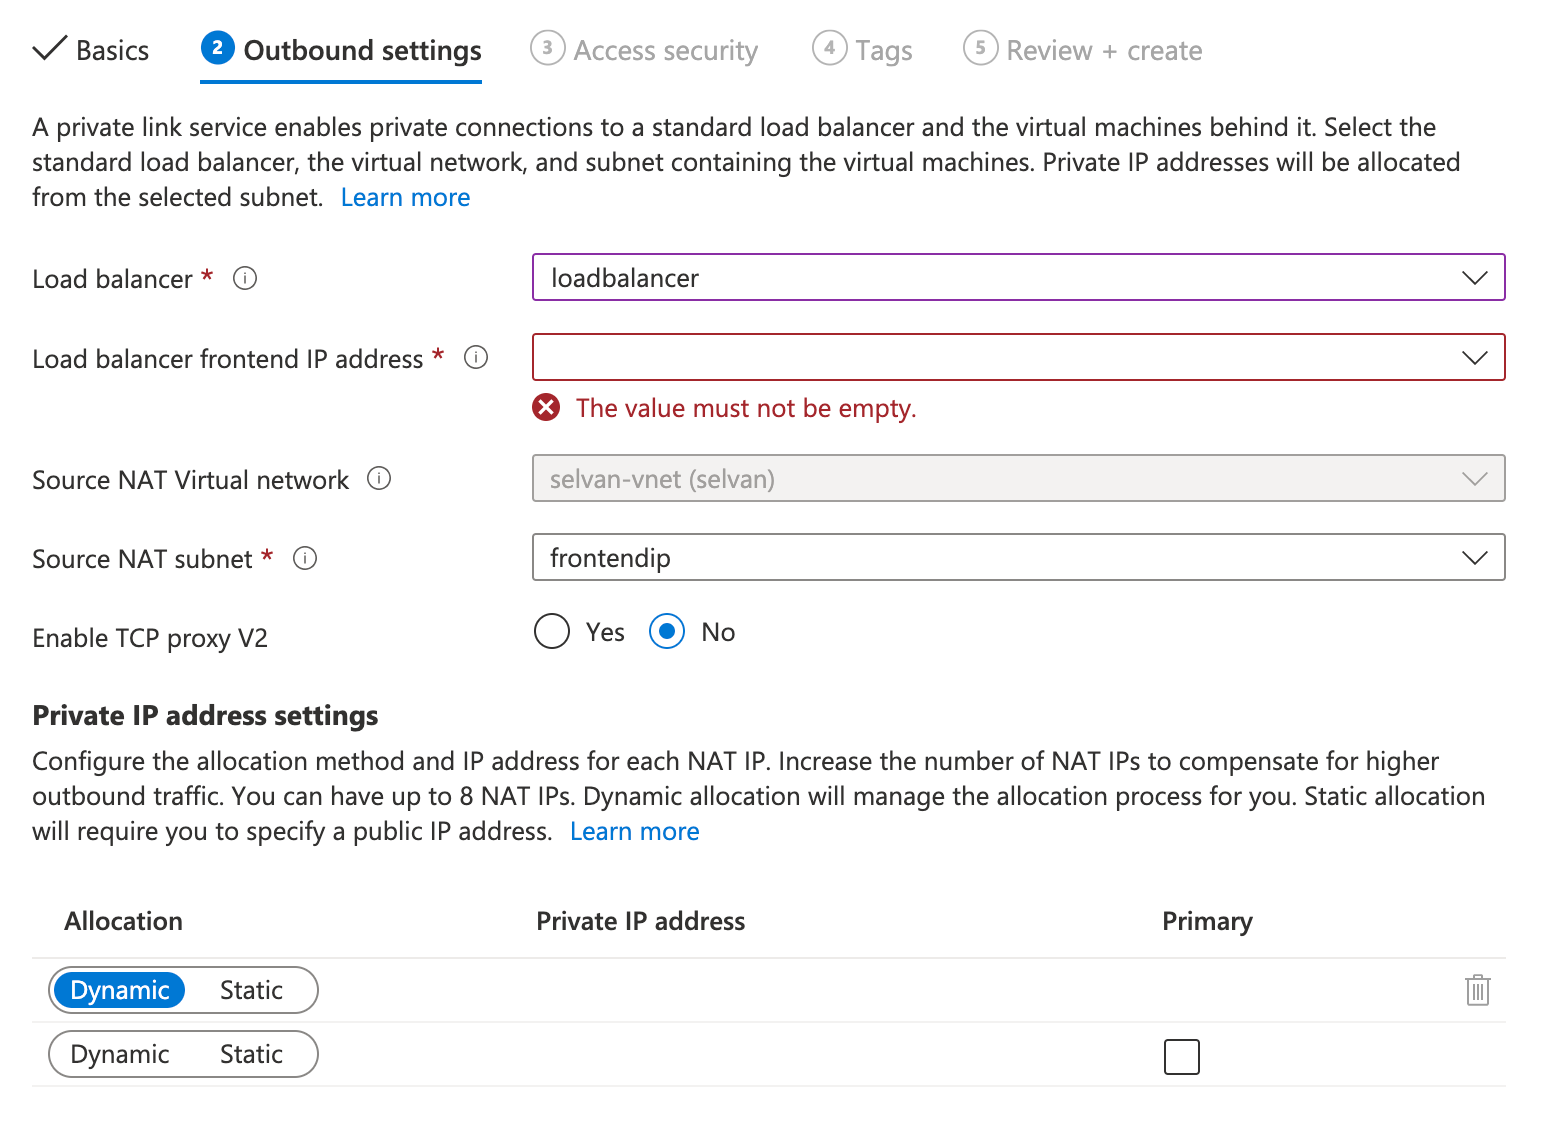
In the Outbound settings page, provide the following details then choose Next:
Load balancer name
Load balancer Frontend IP address
Source NAT Virtual Network
Source NAT subnet
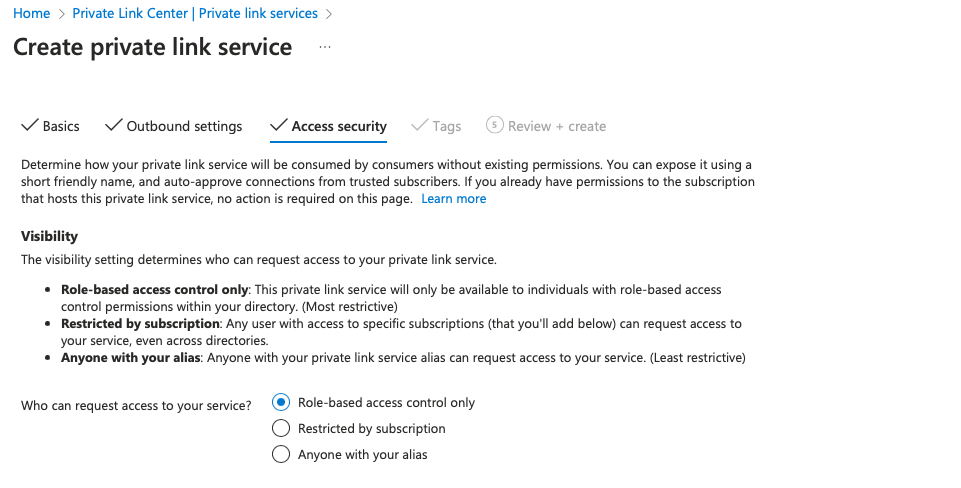
In the Access security page, choose Role-based access control only. Then choose Next.
Note
You also can use the Restricted by subscription option. In that case, ask Striim for the subscription ID.
In the Tags page, define any optional tags, and choose Next: Review + Create.
In the Review and create page, verify the settings you configured, and choose Create.
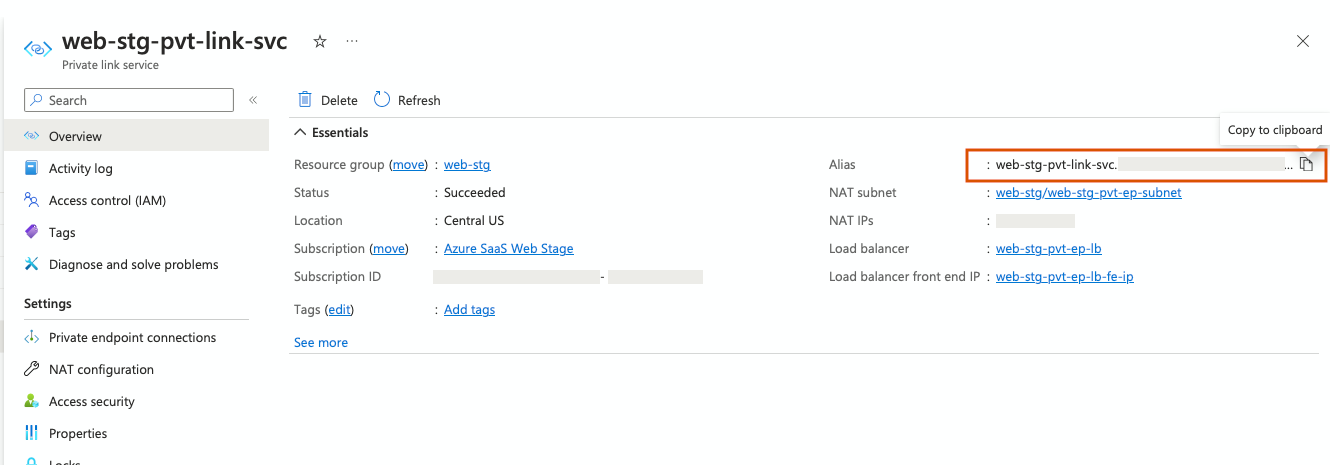
When the Private Link service has been created, choose Overview and copy the Alias. You need this alias to create the Private endpoint as described in Create a Private Endpoint in Striim.
Create a Private Endpoint in Striim
This sections describes how to create a private endpoint for your Striim Cloud application using the Private Link Service alias. Once you have created the endpoint, you need to approve the private endpoint connection in Azure, which establishes a connection to your databases located in your external network.
You will also receive an email from Striim with your private endpoint IP and/or DNS information. You can also find this information in the Striim console under the Secure connection tab. You can next use the IP address or DNS name to configure your source or target endpoint within the Striim application connection URL.
Log in to your Striim Cloud account.
Select the service you want to create a private endpoint with.
Under the Secure connection tab, choose Create Private Endpoint.
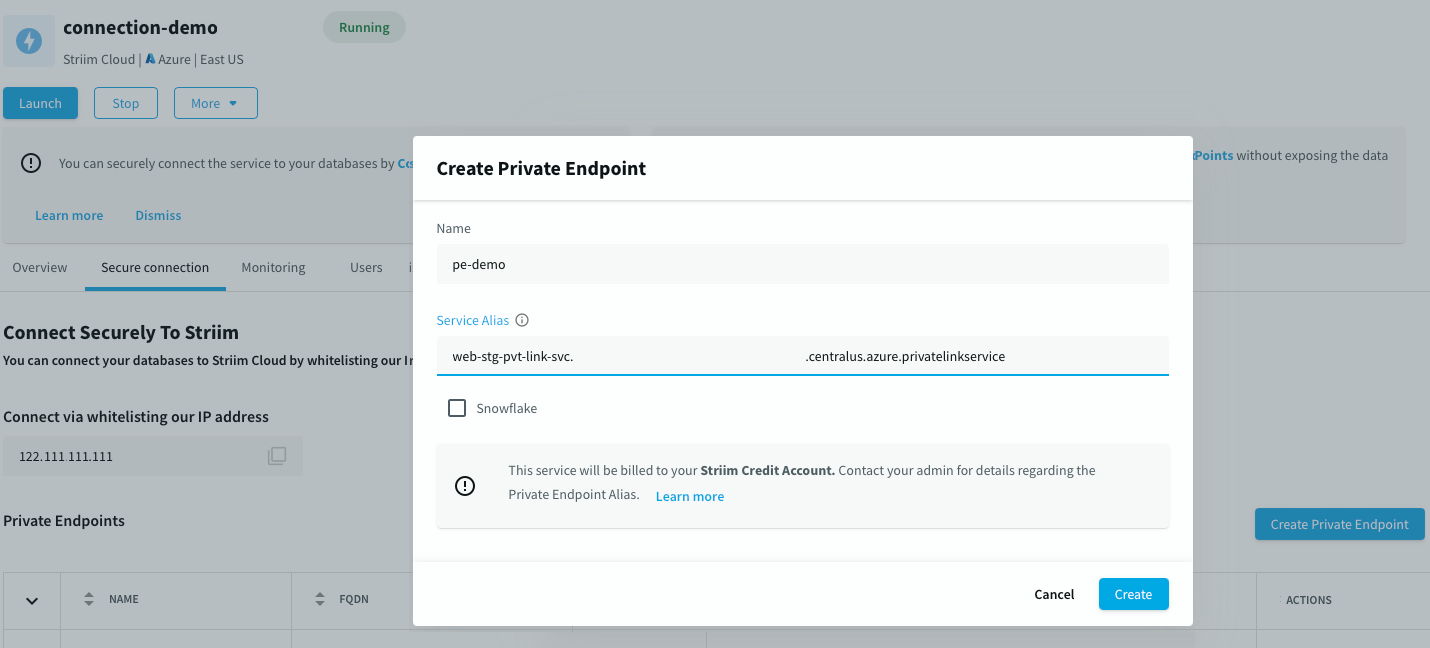
Enter a descriptive name for your endpoint, and paste the Private Link Service Alias you copied in step 6(e). Then choose Create.
In Azure, go to your Private link service portal and select the Private link service that you created earlier. Under Private endpoint connection, you can see a connection in the pending state.
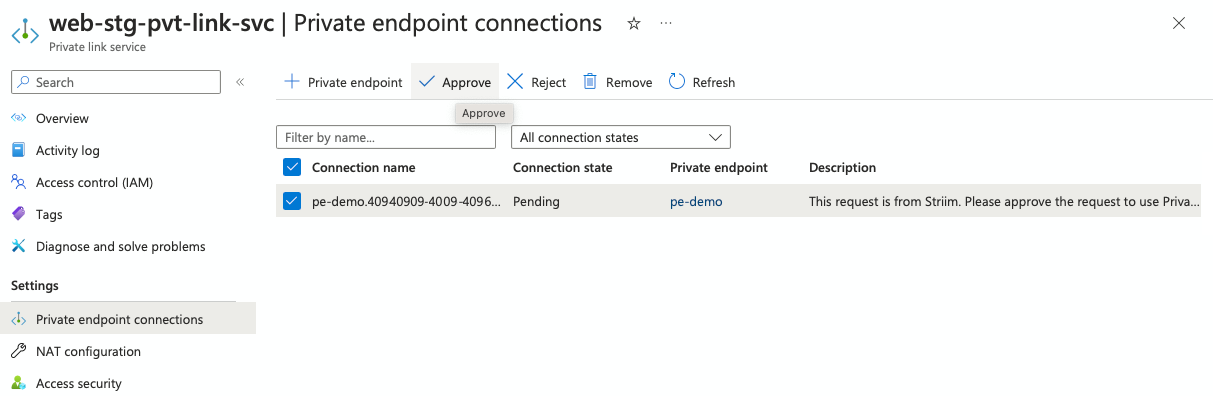
Select the connection name and choose Approve. After some time you can see the connection status changes to Approved.
You receive an email with your private endpoint IP and/or DNS information. You can also find the DNS information in the Striim Cloud portal under the Secure connection tab.
Use that IP address or DNS name to configure your Striim Cloud endpoints using the application connection URL.