Connecting Striim Cloud on AWS to self-managed data services
This topic describes how to enable private (non-public) connectivity from Striim Cloud hosted on AWS to customer databases hosted in Google Cloud Platform (GCP), Microsoft Azure, Oracle Cloud Infrastructure (OCI), and on-premises data centers. The connection leverages AWS VPC Endpoint Service via the customer's AWS account to ensure secure, private communication between Striim Cloud and your data sources without exposing traffic to the public internet.
If your database is on-premises or in another cloud provider (GCP, Azure, OCI), you must first establish VPN or Direct Connect connectivity to your AWS VPC. If your database is already within AWS, this step is not required.
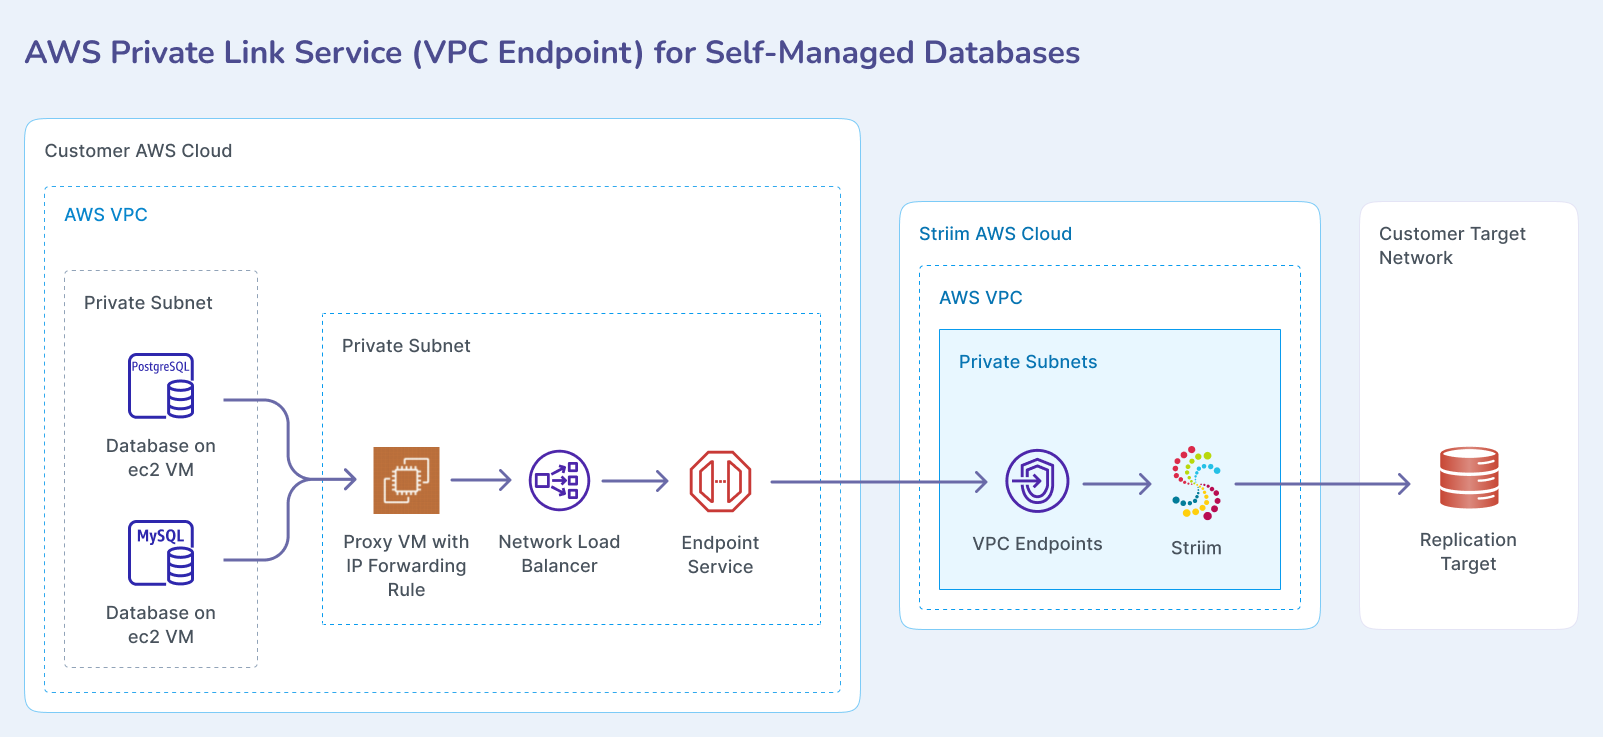
The following diagram shows the connection architecture for self-managed databases hosted on AWS.
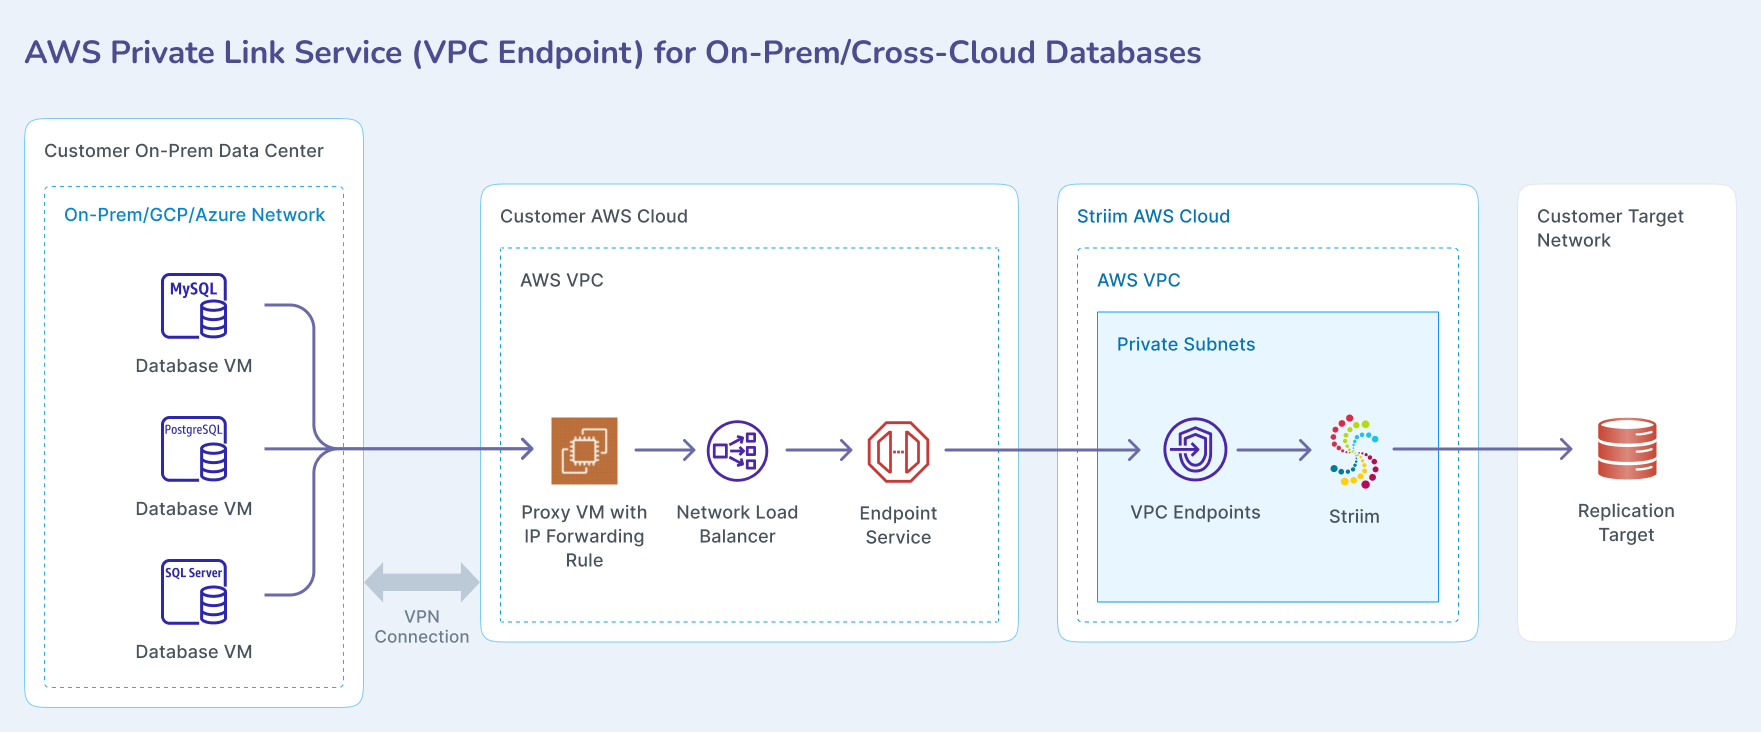
The following diagram shows the connection architecture when connecting through VPN to databases in on-premises data centers or other cloud providers.
Prerequisites
A VPC network with at least four subnets in four different availability zones.
AWS IAM Administrator role for the user.
AWS account number that is hosting the Striim service. Contact your Striim team to obtain this account number.
(Optional, for cross-cloud or on-premises connections only) A VPN, Express Route, Direct Connect, or similar connection between your customer AWS VPC and your on-premises or cross-cloud network.
Prepare customer VPN with on-premises or cross-cloud network
If you need to connect to databases in on-premises data centers or other cloud providers, you must first establish connectivity between your AWS VPC and the target network.
For AWS to on-premises or cross-cloud connections, see Get started with AWS Site-to-Site VPN in the AWS documentation.
Launch an EC2 forwarder instance
You must launch an EC2 instance in your AWS VPC that will forward traffic from the load balancer to your database.
In the EC2 console, launch a new EC2 instance.
Choose Ubuntu as the operating system type.
In the Network settings, choose the correct VPC, subnet, and default security group. Optionally enable assign public IP during creation.
Select an m6a.large instance type or larger. This instance size is sufficient for this solution.
Once the instance is ready, add a VPC Security Group Inbound Rule to accept SSH connections from your IP address.
Configure IP forwarding rules for Ubuntu
You must configure IP forwarding on the forwarder instance to route traffic from the load balancer to your database. This configuration assumes you can successfully access your database from the forwarder VM over VPN, Direct Connect, or locally.
Connect to the forwarder VM using SSH.
Execute the following commands as root user to create IP forwarding rules:
# local port where Load Balancer sends traffic to:
SOURCE_PORT1=<portT1>
# destination server inside internal network:
DESTINATION_IP1=<databaseT1_IP>
DESTINATION_PORT1=<portT1>

# enable IP forwarding on host:
echo 1 > /proc/sys/net/ipv4/ip_forward

# clear existing iptables rules and chains:
iptables -F
iptables -t nat -F
iptables -X

# change the packet recipient from local to destination socket (host & port):
iptables -t nat -A PREROUTING -p tcp --dport ${SOURCE_PORT1} -j DNAT --to-destination
${DESTINATION_IP1}:${DESTINATION_PORT1}

# change the source IP address from the LB NAT IP address to the IP of this LB-backend host:
iptables -t nat -A POSTROUTING -p tcp -d ${DESTINATION_IP1} --dport
${DESTINATION_PORT1} -j SNAT --to-source $(hostname -i)

# to save iptables rules:
iptables-save

# To make this rule persist during reboot download iptables-persistent package
(press yes in the popup window to acknowledge.):
apt install iptables-persistent

# Additionally, to review iptables rules:
iptables -t nat -nvL
Replace the placeholder values with your actual destination port and IP address. The source port must be the same port as the destination port. The destination IP and port are your database IP address and port number.
Create additional forwarding rules
If you need to forward traffic to multiple databases, you can create additional forwarding rules without clearing the existing iptables rules.
# local port where Load Balancer sends traffic to:
SOURCE_PORT2=<portT2>
# destination server inside internal network:
DESTINATION_IP2=<databaseT2_IP>
DESTINATION_PORT2=<portT2>

# Do not clear existing iptables rules and chains

# change the packet recipient from local to destination socket (host & port):
iptables -t nat -A PREROUTING -p tcp --dport ${SOURCE_PORT2} -j DNAT --to-destination
${DESTINATION_IP2}:${DESTINATION_PORT2}

# change the source IP address from the LB NAT IP address to the IP of this LB-backend host:
iptables -t nat -A POSTROUTING -p tcp -d ${DESTINATION_IP2} --dport
${DESTINATION_PORT2} -j SNAT --to-source $(hostname -i)

# to save iptables rules:
iptables-save

# Additionally, to review iptables rules:
iptables -t nat -nvL
Configure IP forwarding rules for Windows
If you are using a Windows instance as the forwarder, you can create IP forwarding rules using netsh. This configuration assumes your Windows firewall is disabled.
Open a CMD terminal on the Windows instance.
Create IP forwarding rules using netsh:
netsh interface portproxy add v4tov4 listenport=<port_number> listenaddress=<ip_address>
connectport=<port_number> connectaddress=<target_IP>
Verify the port forwarding rule:
netsh interface portproxy show all
Create a load balancer target group
You must create a target group in the same VPC as the forwarder instance to route traffic from the load balancer to the forwarder.
In the EC2 console, navigate to Target Groups.
Click Create target group.
Select Instances as the target type.
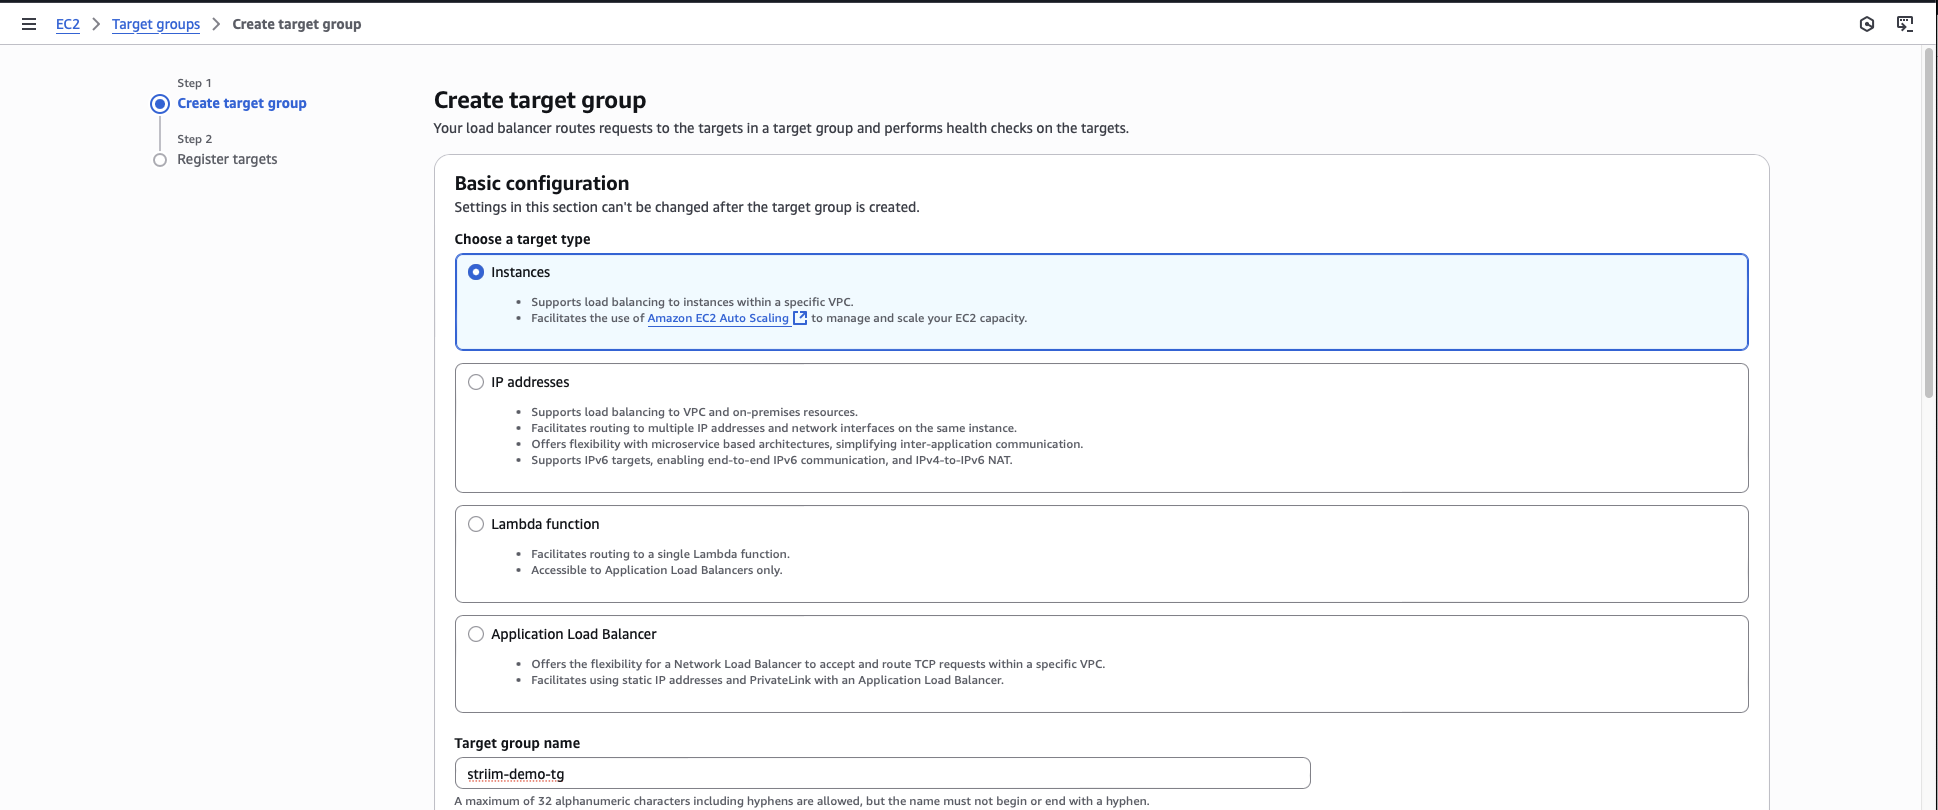
Enter a name for the target group.
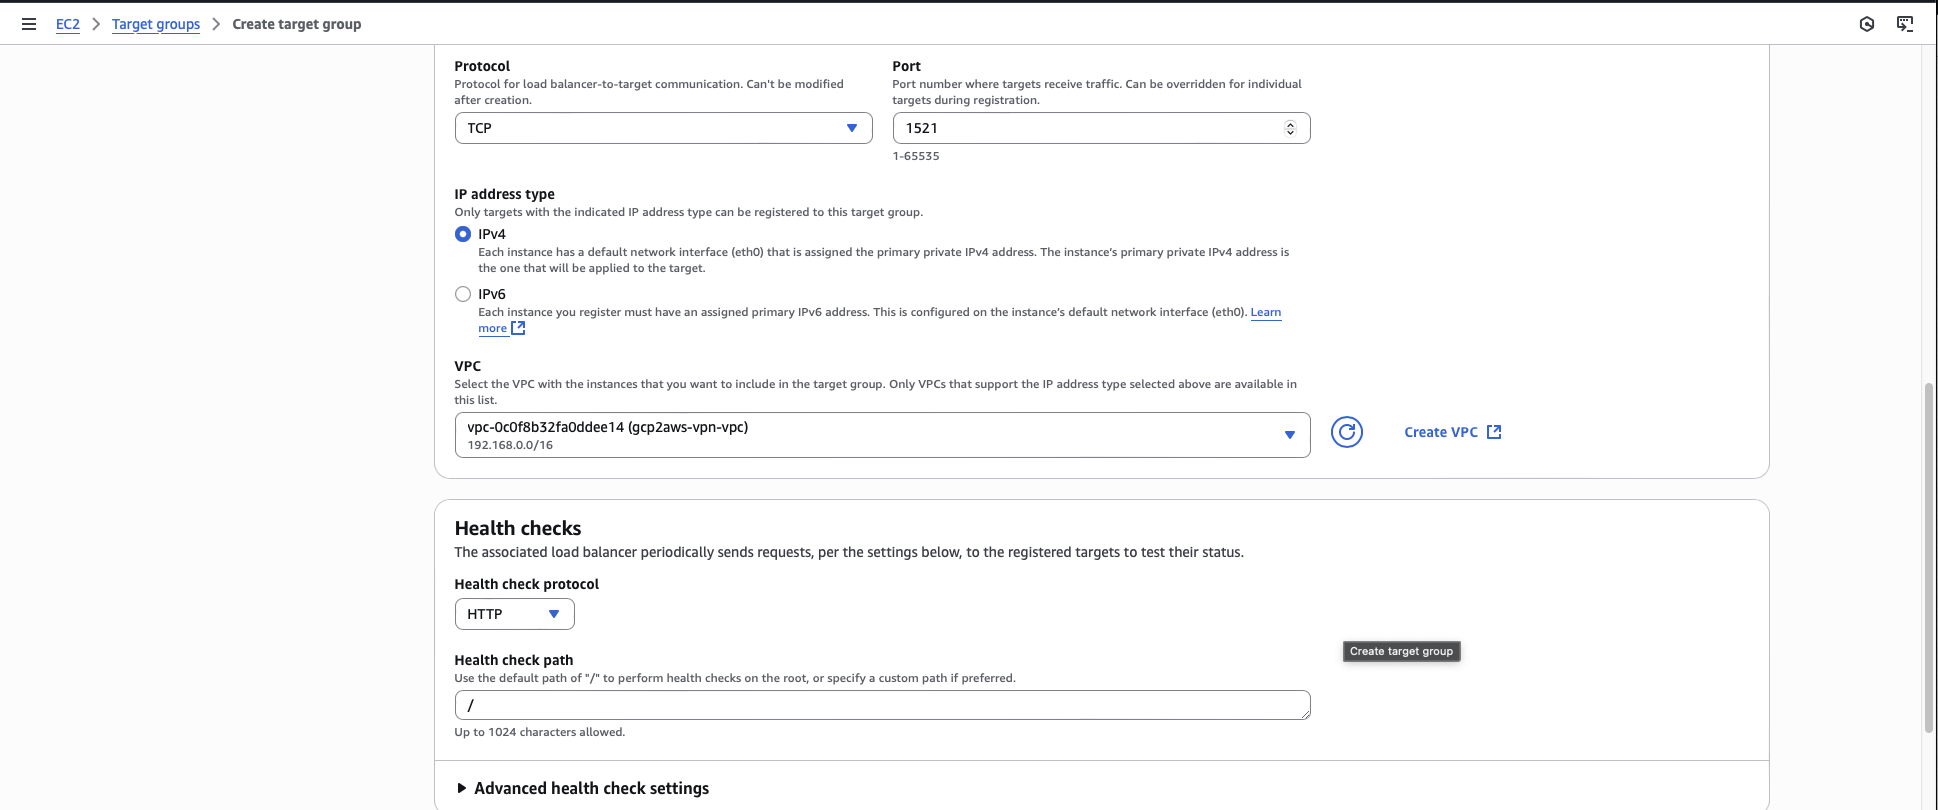
For the port, enter the same port number as your database port.
Select the VPC that contains your forwarder instance.
Register the forwarder instance that you created as a target.
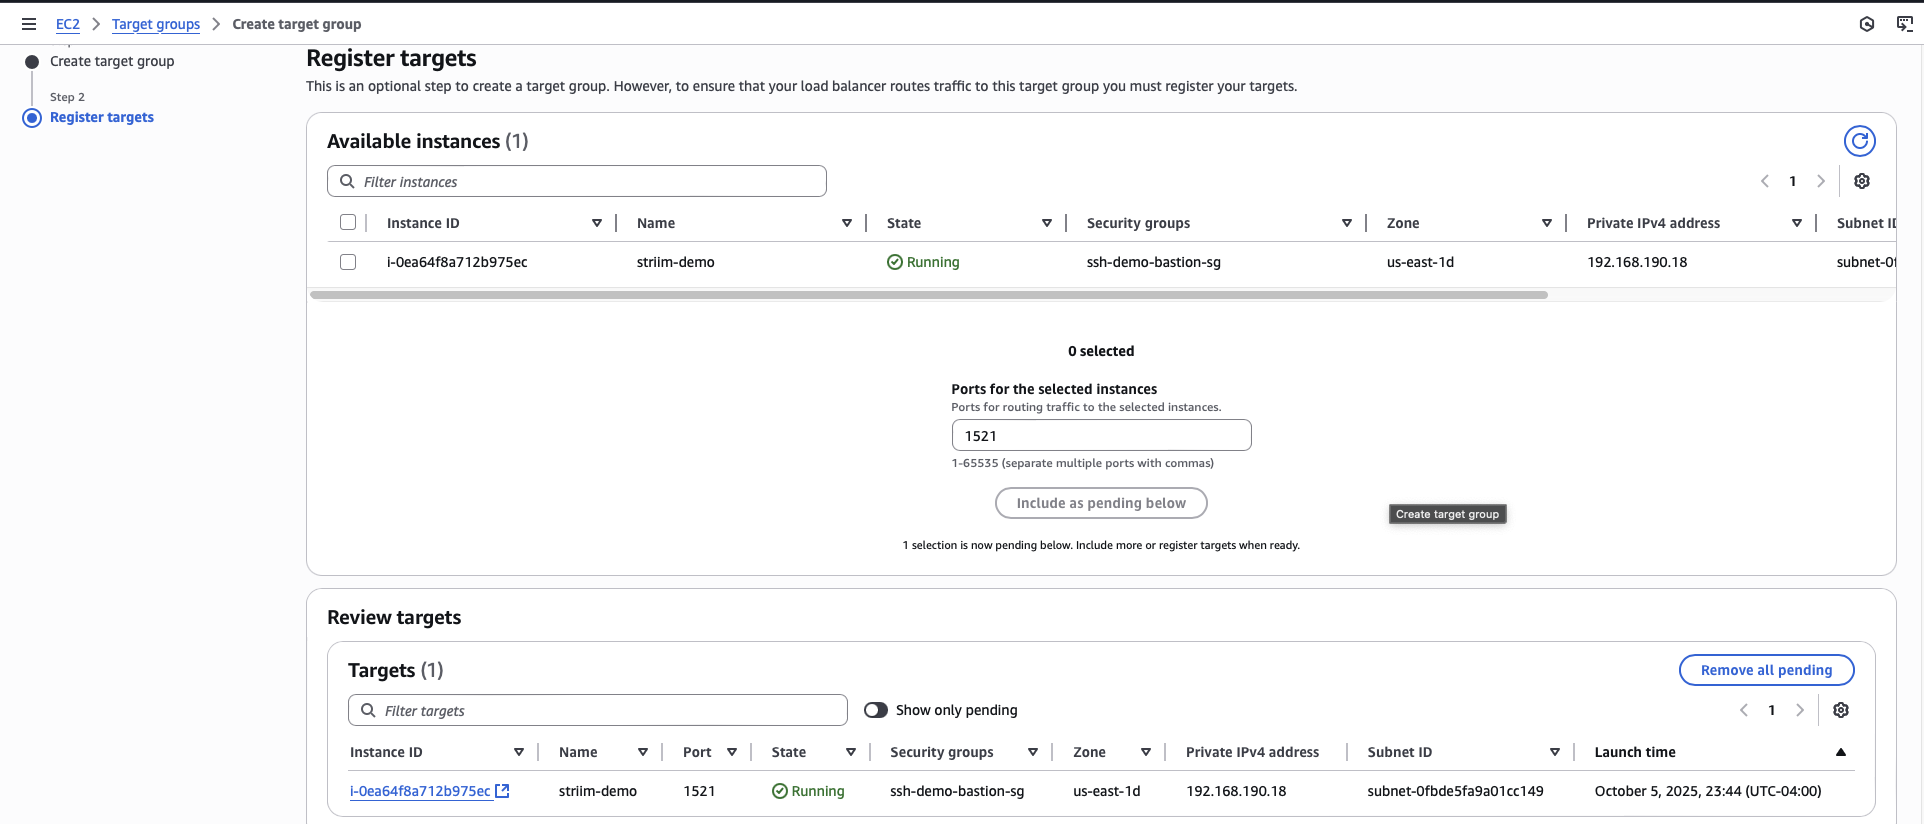
Click Create target group.
Create an internal network load balancer
You must create an internal Network Load Balancer to send traffic from the VPC endpoint to the target group.
In the EC2 console, navigate to Load Balancers.
Click Create load balancer.
Choose Network Load Balancer.
Enter a name for the load balancer.
For Scheme, select Internal.
Select the VPC that contains your forwarder instance.
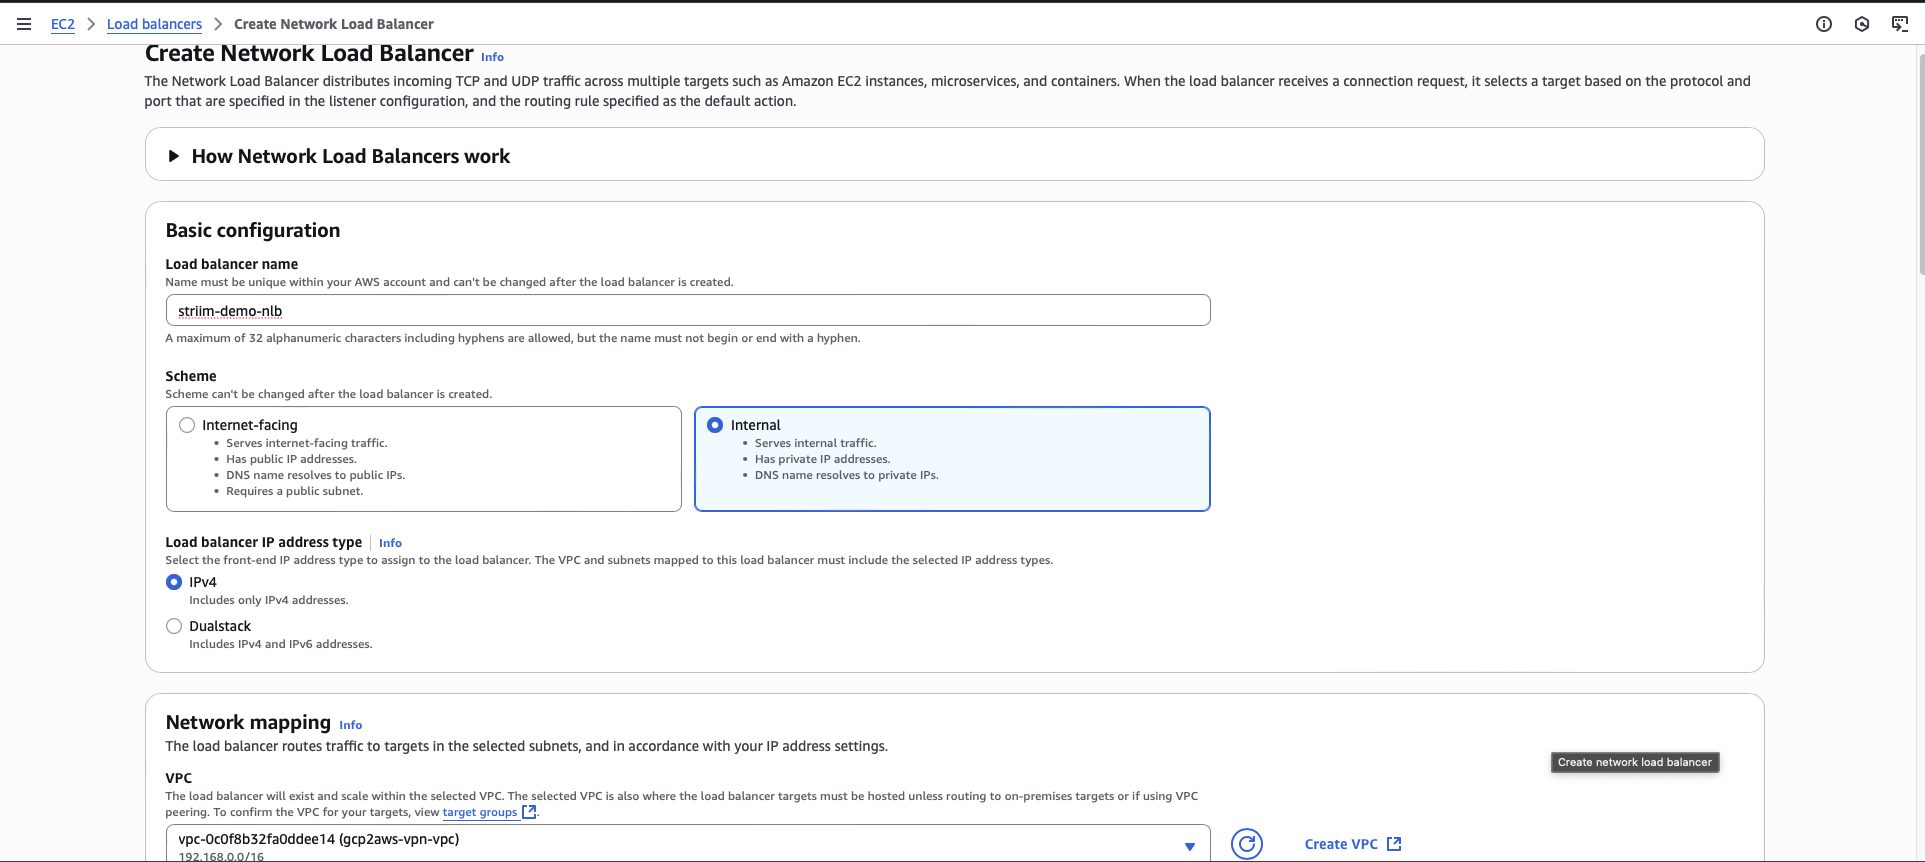
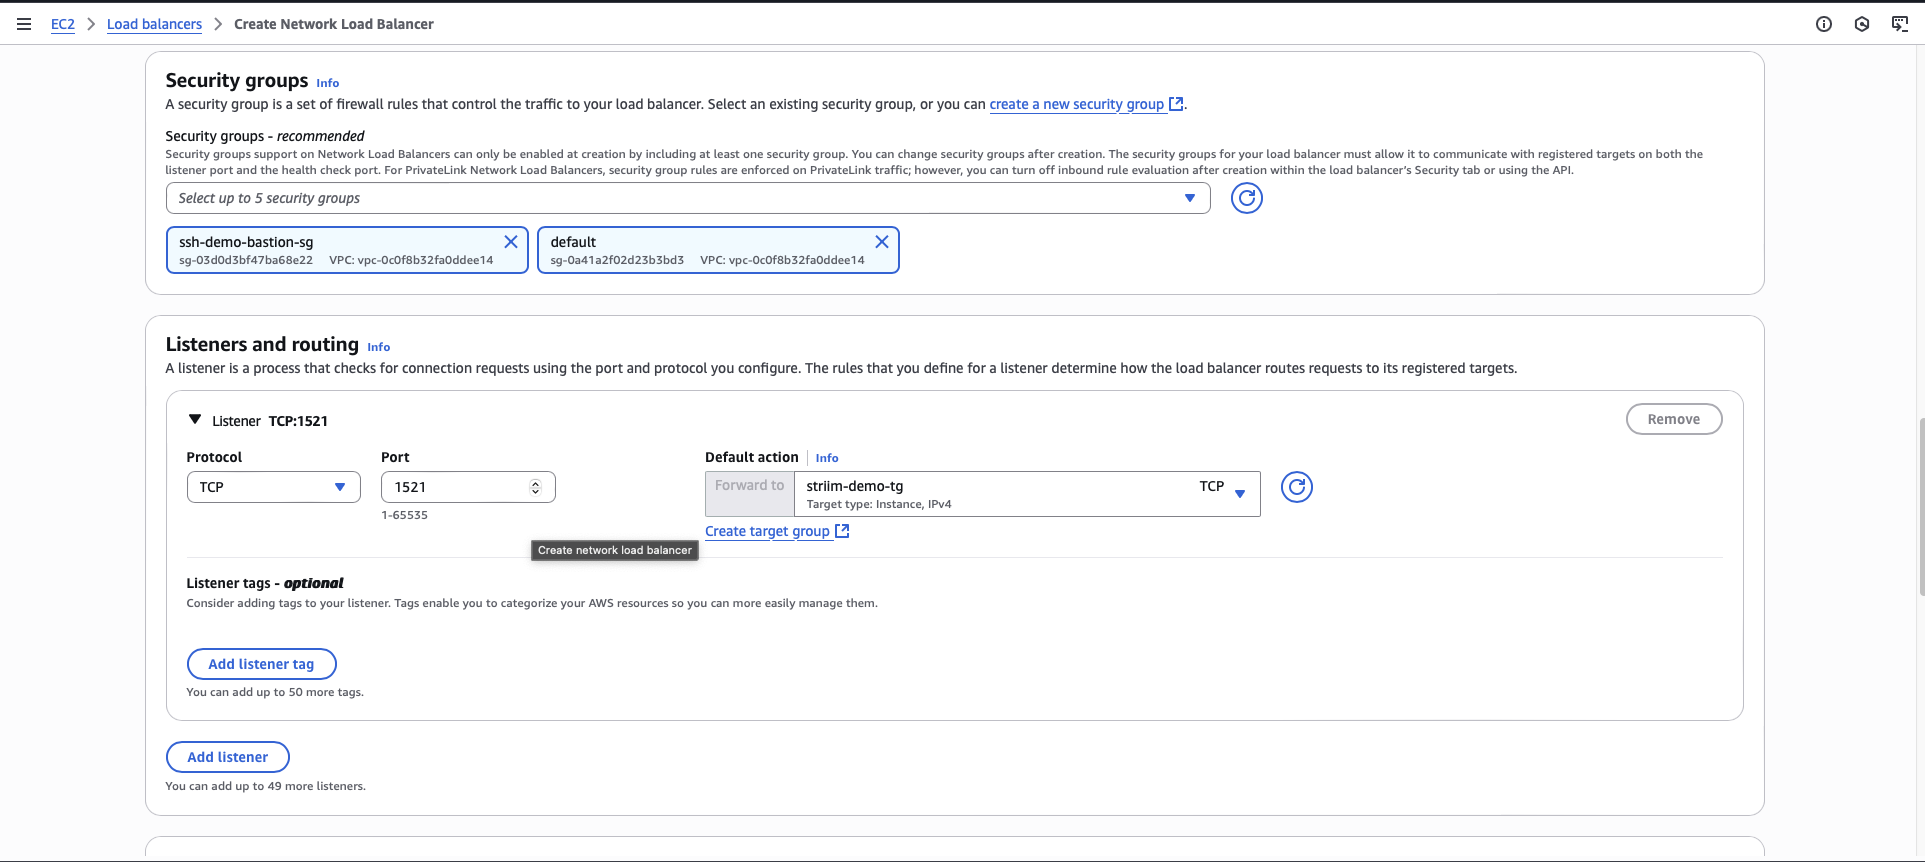
Select your VPC security group.
Add a listener with protocol TCP and port number matching your database port.
For the default action, select the target group you created.
Click Create.
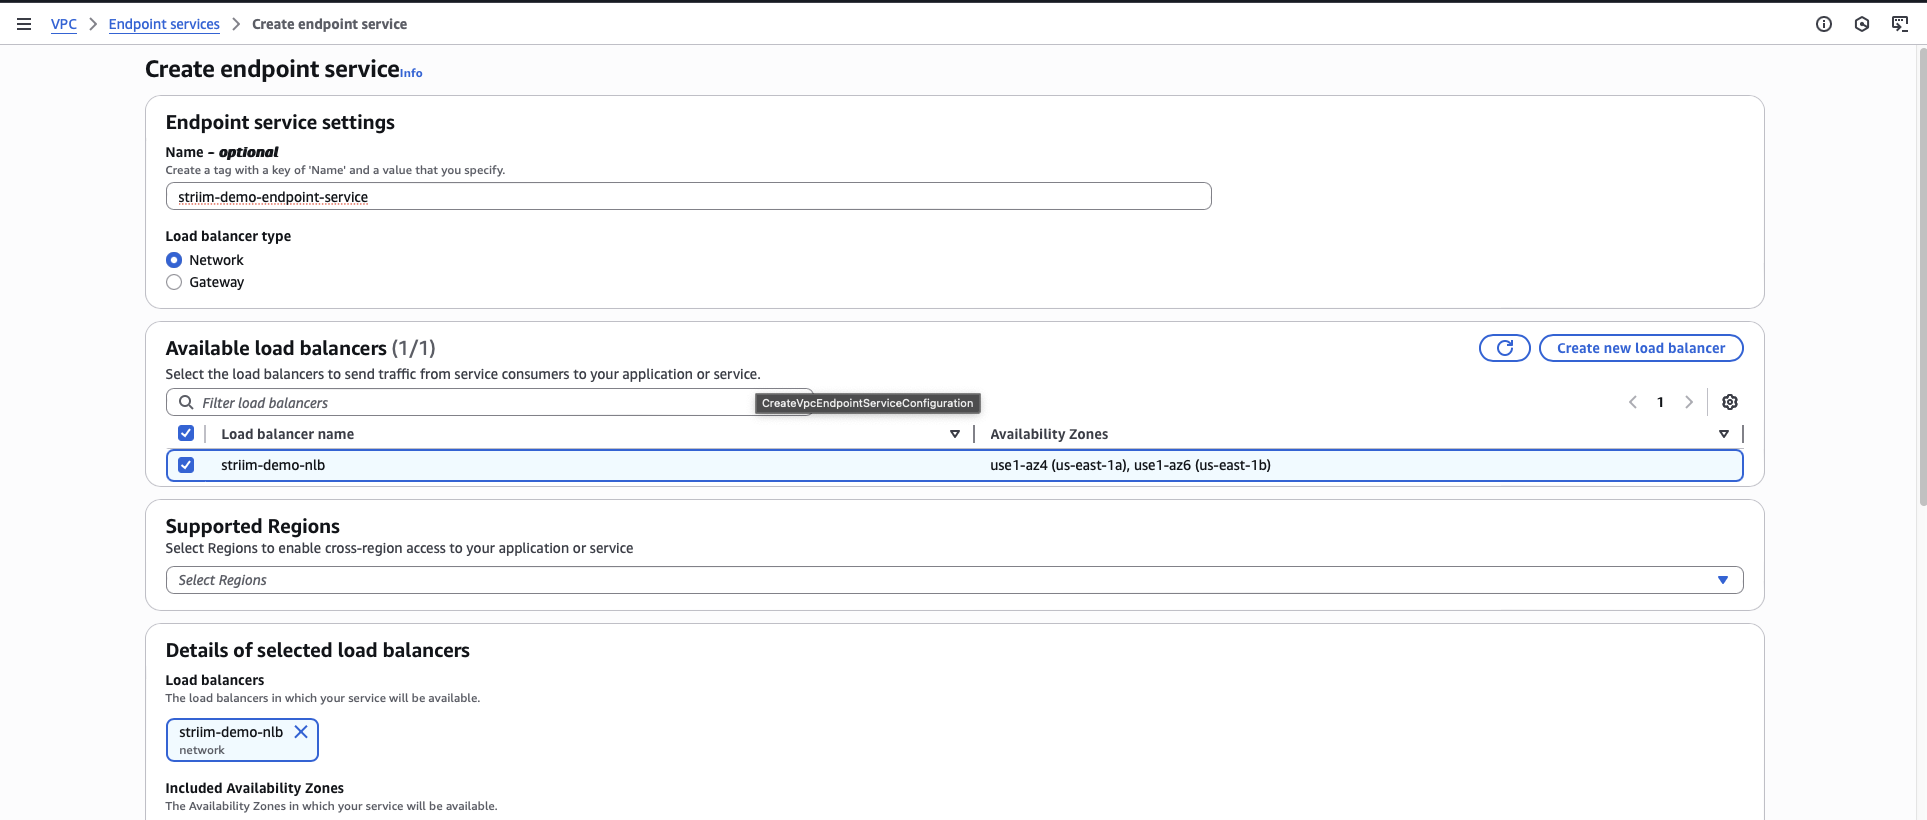
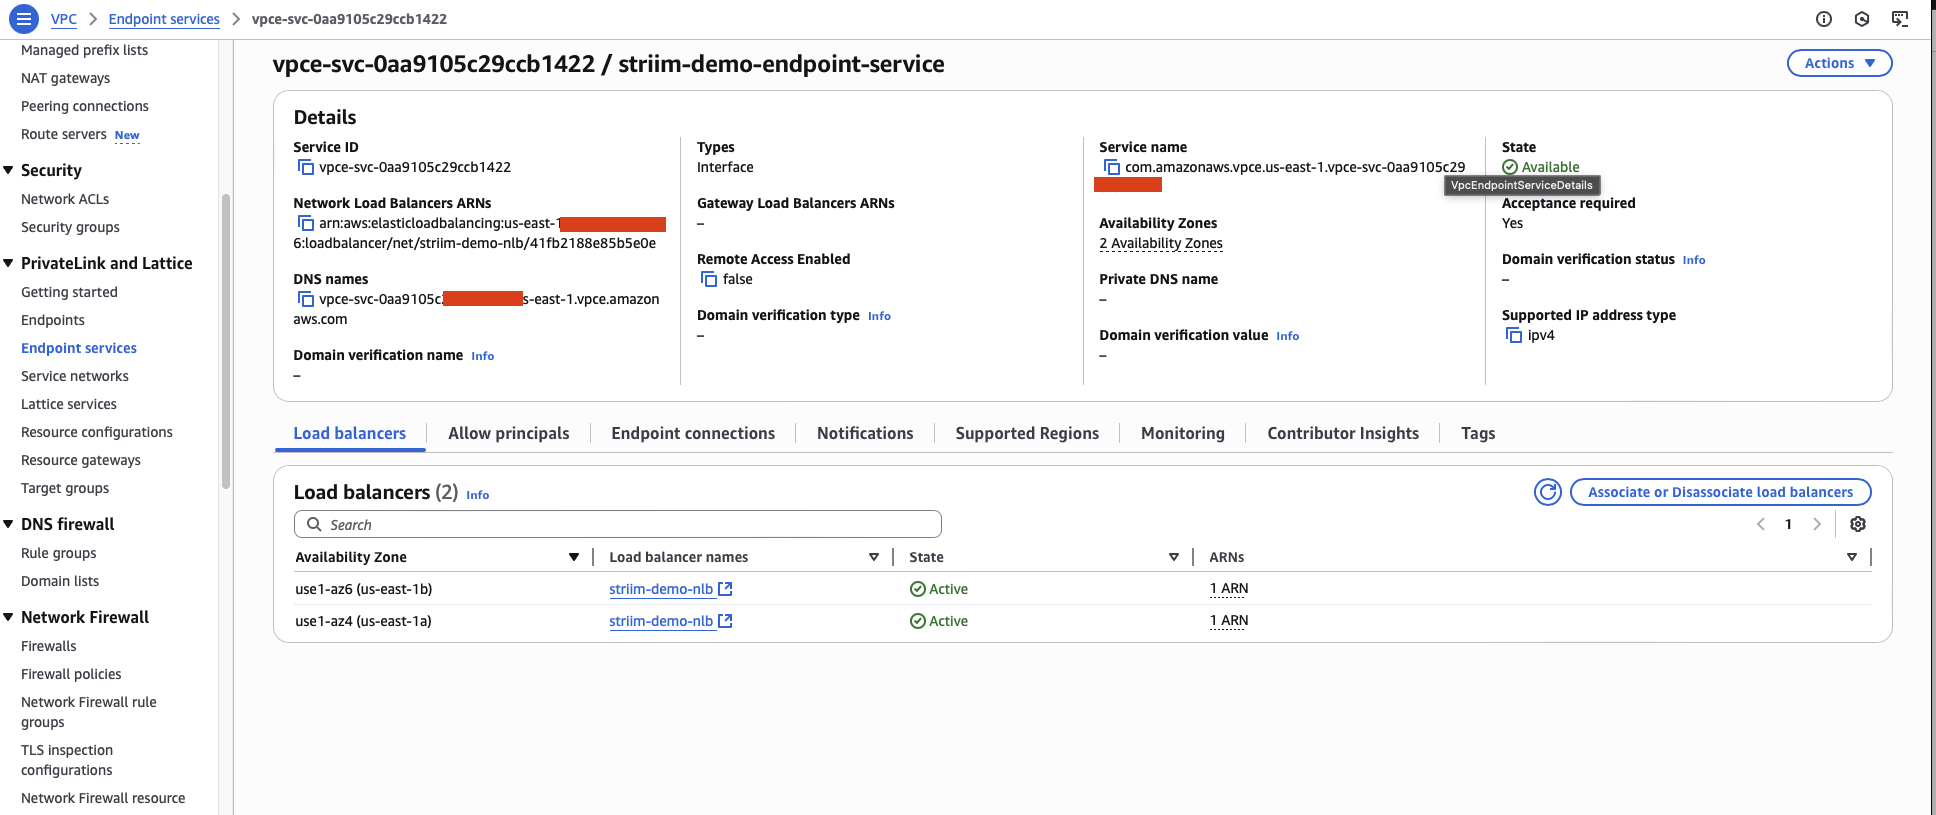
Create a VPC endpoint service
You must create a VPC Endpoint Service that Striim Cloud will use to establish a private connection to your network.
In the VPC console, navigate to Endpoint Services.
Click Create endpoint service.
Enter a name for the endpoint service.
For Load balancer type, select Network Load Balancer.
Select the load balancer that you created for this setup.
For Acceptance required, select Acceptance required. This ensures you must manually approve connection requests.
Click Create.
After the endpoint service is created, navigate to the Allow principals tab.
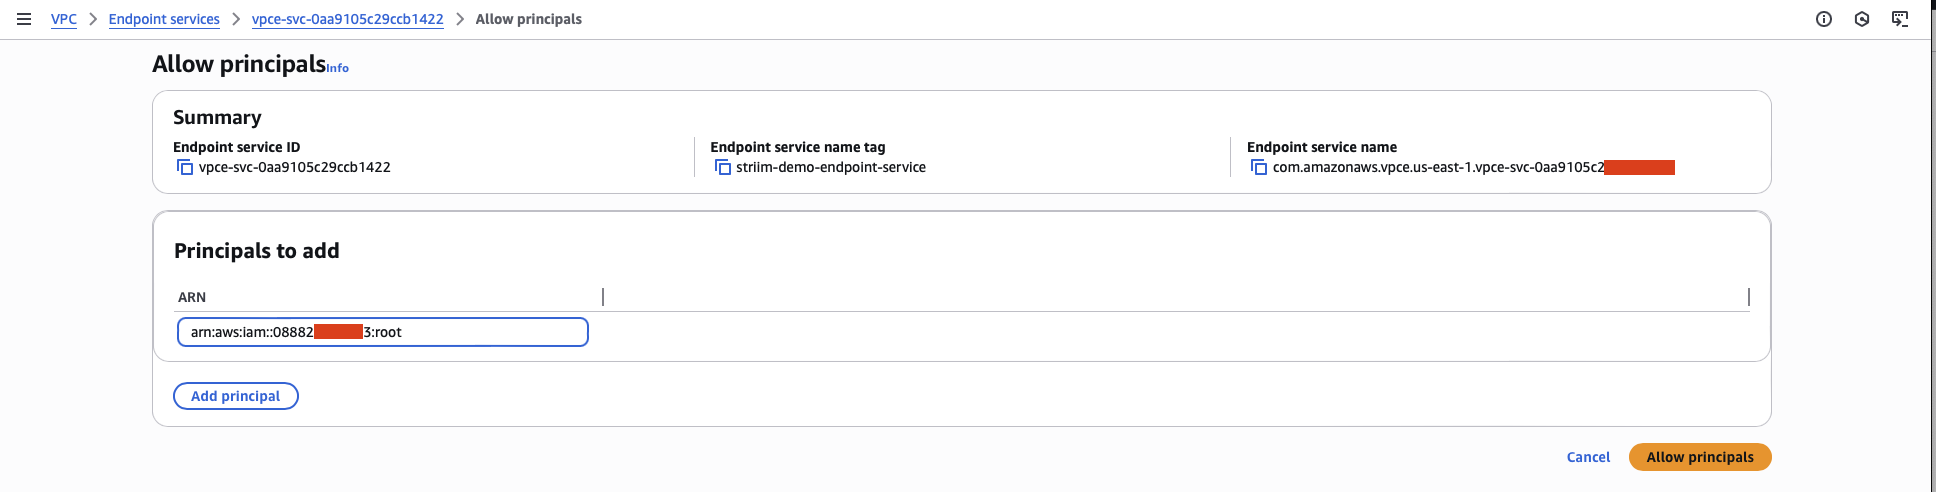
Add the Striim AWS account ID as an allowed principal. Use the account ID you obtained in the prerequisites.
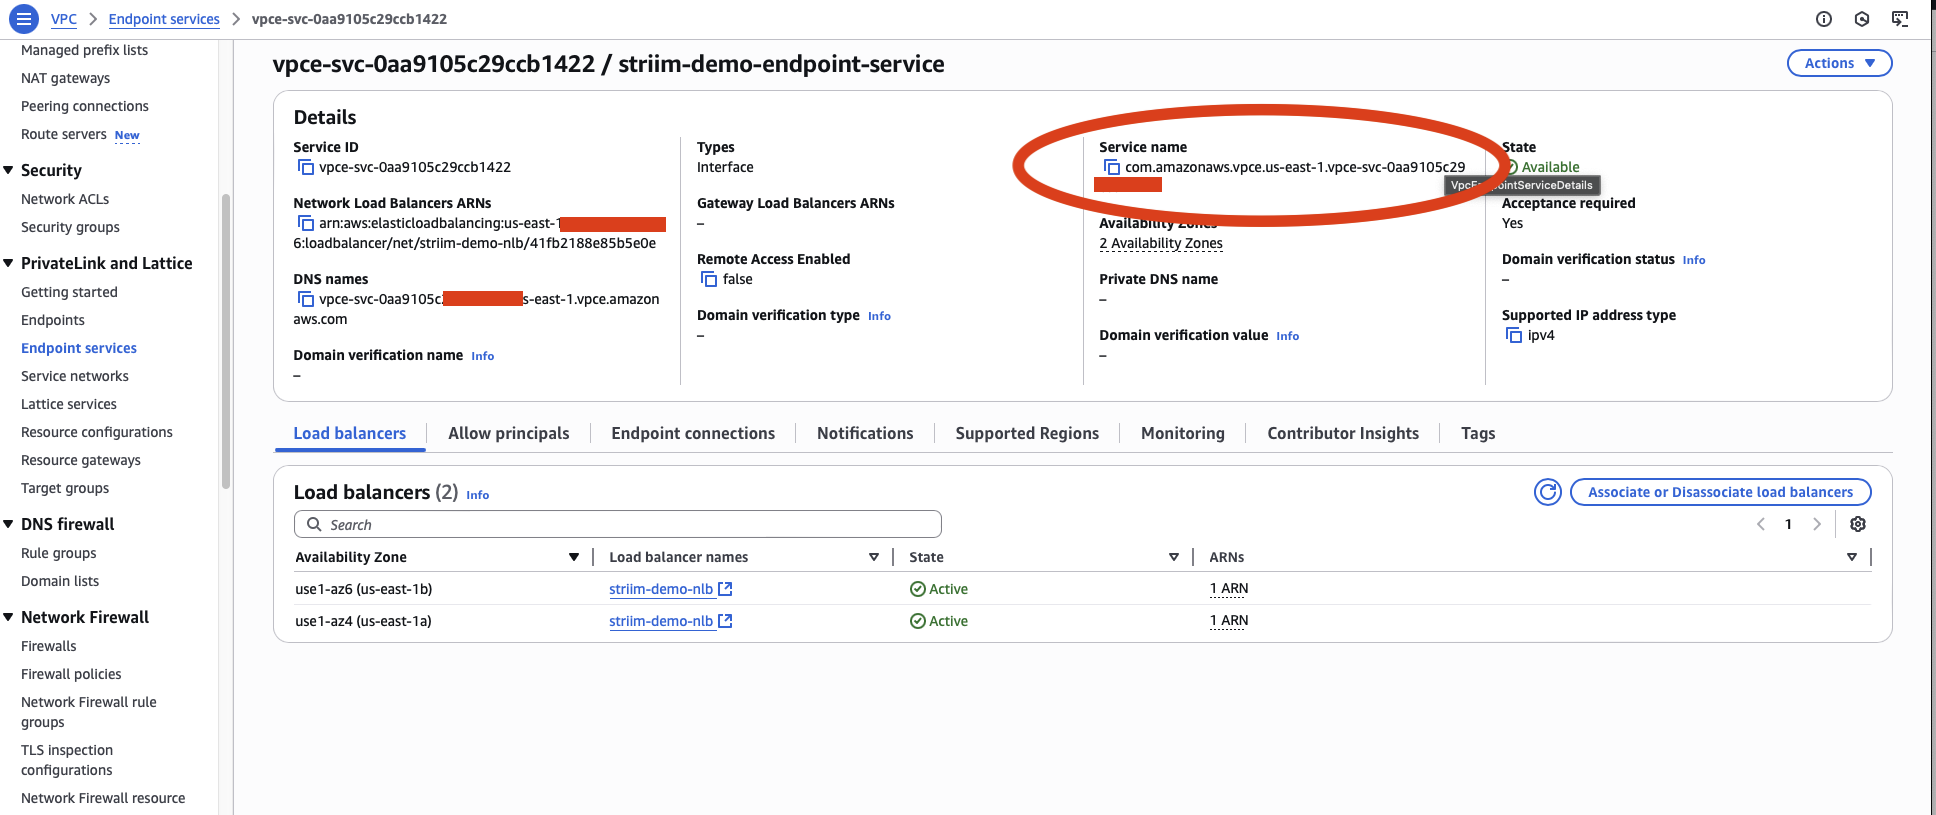
Copy the VPC Endpoint Service Name. You will need this value in the next step.
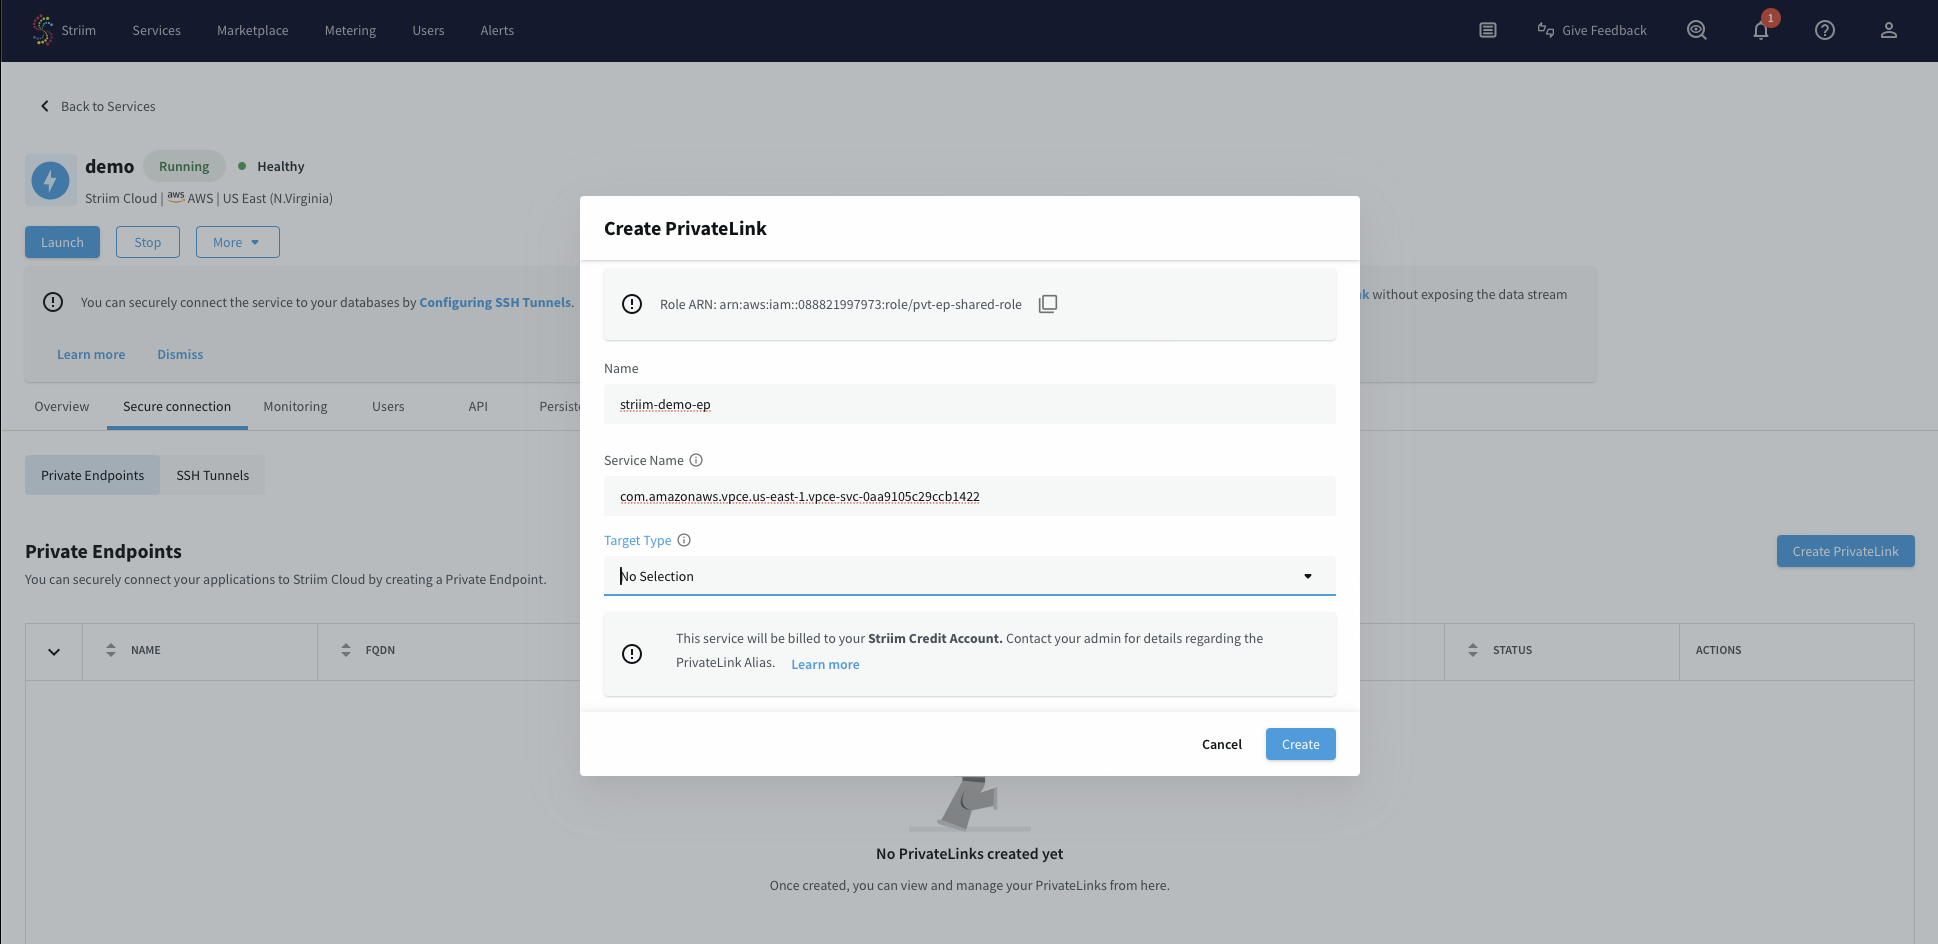
Create VPC endpoint from Striim service portal
You must create a VPC endpoint in the Striim service portal to initiate the connection request to your VPC endpoint service.
Log in to your Striim account.
Select the service for which you want to create the endpoint.
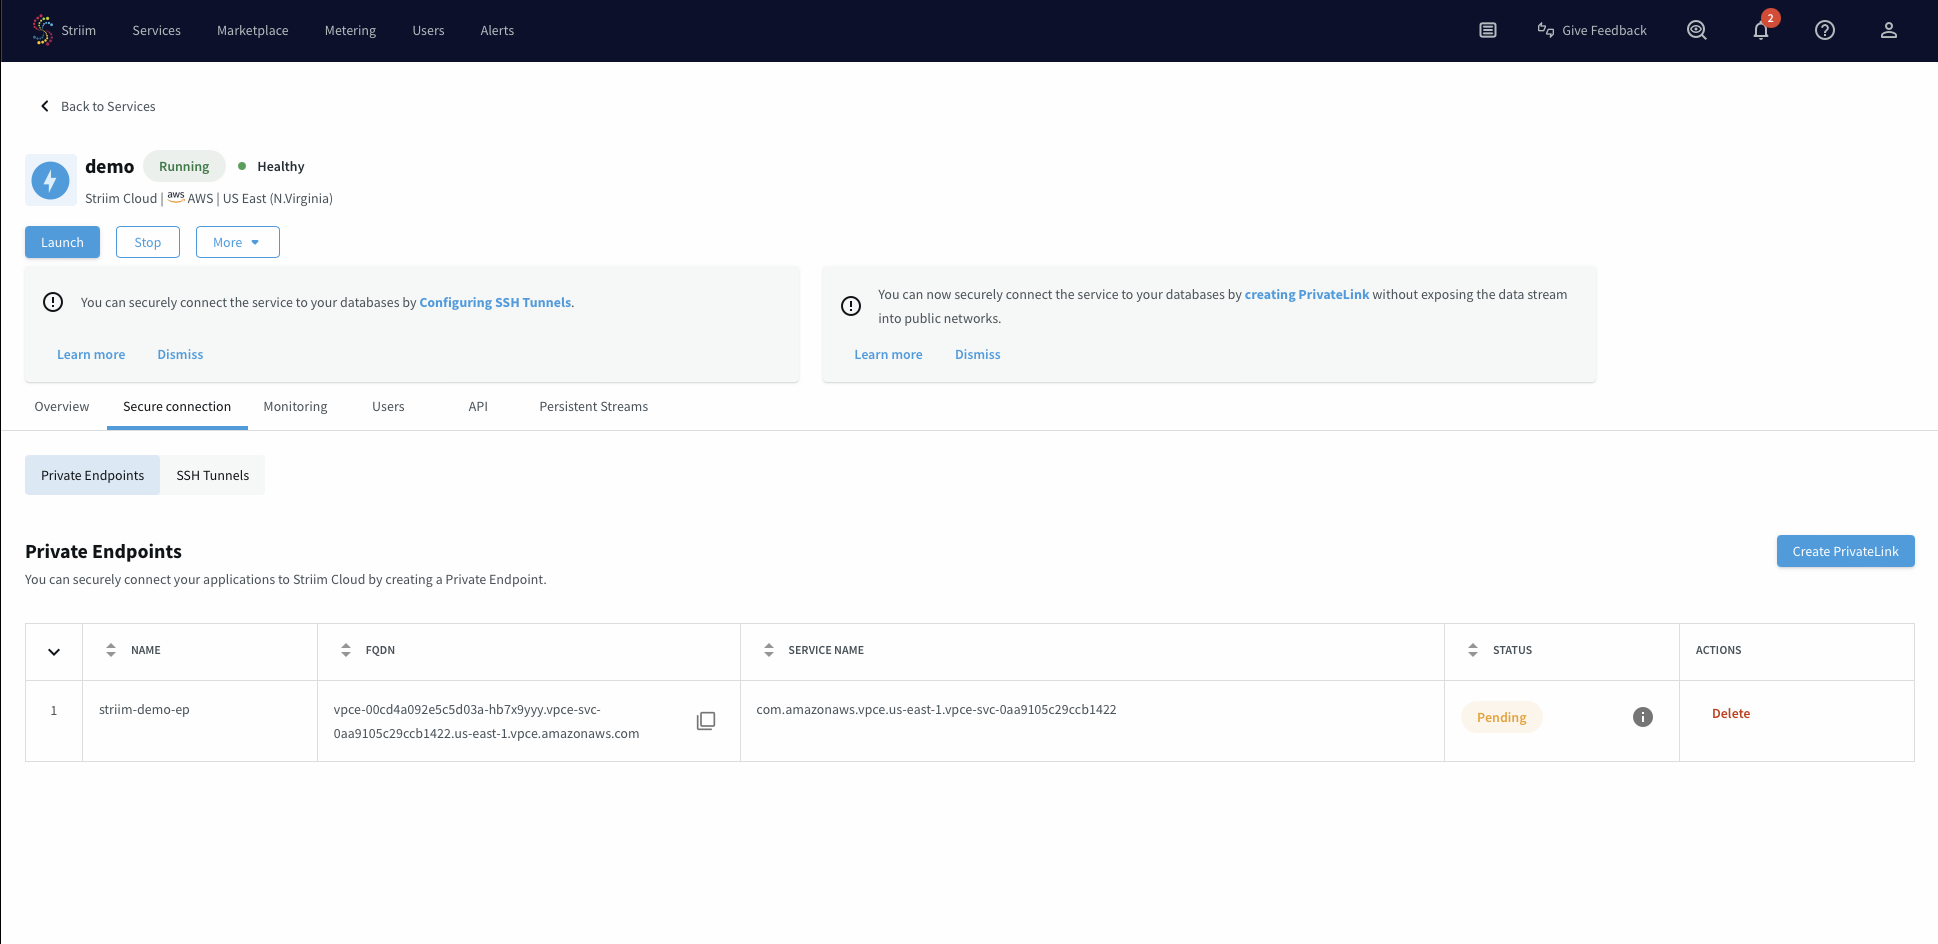
Under the Secure connection tab, click Create PrivateLink.
In the popup dialog, enter a name for this endpoint. Use a concise and meaningful name.
In the Service name field, enter the VPC Endpoint Service name that you copied from the previous step.
Leave the Target type field blank.
Click Create.
The endpoint displays a status of Pending initially while it waits for your acceptance in the AWS console.
Accept VPC endpoint connection request
You must manually accept the VPC endpoint connection request in the AWS console before the connection becomes active.
In the VPC console, navigate to Endpoint Services.
Select the endpoint service you recently created.
Click the Endpoint connections tab.
Select the endpoint connection that is in Pending state.
From the Actions dropdown menu, select Accept endpoint connection request.
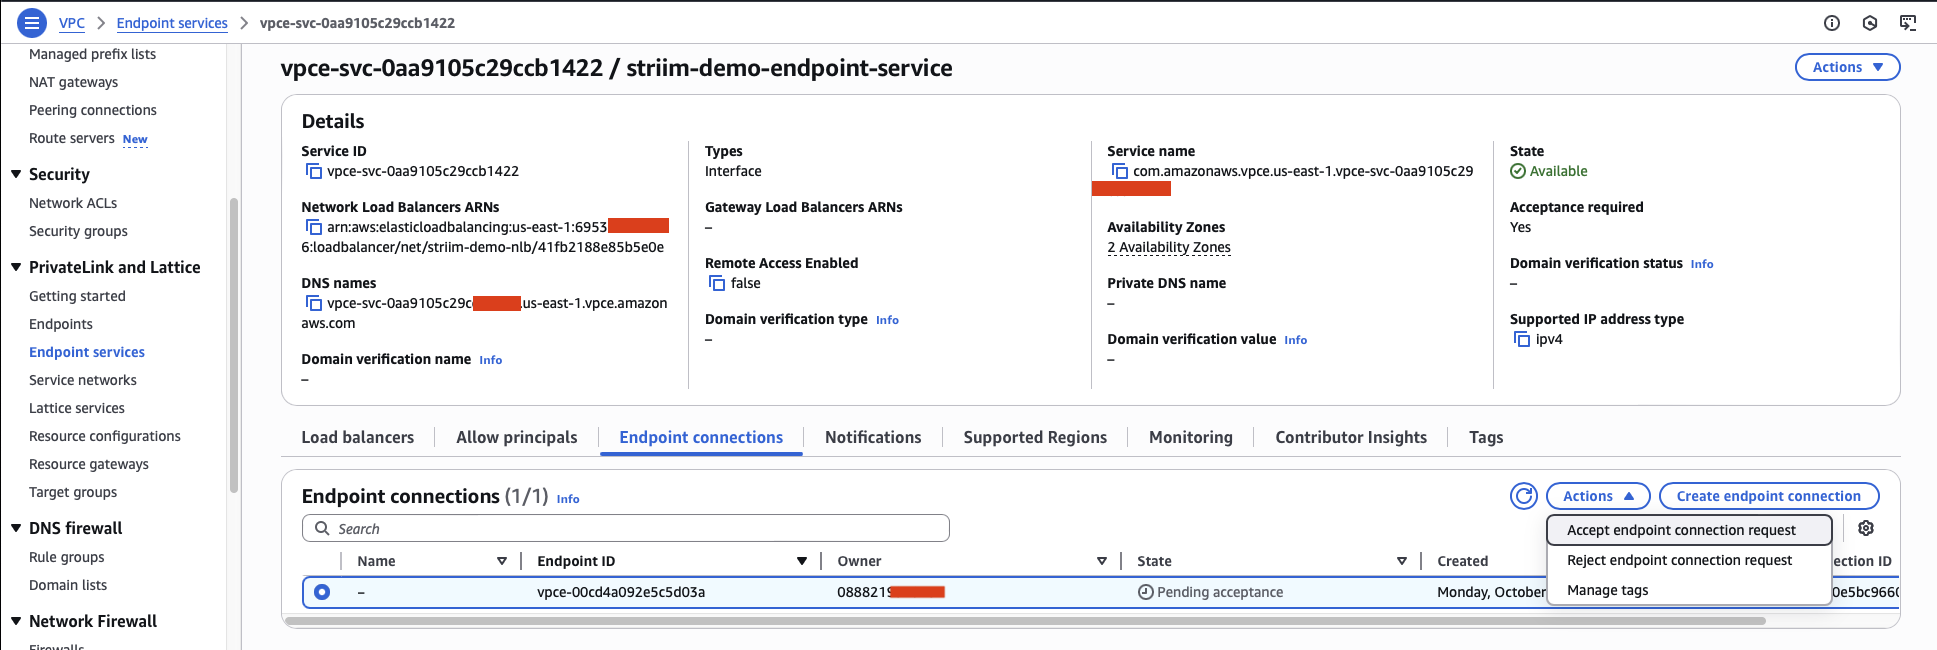
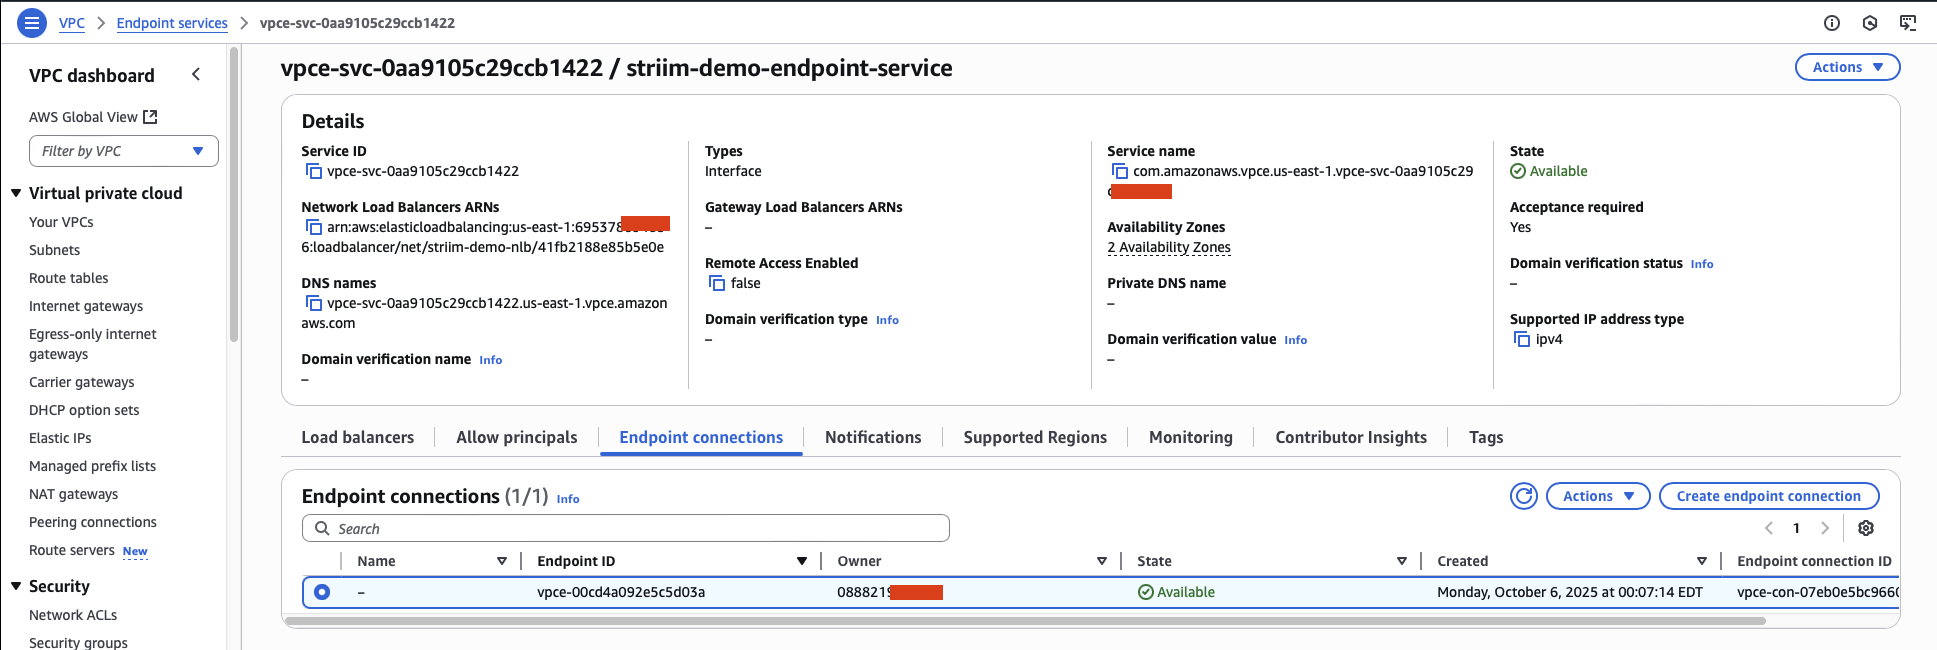
Within a few minutes, the connection status changes to Available, indicating your endpoint connection is ready to use.
Note
You can reject endpoint connection requests at any time by selecting Reject endpoint connection request from the Actions dropdown menu. This disconnects the connection.
Use the endpoint connection for your data source
After the endpoint connection is available, you can use the endpoint FQDN to configure your Striim data source connection.
In your Striim account, navigate to the service and select the Secure connection tab.
Copy the FQDN of the newly created endpoint connection.
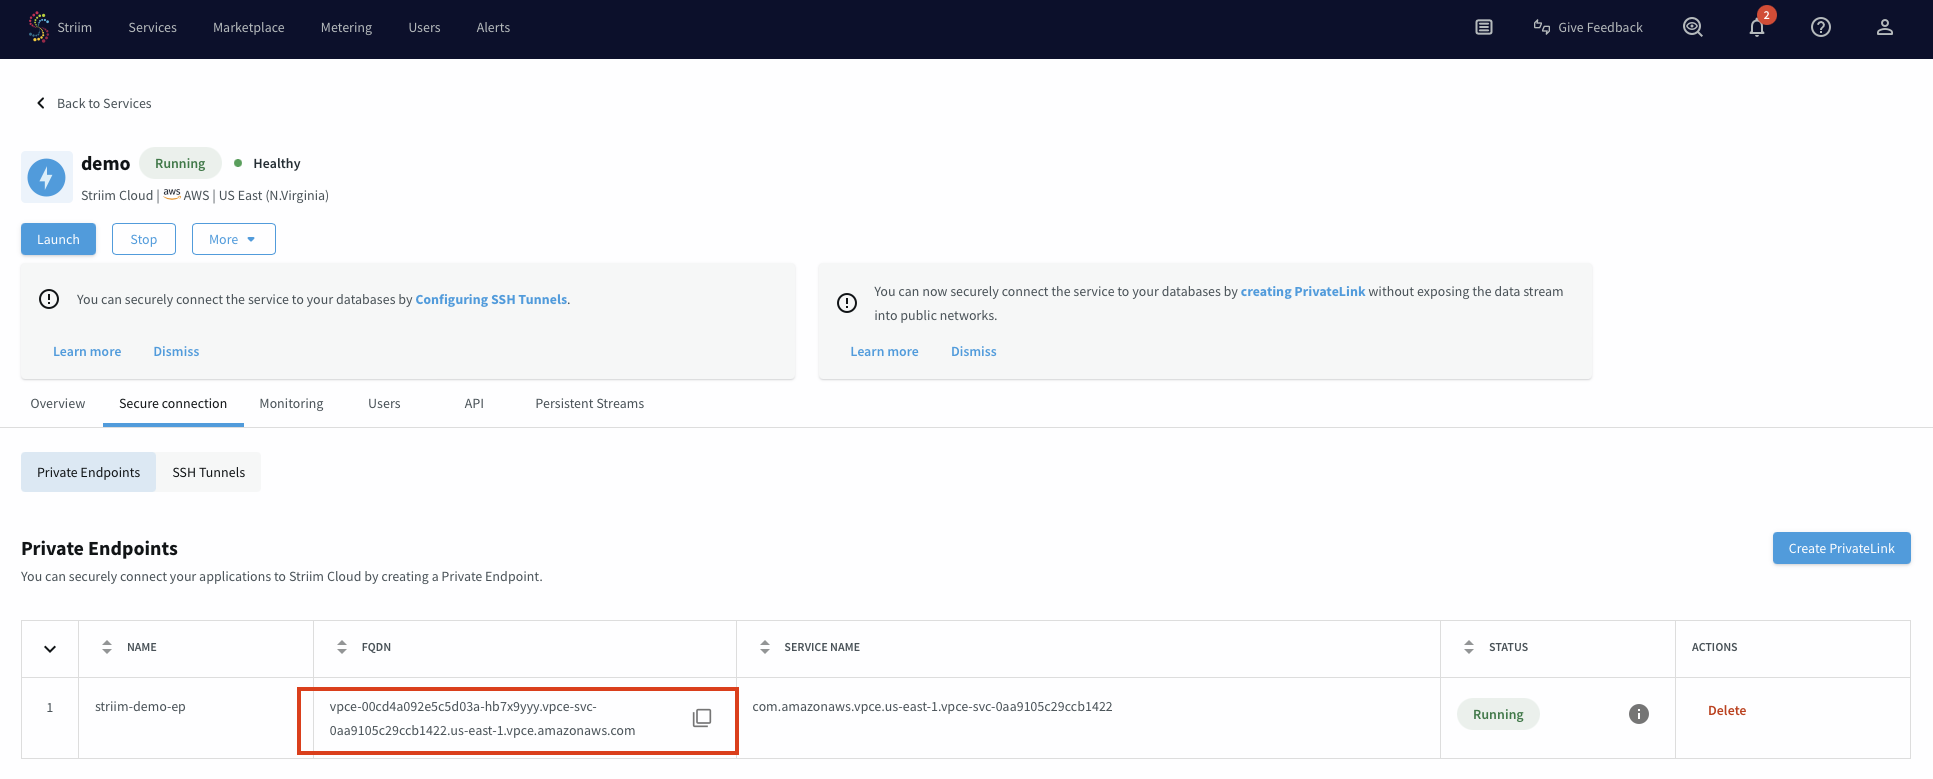
Use this FQDN as the connection string for your data source in your Striim application.
Endpoint for MongoDB Atlas
For information about connecting to MongoDB Atlas, see the following topic.