Databricks Writer initial setup
Initial setup for Databricks on AWS
Note
Personal staging locations have been deprecated by AWS (see Create metastore-level storage) and Microsoft (see Create metastore-level storage).
When using Databricks on AWS, you must perform the following one-time tasks before you can use Databricks Writer in an application. This is a brief summary overview; detailed instructions follow.
Create a personal access token for Striim to use to authenticate with the Databricks cluster (see Documentation > Developer tools and guidance > Authentication for Databricks automation > Databricks personal access token authentication > Databricks personal access tokens for users.
Grant the user associated with the personal access token View and Create permissions on the Databricks File System (see Documentation > Security and compliance guide > Authentication and access control > Access control > Workspace object access control > Folder permissions).
If table access control has been enabled, also grant the user associated with the personal access token MODIFY and READ_METADATA privileges (see Documentation > Databricks reference documentation > Language-specific introductions to Databricks > SQL language reference > Privileges and securable objects in the Hive metastore > Privilege types).
Writing to Databricks happens in two steps. First, Striim writes data to temporary files in a "staging area" in the cloud. Then Databricks copies the data from those files to its tables. We strongly recommend using Amazon S3 for staging (see Create an Amazon S3 bucket to use as a staging location for Databricks on AWS. The native Databricks File System (DBFS) should not be used as the staging area for production or sensitive data (see Documentation > Databricks data engineering > What is the Databricks File System (DBFS)? > Recommendations for working with DBFS root).
Create an Amazon S3 bucket to use as a staging location for Databricks on AWS
If the bucket does not already exist, create it (see AWS > Documentation > Amazon Simple Storage Service (S3) > User Guide > Create your first S3 bucket).
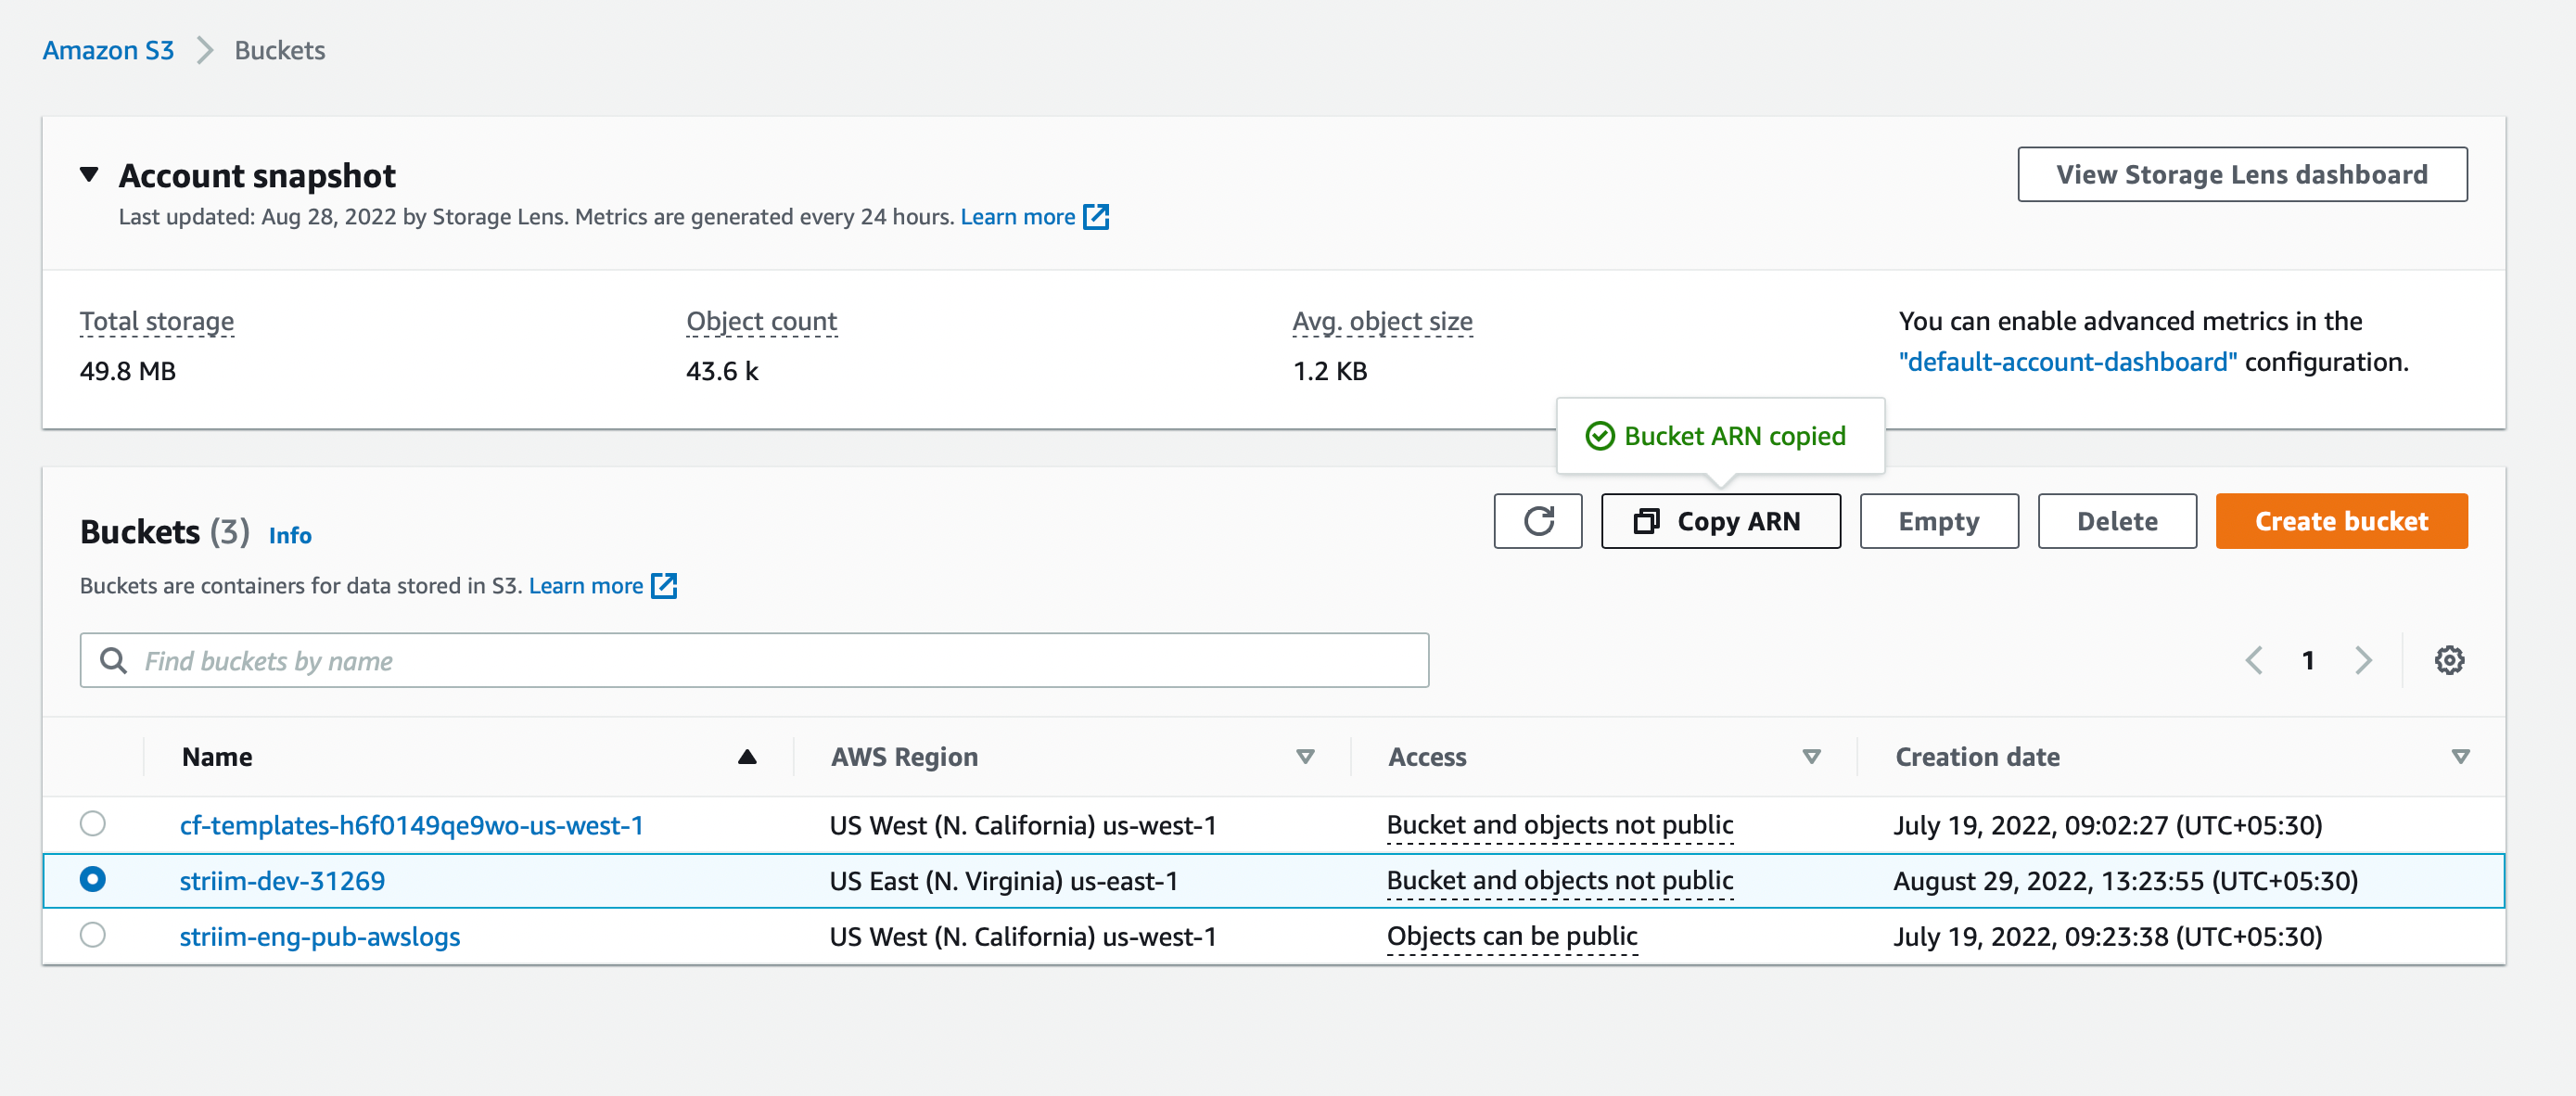
Select the bucket and click Copy ARN.
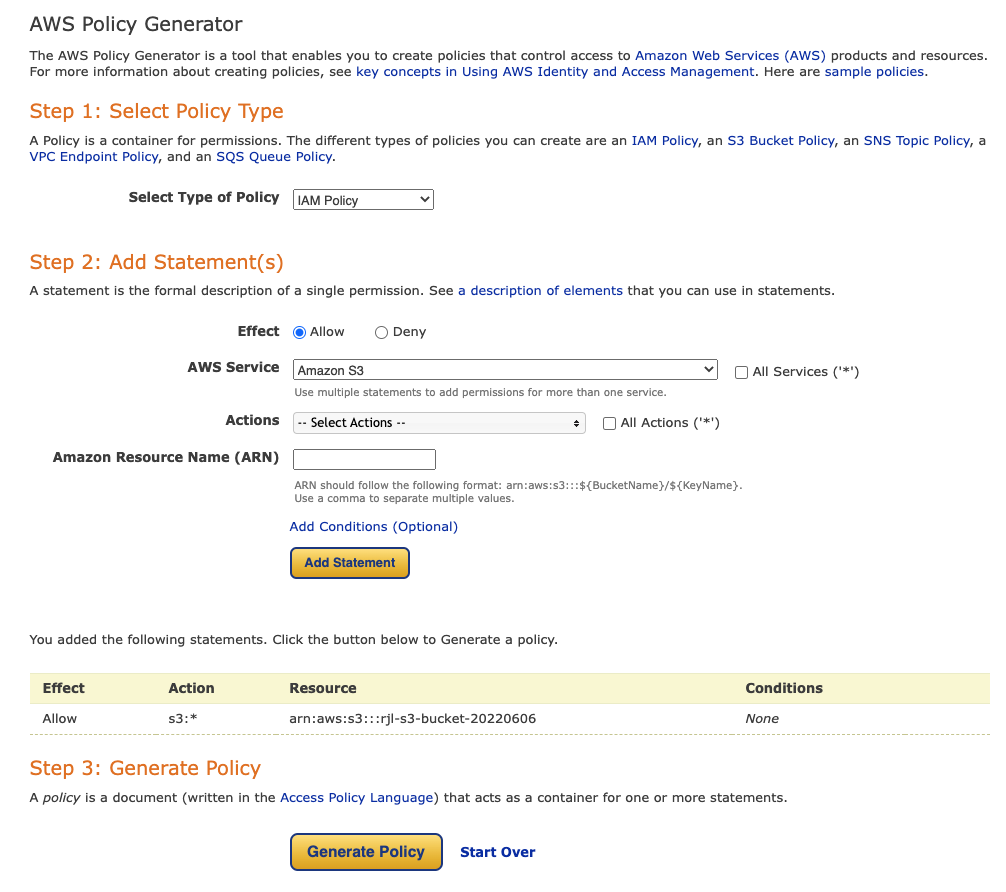
Go to the AWS Policy Generator at https://awspolicygen.s3.amazonaws.com/policygen.html
For Select Type of Policy, select IAM Policy.
For AWS Service, select Amazon S3.
Select the individual actions you want to allow or select All Actions.
In the Amazon Resource Name (ARN) field, paste the bucket's ARN that you copied.
Click Add Statement. You should see something similar to this:
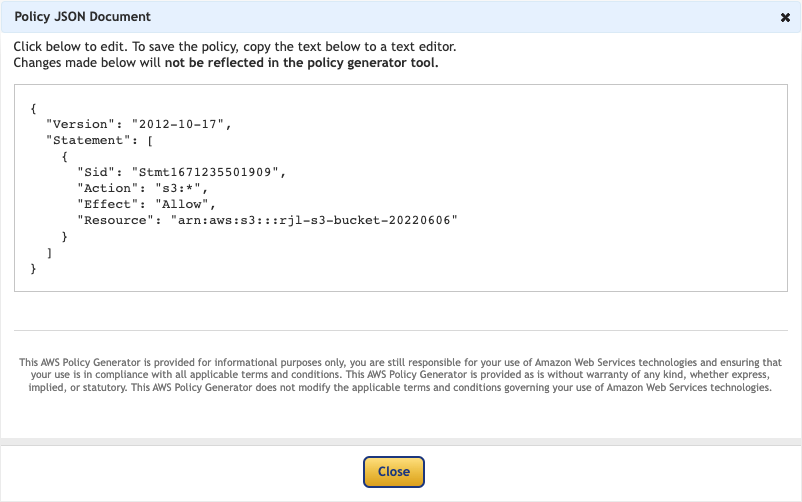
Click Generate Policy.
Copy the Policy JSON Document and close the dialog.
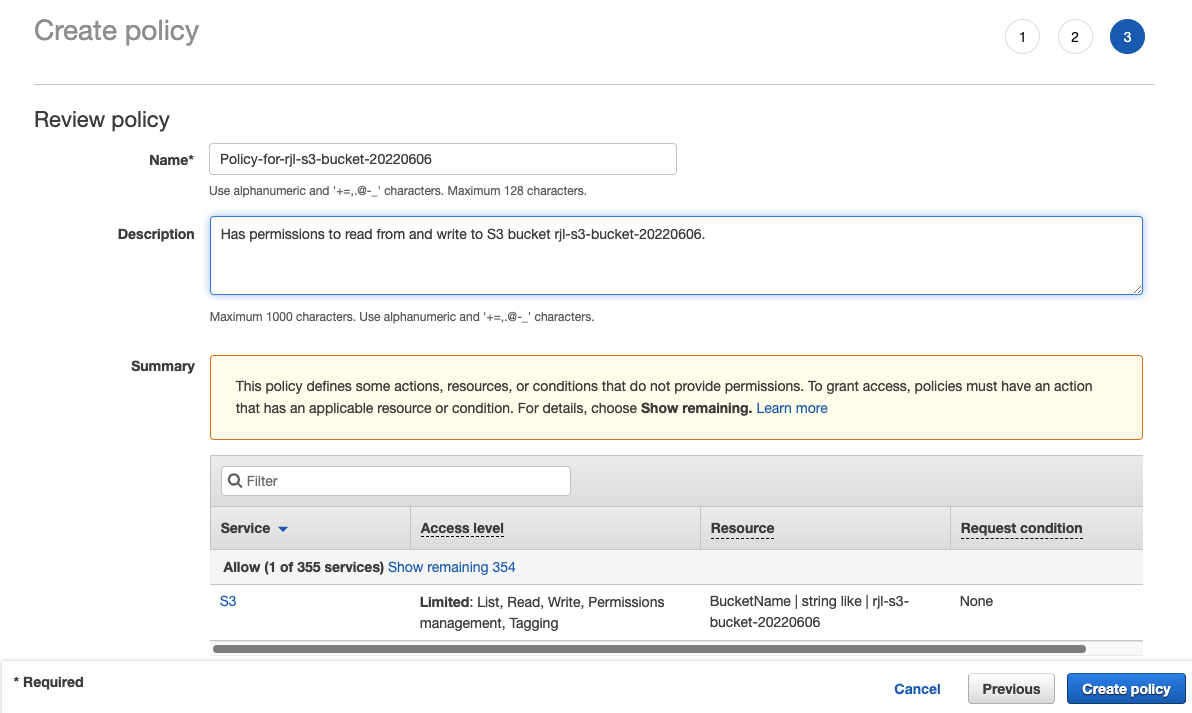
Go to the IAM Policies page and click Create policy.
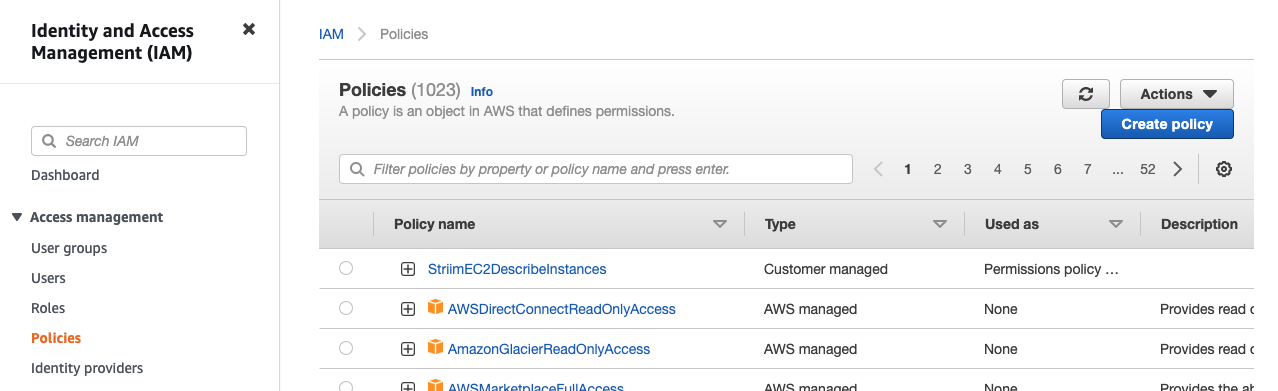
Select the JSON tab, replace the existing text with the policy JSON document you copied, and click Next: Tags > Next: Review.
Enter a descriptive name for the policy (make a note of this as you will need it later), optionally enter a description, and click Create Policy.
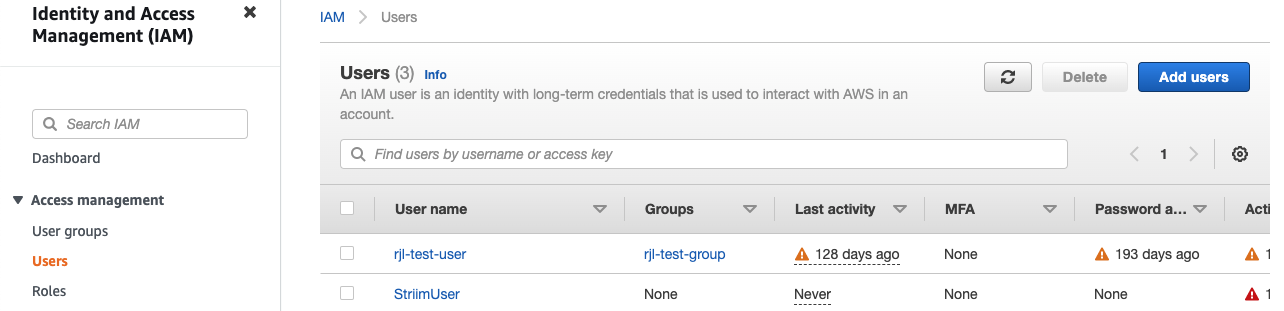
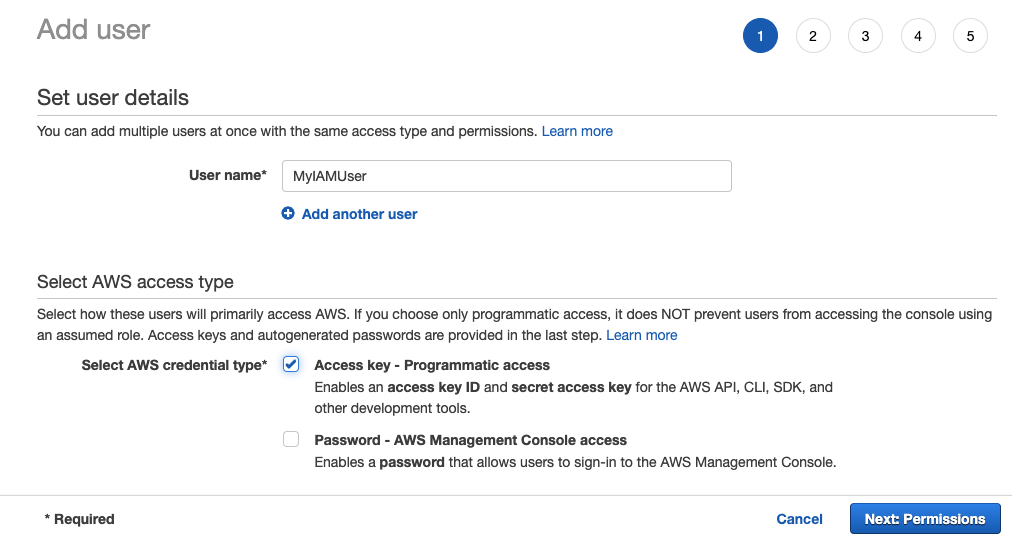
Go to the IAM Users page and click Add users.
Enter a name for the IAM user, select Access key, click Next: Permissions.
Select Attach existing policies directly, in Filter policies enter the name of the policy you created, select the policy, and click Next: Tags > Next: Review > Create user.

Click Download .csv. This file contains the access key and secret access key you must specify in Databricks Writer's properties.
Initial setup for Azure Databricks
When using Azure Databricks, you must perform the following one-time tasks before you can use Databricks Writer in an application.
Create a personal access token for Striim to use to authenticate with the Databricks cluster as described in Learn / Azure / Azure Databricks / Authentication for Azure Databricks automation / Generate a personal access token. The user associated with the token must have read and write access to DBFS (see Important information about DBFS permissions). If table access control has been enabled, the user must also have MODIFY and READ_METADATA (see Data object privileges - Data governance model).
Writing to Databricks happens in two steps. First, Striim writes data to temporary files in a "staging area" in the cloud. Then Databricks copies the data from those files to its tables. We strongly recommend using Azure Data Lake Storage (ADLS) Gen2 as an external staging area. To use an external stage, your Databricks instance must use Databricks Runtime 10.4 or later. The native Databricks File System (DBFS) should not be used as the staging area for production or sensitive data (see Learn / Azure Databricks documentation / DBFS / Recommendations for working with DBFS root).
Optionally, configure Azure Databricks to authenticate using Microsoft Entra (formerly Azure Active Directory).
Set up Azure Data Lake Storage Gen2 as the staging location for Azure Databricks
Create a general-purpose v2 storage account as described in Learn / Azure / Storage / Blobs / Create a storage account to use with Azure Data Lake Storage Gen2.
Create a service principal and client secret as described in Learn / Tutorial: Connect to Azure Data Lake Storage Gen2
You may manually create the required container, or Databricks Writer can create it automatically, in which case it will be named striim-deltalakewriter-container.
Using an Azure personal staging location
Caution
Support for personal staging locations has been deprecated by Databricks (see (Optional) Create metastore-level storage) and Microsoft (see (Optional) Create metastore-level storage).
Using a personal staging location requires Striim 4.2.0.4 or later and Unity Catalog (see Learn / Azure Databricks documentation / Data Governance / What is Unity Catalog?). You may not use a personal staging location when the Authentication Type is Manual OAuth.
To use a Personal Staging Location as your staging area:
Create a Unity Catalog metastore (see Learn / Azure Databricks documentation / Data Governance / Create a Unity Catalog metastore).
Configure that metastore as described in Learn / Azure Databricks documentation / Data Governance / Create a Unity Catalog metastore / Enable Azure Databricks management for personal staging locations.
Set External Stage Type to
PersonalStagingLocation.Set Personal Staging User Name specify a user name or application ID for a user or service principal with a personal access token (see Learn > Azure Databricks documentation > Administration Guide > Manage personal access tokens):
If the personal access token is associated with a Databricks user, specify the user name.
If the personal access token is associated with the Databricks service principal, specify its Application Id (see Learn / Azure Databricks documentation / Developer Tools / Provision a service principal for Azure Databricks automation - Azure Databricks UI).
Configuring Microsoft Entra ID (formerly Azure Active Directory) for Databricks Writer manually
Using a connection profile provides a much simpler way to use Entra ID with Azure Databricks. See Connection profiles.
In summary, configuring Entra ID requires the following steps:
Register the Striim app with the Entra ID identity provider (IdP).
Note the registered app's Client ID, Client Secret, and Tenant ID
Make a request to the
/authorizeendpoint using the Postman app or the browser.Authenticate to Entra ID.
Consent to login at the consent dialog box to obtain the authorization code.
Provide the authorization code and Client Secret to the /token endpoint to obtain the access and refresh tokens.
In detail:
Log in to the Azure Portal.
Register a new app.
Note the Application ID (referred to as Client ID in this procedure), the OAuth v2 authorization endpoint, and the OAuth v2 token endpoint.
Generate a new Client secret.
Note the Client Secret for future use.
Add the
AzureDatabricksAPI permission.(When the external stage is ADLS Gen 2) Add the
Azure StorageAPI permission.
You may fetch the refresh token using any OpenAPI client. The following two examples use curl and Postman.
The following procedure uses curl and the Web browser to fetch the refresh token.
Open the following URL in a Web browser.
https://login.microsoftonline.com/<tenant-id>/oauth2/v2.0/authorize?
   client_id=<client-id>&
   response_type=code&
   redirect_uri=http%3A%2F%2Flocalhost%3A7734%2Fstriim-callback&
   response_mode=query&
   scope=2ff814a6-3304-4ab8-85cb-cd0e6f879c1d%2F.default%20offline_access
Replace <tenant-id> with with the tenant ID of the registered app. Replace <client-id> with the client ID of the registered app. Provide valid authentication credentials if Azure Portal requests authentication.
The web browser redirects to the specified redirect URI. The authorization code is the part of the URI after the
code=string.Note the authorization code for future use.
Execute the following
curlcommand.curl -X POST -H 'Content-Type: application/x-www-form-urlencoded' \ https://login.microsoftonline.com/<tenant-id>/oauth2/v2.0/token \ -d 'client_id=<client-id>' \-d 'client_secret=<client_secret>' \ -d 'scope=2ff814a6-3304-4ab8-85cb-cd0e6f879c1d%2F.default%20offline_access' \ -d 'code=<authorization_code>' \ -d 'redirect_uri=http%3A%2F%2Flocalhost%3A7734%2Fstriim-callback' \ -d 'grant_type=authorization_code'
Replace <tenant-id> with with the tenant ID of the registered app. Replace <client-id> with the client ID of the registered app. Replace <client_secret> with the client secret of the registered app. Replace <authorization_code> with the previously noted authorization code.
The call returns an object that contains an access_token key and a refresh_token key.
Note the value of the refresh_token key.
The following procedure uses the Postman app to generate an access token.
Open the Postman app.
In the Authorization tab, set the authorization type to OAuth 2.0.
Configure values for the Client ID, Client secret, authorization URL and access token URL.
Set the value of the Scope field to
2ff814a6-3304-4ab8-85cb-cd0e6f879c1d/.default offline_access.Set the value of the Callback URL field to the redirect URL determined in earlier procedures.
Click Get New Access Token.
Sign into Microsoft Azure and accept the app privilege requests at the consent dialog box.
The browser sends an access token and a refresh token as a response. Note the value of the refresh token.
When the External Stage type is ADLS Gen 2 and the authentication type is Manual OAuth, you must grant the service principal account the Storage Blob Data Contributor privilege before generating the access and refresh tokens.
CREATE OR REPLACE TARGET db USING Global.DeltaLakeWriter (
   tenantID: '71bfeed5-1905-43da-a4a4-49d8490731da',
   connectionUrl: 'jdbc:spark://adb-8073469162361072.12.azuredatabricks.net:443/default;
                   transportMode=http;ssl=1;
                   httpPath=sql/protocolv1/o/8073469162361072/0301-101350-kprc8x3a;
                   AuthMech=3;UID=token;PWD=<personal-access-token>',
   stageLocation: '/',
   CDDLAction: 'Process',
   adapterName: 'DeltaLakeWriter',
   authenticationType: 'AzureAD',
   ConnectionRetryPolicy: 'initialRetryDelay=10s, retryDelayMultiplier=2, maxRetryDelay=1m,
     maxAttempts=5, totalTimeout=10m',
   ClientSecret: 'untNjHnQOzsY90BjrKs2napohIP8WebUUcXybRdKVURH0XeklB5+Xw8NZgZUylqn',
   ClientSecret_encrypted: 'true',
   ClientID: 'dcf190e8-a315-42bb-a0b1-86063ff1c340',
   RefreshToken_encrypted: 'true',
   Mode: 'APPENDONLY',
   externalStageType: 'ADLSGen2',
   Tables: 'public.sample_pk,default.testoauth',
   azureAccountName: 'samplestorage',
   RefreshToken: '<refresh-token-value>',
   azureContainerName: 'striim-deltalakewriter-container',
   uploadPolicy: 'eventcount:10000,interval:60s' )
 INPUT FROM sysout;
CREATE TARGET db USING Global.DeltaLakeWriter (
   connectionUrl: 'jdbc:spark://adb-8073469162361072.12.azuredatabricks.net:443/default;
                   transportMode=http;ssl=1;
                   httpPath=sql/protocolv1/o/8073469162361072/0301-101350-kprc8x3a;
                   AuthMech=3;UID=token;PWD=<personal-access-token>',
   azureAccountAccessKey: '2YoK5czZpmPjxSiSe7uFVXrb9jt9P4xrWp+NNKxWzjU=',
   stageLocation: '/',
   CDDLAction: 'Process',
   ConnectionRetryPolicy: 'initialRetryDelay=10s, retryDelayMultiplier=2, maxRetryDelay=1m,
     maxAttempts=5, totalTimeout=10m',
   authenticationType: 'PersonalAccessToken',
   Mode: 'APPENDONLY',
   externalStageType: 'ADLSGen2',
   Tables: 'public.sample_pk,default.testoauth',
   azureAccountName: 'samplestorage',
   azureAccountAccessKey_encrypted: 'true',
   personalAccessToken: 'GGR/zQHfh7wQa3vJhP6dcWtejN1UL+E8YEXc13g9+UZdTQmYN1h3E0d0jabboJsd',
   personalAccessToken_encrypted: 'true',
   uploadPolicy: 'eventcount:10000,interval:60s' )
 INPUT FROM sysout;
Configure Striim to work with Databricks
All clients and drivers required by Databricks are bundled with Striim. No additional setup is required.