Initial setup for ADLS Reader
This topic describes how to set up the ADLS Reader, including required Azure configuration (Entra ID app and Log Analytics, if used) and, optionally, creating a reusable Striim connection profile for the reader.
Setting up the Entra ID application for ADLS Reader
Set up a Microsoft Entra ID application with authorization to access the Azure Storage account:
Register a single-tenant Entra ID application. See Register an application with the Microsoft identity platform.
Create a client secret for the application and store the secret value securely.
Assign the role of Storage Blob Data Contributor (or read-only Storage Blob Data Reader) to the Entra ID application using Access Control (IAM). See Assign Azure roles using the Azure portal.
Record the application’s Client ID and Tenant ID from the app’s Overview page. The client secret is used as the credential.
Authorizing the Entra ID application to access Log Analytics
If you set the ADLS Reader Object Detection Mode to Log Analytics, authorize the Entra ID application to the Log Analytics workspace by assigning the Log Analytics Reader role via Access Control (IAM).
Setting up a Log Analytics workspace
A Log Analytics workspace ingests Azure logs used by the ADLS Reader when the object detection mode is set to Log Analytics. Create or choose a workspace and note its Workspace ID.
To capture storage logs from Azure Data Lake Storage to the workspace:
Open the storage account resource and select Diagnostic settings under Monitoring.
Enable diagnostics for blob and provide a diagnostic setting.

Click Add diagnostic setting.
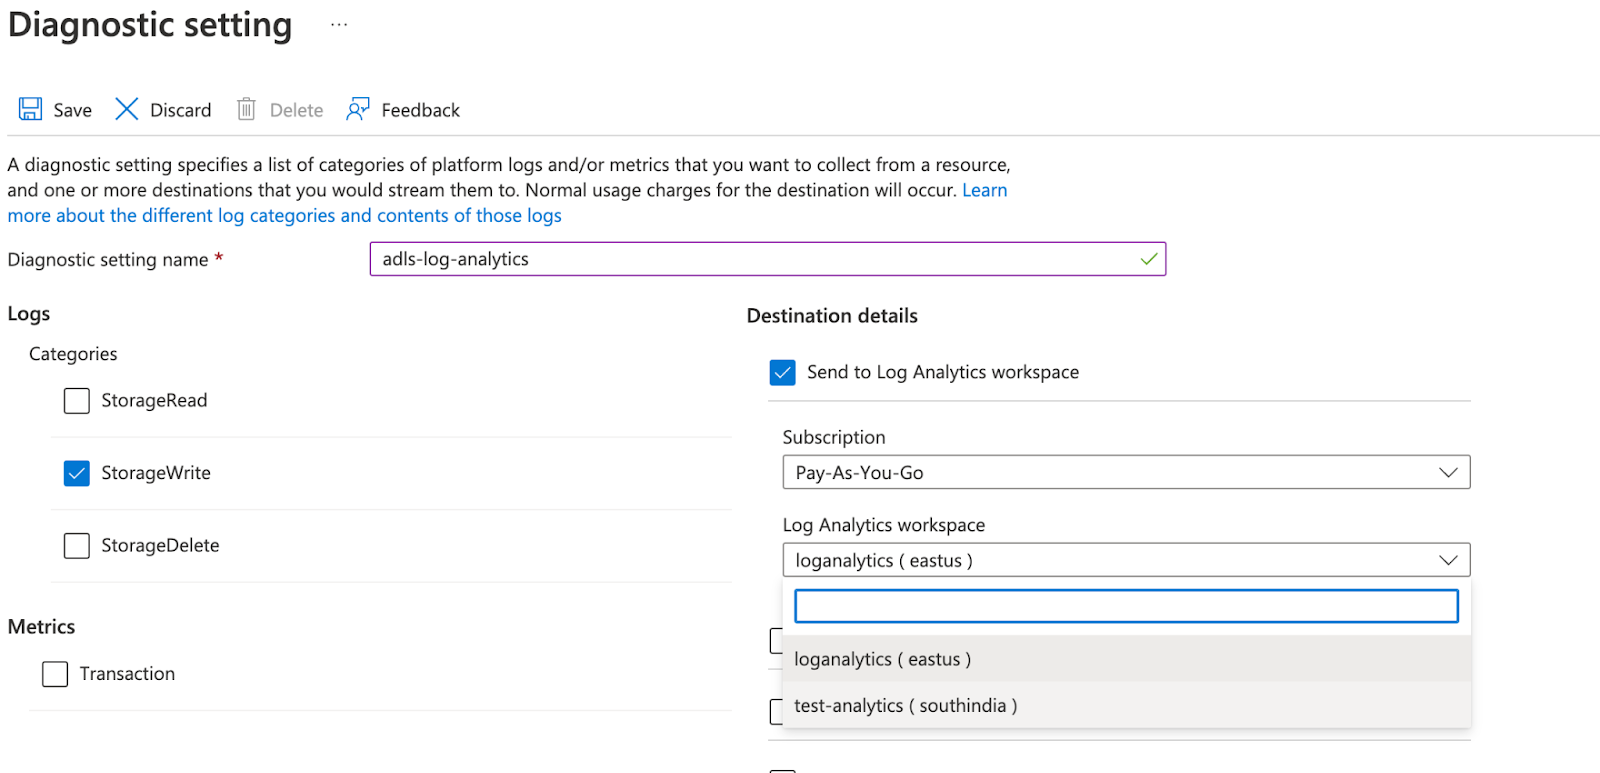
Configure the setting:
Enter a name for the diagnostic setting.
Under Logs > Categories, select StorageWrite.
For Destination, select Send to Log Analytics workspace and choose the workspace.
Click Save.
Configuring a Striim connection profile
Optionally create a connection profile so you can reuse ADLS credentials and settings across apps without re-entering them.
In the Striim UI, open Connection profiles and create a new profile.
Enter a Name and (optionally) a description.
For the ADLS Reader, provide the following properties:
Account name — the ADLS storage account name.
Tenant ID — Entra ID directory (tenant) ID.
Client ID — Entra ID application (client) ID.
Client secret — Entra ID application secret (stored encrypted).
Log Analytics Workspace ID — required only when using the Log Analytics object detection mode.
Customer-provided key — required only if the storage account uses customer-provided server-side encryption.
Connection retry policy — optional (for example,
retryInterval=30, maxRetries=3).
Save the profile. When building a pipeline (wizard, Flow Designer, or TQL), select this connection profile for the ADLS Reader instead of entering the properties inline.